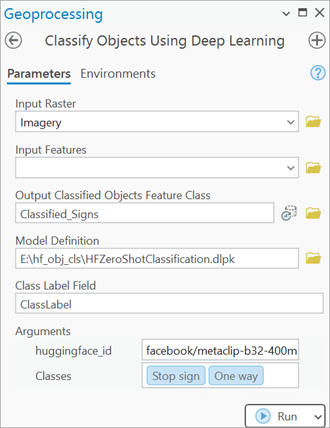
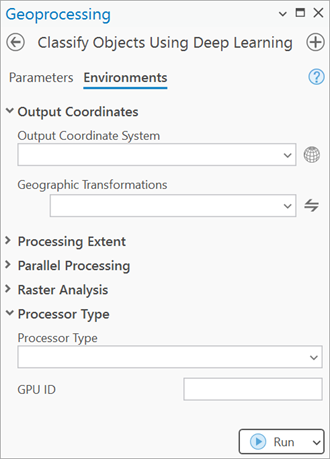
You can use the HF Zero-Shot Classification pretrained model in the Classify Objects Using Deep Learning tool available in the Image Analyst toolbox in ArcGIS Pro.
Classify objects
Complete the following steps to use HF Zero-Shot Classification from the imagery:
- Download the HF Zero-Shot Classification model.
- Click Add
data to add an image to the Contents pane.

You'll run the prediction on this image.
- Click the Analysis tab and browse to Tools.

- In the Geoprocessing pane, click Toolboxes and expand Image Analyst
Tools. Select the Classify Objects Using Deep Learning tool under Deep Learning.

- On the Parameters tab, set the variables as follows:
- Input Raster—Choose an input image from the drop-down menu or from a folder location.
- Output Classified Objects Feature Class—Set the output feature layer that will contain the classification label and confidence score.
- Model Definition—Select the pretrained model .dlpk file.
- Arguments (optional)—Change the values of the arguments if
required.
- huggingface_id—The model id of a pretrained Zero-Shot Object Classification model hosted on huggingface.co
Zero-Shot Image Classification models can be filtered by choosing the Zero-Shot Image Classification tag in the Tasks list on the Hugging Face model hub, as shown below:

The model id consists of the {username}/{repository} as displayed at the top of the model page, as shown below:

Only those models that have config.json and preprocessor_config.json are supported. The presence of these files can be verified on the Files and versions tab of the model page, as shown below:

- classes— Zero-shot object classifiers are not trained to classify predetermined classes. The categories to which you want to classify the image can be provided here. Each class should be separated by a ','.

- huggingface_id—The model id of a pretrained Zero-Shot Object Classification model hosted on huggingface.co
- On the Environments tab, set the variables as follows:
- Processing Extent—Select the default extent or any other option from the drop-down menu.
- Cell Size—Change if required.
Note:
- Full Image Processing Recommendation: To process the full image without generating a fishnet grid, do not specify both the Input Features and Cell Size parameters.
- Fishnet Grid Output: If Input Features is not provided (that is, the entire image is processed) but Cell Size is specified for a geo-referenced raster, the output feature layer will be created as a fishnet grid.
- Processor Type—Select CPU or GPU as needed.
It is recommended that you select GPU, if available, and set GPU ID to the GPU to be used.

- Click Run. The output layer
is added to the map. The Label column of the attribute table contains
the predicted class and confidence.
