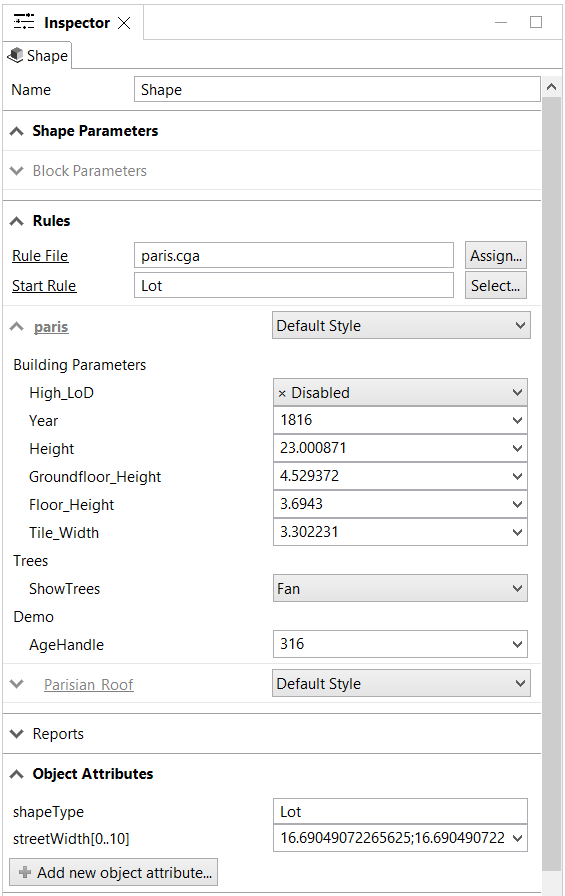
The Inspector is the main tool for viewing and modifying attributes of objects, such as shapes, map layers, and models. Depending on the type of object selected, the Inspector adapts its user interface to provide full access to the object's attributes. You can open the Inspector by clicking Window > Inspector in the main-menu, or by pressing Alt+I.
The Inspector not only supports editing of single objects but also a collection of objects. Attributes that are unique across all objects are shown as-is. If an attribute has different values in the object collection, the attribute is marked as non-unique with the "?" symbol. The Inspector shows the attributes of the lead object when multiple objects are selected. The lead object is always the most recent individually selected object.
For map layers, the Inspector lets you change the map files, modify the bounds, and adjust the display offset (how much the rendering of the map is displaced regarding the actual map values). In addition, an overlay color and alpha value for the map can be specified.
Work with object attributes
Add an attribute
To add an attribute, do the following:
- Click Add new object attribute.
- Enter information for the Attribute Name, Value, and Type.
City Engine has the following types of object attributes:
- BOOL : boolean
- FLOAT : floating point value (double precision)
- STR : character string (UTF-16 encoded)
- BOOL[ ] : array of boolean values
- FLOAT[ ] : array of floating point values
- STR[ ] : array of character string
Note:
- When entering the value of an attribute, the user can enter a "NaN" value for a float (Not a Number), or a "NULL" value for a String.
- When entering the value for attributes arrays, separate the values with a semi-colon. For example :
- 1;2;3;4;NaN;6
- a;b;c;d;e;f;NULL;h;i;j
- true;false;true;false
Edit an array attribute with the List Editor Dialog
- Click Edit List... from the drop-down menu.
- Modify the values by editing the second column cells.
You can replicate the elements, add, duplicate, and delete elements using the toolbar.
- Click OK.
The new values are added to the data model and scene.
Edit table attributes with the Table Editor Dialog
If an object has many attribute arrays which follow the prefix_... syntax, you can click edit the attribute values from drop-down menu in the Inspector and select Edit Table... for each of the attributes.
To edit the multiple array attributes, do the following:
- Click Edit List... from drop-down menu of one of the attributes.
This opens a table of array attributes for editing.
- Modify the values in each column.
- Click OK.
Attributes, sources, and connections
Attributes and parameters can have different sources, that allow fine grained control over the values. The following is a list of possible of sources:
Default | The default value used. For rule attributes, this is the initial attribute value. For parameters, this is the algorithm specific default. |
User | A value that is entered by the user. Whenever the user sets a value (also by Python), uses a slider, or handle the source is set to User defined. |
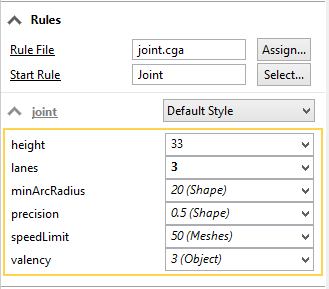
Object | The value is taken from the corresponding object attribute. The value is displayed in italic, and marked with (Object). |
Shape | A rule attribute can use the value from the parent shape. For example a street shape may sample the street segment's streetWidth. The value is displayed in italic, and marked with (Shape). |
Layer | The value is connected to a layer attribute. The value is displayed in italic, and marked with the source layer in brackets. See Layer Attributes for details. |
Note:
- The easiest way to create connections and set sources is using the Connection Editor.
- During rule assignment, object attributes with names that match a rule attribute get connected automatically. During rule assignment, object attributes with names that match a rule attribute get connected automatically.
- Whenever you enter a value to a parameter or attribute, it will automatically change to user source.
Inspector attribute options
Depending on the type of the selected object, there are different options available for modifying objects.
Example street parameters
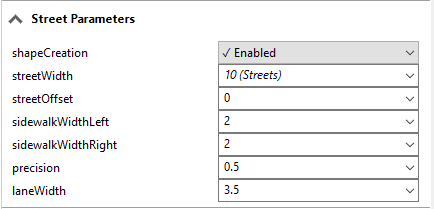
shapeCreation | default value |
streetWidth | connected to layer Streetnetwork |
streetOffset | user specified value |
sidewalkWidthLeft | connected to object attribute (below) |
sidewalkWidthRight | connected to layer Meshes |
precision | default value |
laneWidth | user specified value |
Example rule attributes
Map object array attributes to rule attributes
Since CGA does not support arrays, object attributes of array types are converted to string lists and mapped to rule attributes of the string type.
Map attributes with Connection Editor
Attributes and object parameters in CityEngine can be controlled from various sources. The Connection Editor helps to create these attribute connections.
Connection Editor
To edit the connection of a specific attribute, do the following: locate the attribute in the Inspector, and select the Connection Editor from the drop-down menu.
- Click Connect > Connect Attribute... to open the Attribute Connection Editor.
- Set the attribute connection.
- Click OK.
In the Attribute Connection Editor menu you have the following options:
Object attribute | Connect your attribute to an object attribute. This option is only available if:
|
Shape parameter | Connect your attribute to the parent shape parameter. This option is only available if:
|
Layer Attribute | Connect your attribute to Layer Attributes from arbitrary layers. Choose the source layer from the drop-down menu, and the desired Layer Attribute from the drop-down menu. Each layer will provide a list of its available layer attributes, consisting of the following:
Note:
|
Reset attributes | You can reset a specific attribute through the Rule default option in the attribute drop-down menu. Depending on the attribute's type this resets to the default value of the algorithm (e.g. Street Shape creation) or to the default value from the rule file (rule attribute). Additional options are available as well from the attribute context menu (open by right click) :
|
Map object attributes with Layer Attribute
Layer attributes
Every layer can have an arbitrary set of layer attributes defined. Whereas, map layers normally use their image data as source for layer attributes, graph and shape data layers can query their vector objects to layer attributes.
Object attribute mapping
Layer attributes can be used to map object attributes of its scene objects to attributes with different names, or to objects on other layers.
Note:
For simple cases, use Connection Editor to perform attribute mapping.
Object attributes of nodes, segments and shapes can be mapped with layer attributes using the command:
getObjectAttr(Object_Attribute, Should_Sample)This command searches matching object attributes within the layer that the object attribute was created.
If the Should_Sample argument is false, only the shape's object attributes are examined. If Should_Sample is true (the default value), and the shape has no such object attribute, overlapping shapes in the attribute layer are sampled for the specified Object_Attribute.
If you use the object attribute width on street segments to control the width of created street shapes (the street parameter streetWidth), getObjectAttr allows the attribute layer to obtain the value from other objects.
attr streetWidth = getObjectAttr("width")To use this layer attribute set the source of the streetWidth parameter in the Street Parameters pane to its own layer.
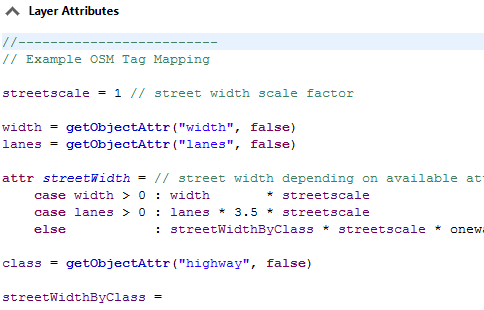
streetWidth attribute is mapped from object attribute width and the layer attribute streetWidth can now be used to control the street width of street shapes.
Note:
When importing OSM, shape or GDB data, a predefined set of layer attributes is automatically created on the imported layers. Select the new layers and show or modify the created layer attributes in the Inspector.