The Scene Editor is the central place where you manage your scene and scenarios. A CityEngine scene is organized in groups and layers. The following is a list of layer types:
- Map Layer—Contains arbitrary maps (images) and can be used to globally control various parameters for scene objects. The scene terrain is also created using a map layer.
- Graph Layer—Contains street networks and blocks, dynamic shapes (street shapes, blocks, parcels), and generated models.
- Shape Layer—Contains shapes, typically used as building footprints for generation of CGA models.
- Static Model Layer—Contains static models, such as Collada files.
- Analysis Layer—Contains analysis tools such as Viewsheds and View Corridors.
- Group Layer—Contains other layers to organize the scene hierarchy.
See Scene objects overview for more information about layer types.
The Scene Editor displays the current scene as a tree with group elements, layers, and objects. You can delete, duplicate, or merge layers by selecting the corresponding menu item from the context menu or by opening Layer in the main menu. In addition, you can use the standard cut, copy, and paste actions to transfer objects between layers. You may rearrange layers by dragging them to the desired position.
Create a group layer
With group layers you can organize your data by putting similar layers together based on similar geometry (e.g. buildings, blocks, street networks, models) or themes (e.g. elevation, imagery, terrain).
To create a new Layer Group, do the following:
- Right-click inside the Scene Editor window and choose New > New Layer Group.
- Name the group layer.
To add child layers or groups to the group you created, drag and drop them in the new group layer.
Layer states
To work with layers effectively, you can toggle their visibility and edit status and assign different colors to make editing in the viewport easier. The states are represented by the squares next to the Scene Editor.
Set the layer color
Each layer or group has a color state (colored or uncolored).
- Click the left Set Color box to assign a color to the layer or group.
- Choose a color in the palette.
- Click OK.
- Click the Set Color box again to remove the color.
You can access the color value in the Scene Editor and in the Inspector. When a layer doesn't have a color assigned to it, the color box displays grey-striped diagonal lines.
Layer colors and hierarchies
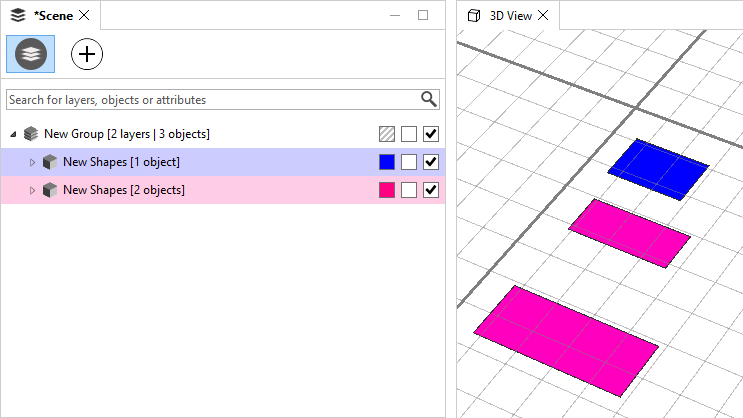
To see how color behaves with parent and child layers, look at the examples below. The color is inherited from the group hierarchy. When you give a parent layer group a color, all child objects and models belonging to this layer or group will have that color in the Viewport. In the Scene Editor, the child layers will maintain their colors at all times. The example below shows two colored layers without inherited colors:

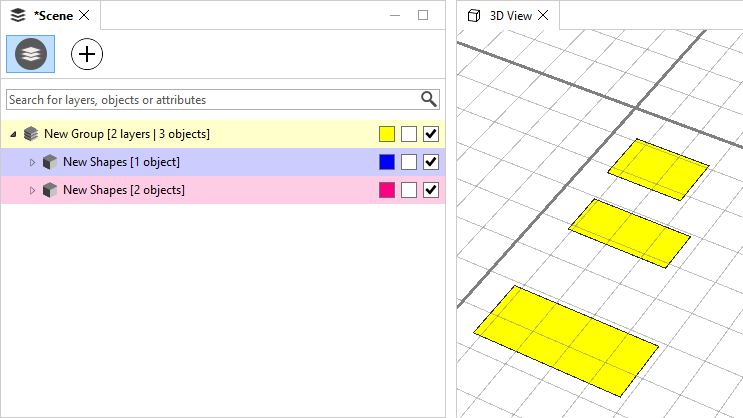
This example, on the other hand, shows two colored layers with inherited colors.

Lock groups and layers
Each layer or group has a locked state (locked or unlocked). The middle check box displays the locked state of the layer. Once you lock a layer, you can't select or modify the contained objects. You can access the locked state and in the Inspector.
Note:
When setting a group to "locked", the child layers and groups will keep their original locked state, but can't be selected or modified.
Toggle visibility
Each layer or group has a visibility state (visible or invisible). The right check box displays the visibility state of the layer or group. When disabling the visibility state, the corresponding objects will not be shown in any viewports. Invisible objects can't be selected. You can access the visibility in the Scene Editor and in the Inspector.
Note:
- When a group is "invisible", the child layers and groups will keep their original visibility state, but their objects will not be displayed in the viewports.
- The visibility of different object / layer types can also be controlled on a per-viewport basis from the view settings menu of the Viewport window.
Additional layer options
Renaming layers and groups | Rename a layer or a group by clicking on its name twice, using with the context menu ("Rename" entry), or by changing the name field in the Inspector. |
Framing elements | Double click any element to frame the element in all viewports. |
Multi selection | Select multiple layers/groups and to change visibility/lock/color state for all the selected items. |
Using the Search Field to select and filter objects | The search field allows the user to search for objects with name match, attribute match (name and value). The result of the search is automatically selected and framed in the Viewport. The result of the search action is displayed in the status bar. In the search field on the top of the scene window you can type a wildcard expression (e.g. "Lot*") to select matching objects.
Note:Whitespace characters in a search query denote a logical OR expression. To match object names with spaces, put your search query in double quotes "" |
Importing and exporting layers |
|