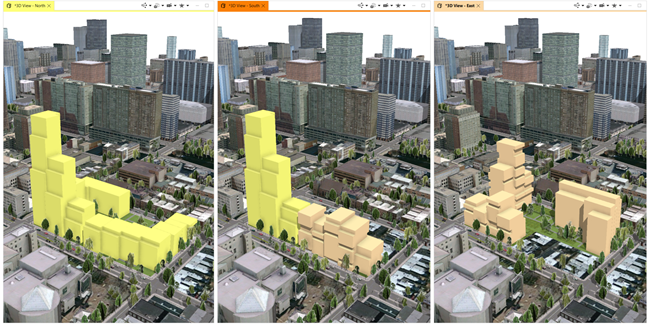
Scenarios allow you to create multiple designs within a single scene and then compare them. Scenarios can be displayed side-by-side in different views for visual comparison. Dashboards are also scenario aware and are able to show the values for multiple scenarios simultaneously, allowing you to compare the performance of designs against each other.
A scenario can contain a subset of objects that only display when that scenario is active. You can make custom changes that affect only a specific scenario or you can make global changes that can be applied across all scenarios. They provide a way to store multiple design alternatives in a single scene. Furthermore, the different scenarios can be exported with the 360 VR experience.
Scene Editor
From the Scene Editor you can create and manage scenarios as well as assign objects to scenarios.
Create new scenarios
Default objects
Before you create scenarios you begin with the Default Objects of the scene. Default Objects are objects in layers, such as terrain and buildings, that make up the original scene.
- Default objects are simultaneous instances of the same object.
- Default objects are, essentially, your background objects contained in layers. You can choose to display them in your scene or keep them hidden.
- The Default Objects button
 can be turned on and off when managing scenarios.
Add scenarios
Create new scenarios with objects of each version of the scene you wish to visualize.
- Click the Add new scenario button
 to create a new scenario.
 - Provide the Name, ID, and Color.
- Click OK.
Create as many additional scenarios as needed.
Add objects to scenarios
Scenario objects
When you add objects to scenarios they become scenario objects. This is important because scenario objects and default objects behave differently. Scenario objects are individual objects that are part of a scenario. You can customize scenarios by adding or removing objects from specific scenarios and leaving in others.
Add default objects
- Select objects from the Default Objects.

- Click Edit > Copy to scenario > North.
See Modify scenario objects for more information on the Copy to scenario, Move to scenario, Make default object, and Remove from current scenario options. Also see Manage scenarios for more detail on Scenario Manager.
All the selected objects become scenario objects and are now only in the North scenario.

Add scenario objects to another scenario
You can also use Scene Editor to duplicate and mirror existing scenarios. When you right-click any scenario in the Scene Editor you will get the following:
- Duplicate
- Mirror
There are additional options for Manage scenarios with the Scene Editor toolbar, such as changing properties, deleting, or changing the order.
Duplicate
When you duplicate a scenario you copy all objects in one scenario to another.
- Right-click the existing scenario to duplicate.
- Click Duplicate...
- Provide a Name, ID, and Color.
- Click OK.
Both scenarios have the copies of the same objects.

Mirror
When you mirror a scenario you create a clone of all the objects to another scenario. Mirror objects behave as if they were same objects in multiple scenarios. For example, if you use the move tool on a building that is a mirror object it will move the object across multiple scenarios.
- Select the scenario you want to mirror.
- Click Mirror...
- Provide a Name, ID, and Color.
- Click OK.
Each scenario is identical and a clone of the other. Any edits made to an object in one scenario are applied equally to the other.

Duplicate vs. mirror objects
Duplicate and mirror objects behave differently in scenarios and you can see the differences in the examples below:
Moving a duplicate object in the North and East scenarios

Moving a mirror object in the North and West scenarios:

Duplicate objects are treated as two separate objects that can be modified independently of each other for each scenario. On the other hand, mirror objects behave as the same object and modifications are applied in both scenarios.
CityEngine gives you additional options with adding and modifying scenarios. See Modify scenario objects and Scenarios in Inspector for more information.
Manage scenarios
Manage scenarios in the Scene Editor toolbar and in the Scenario Manager. Change the order, edit properties, and remove scenarios. When you right-click any scenario, you get the following:
- Duplicate... and Mirror... - see Add scenario objects to another scenario
- Edit... - changes the scenario name, ID, and color
- Delete - removes the selected scenario
- Change order by dragging scenarios left or right or clicking Move right and Move left.
You can also manage scenarios in Scenario Manager.
- Click Edit > Open Scenario Manager...
- Click OK.
Active scenario
The Active scenario is whichever scenario you choose in the Scene Editor. The Default Objects layers will be visible by default. When you view scenarios you can choose to display the Default Objects or hide them.
- Click a scenario to select the active scenario in the Viewport.
- Click Default Objects once to hide the objects.
The Scene Editor and the 3D Viewport match with the scenario. See active scenarios in 3D Viewport for further options.
3D Viewport
You can choose how to display you scenarios in 3D View windows through the Windows main menu.
Change active scenario
In each 3D View you can click the Scenarios tool  to display the active scenario set in the Scene Editor or a to specific scenario.
Note:
The 3D View window displays the name and color of the scenario.
Modify scenario objects in 3D views
The context menu in 3D views allows you to select objects in one scenario and perform actions to affect other scenarios. The context menu gives you different options for scenarios.
Copy objects to a scenario
You can copy objects from one scenario and add to another scenario. To copy objects from the Scenario A to Scenario B, do the following:
- Select objects in the Scenario A.
- Right-click in the scene and select Copy to scenario > Scenario B.
The objects are copied to Scenario B and now exist in both the Scenario A and Scenario B.
Move objects to a scenario
You can move objects to another scenario. To copy objects from the Scenario A to Scenario B, do the following:
- Select objects in the Scenario A.
- Right-click in the scene Move to scenario > Scenario B.
The objects are moved to the Scenario B and no longer exist in the Scenario A.
Make default object
You can make an object a default object so that it belongs to all of the scenarios.
- Select buildings in Scenario A.
- Right-click in the scene and select Make default object.
The buildings are now default objects included in all the scenarios.
Remove from current scenario
You can remove objects from specific scenarios.
- Select buildings in the Scenario A.
- Right-click in the scene and select Remove from current scenario.
The buildings are removed from the South scenario.
Create objects in scenarios with tools
You can create independent objects for each scenario with certain CityEngine tools. For example, you may have scenarios A, B, and C and want to create objects only in Scenario B. The Street and Shape creation tools also allow you to create specific objects per scenario.
Inspector
The Inspector lets you easily manage objects in your scenarios. You can move an object from default object to scenario object. You can also edit the scenario location of the objects.
When you select an object, the Inspector will display the object type: Default or Scenario. You can then choose where object will be located by scenario.
- Click an object in one of your scenarios. You can see that this object is common to both the North and East scenarios.

- Click Edit... to open the Edit Scenario dialog.
The Edit Scenario dialog allows you to edit the Object type and Scenarios. The example above indicates the object is contained in two scenarios. When you choose multiple scenarios the object becomes a mirror object.
- Click another object.
Now the Inspector displays that the object is a Default Object.

- Click Edit....
The selected object is a Default Object that belongs to all three scenarios. You can also uncheck a scenario to exclude the object from specific scenarios.