Synopsis
- setupProjection (uvSet, axesSelector, texWidth, texHeight)
- setupProjection (uvSet, axesSelector, texWidth, texHeight, widthOffset, heightOffset)
- setupProjection (uvSet, axesSelector, texWidth, texHeight, widthOffset, heightOffset, uwFactor)
Parameters
- uvSet—integer (range[0,5])Index of the uv-set (texture layer) to set up. The numbering corresponds to the texture layers of the material attribute.
- axesSelector—selstrDescribes the origin and which axes are taken as u- and v-axes. Possible values:
- { scope.xy | scope.xz | scope.yx | scope.yz | scope.zx | scope.zy }-Choose the scope origin and two of its axes.
- { world.xy | world.xz | world.yx | world.yz | world.zx | world.zy }-Choose the world origin and two of its axes.
- texWidth—floatThe texture width in world coordinate system units (e.g. meters). Values < 0 are allowed and mirror the texture. The operators ~ (floating) and ’ (relative) can be used.
- texHeight—floatThe texture texHeight in world coordinate system units (e.g. meters). Values < 0 are allowed and mirror the texture. The operators ~ (floating) and ’ (relative) can be used, see below.
- widthOffset—floatThe offset in u-direction, in world coordinate system units (e.g. meters).
- heightOffset—floatThe offset in v-direction, in world coordinate system units (e.g. meters).
- uwFactor—floatSets the factor by which the texture is applied on the w-axis relative to the u-axis (see examples below). The default value is 0.
Description
The setupProjection operation initializes a projection matrix for the chosen uv-set based on the reference coordinates system specified with axesSelector. It can be chosen between scope and world coordinate systems. For example, to initialize the u- and v-axes with the x- and y-axes of the current scope, the axesSelector has to be set to scope.xy. Note that some combinations result in a mirrored texture.
The texWidth and texHeight parameters support usage of the floating and relative operators to avoid complex calculations with the scope dimension, analogous to the transformation and split operations. For example, if the parameter texWidth is set to ~2, the projection matrix is initialized such that the current scope width is exactly spanned with texture tiles of approximately size 2. Or if the parameter texHeight is set to ’0.5, the texture will be repeated twice along the height.
Optionally, the influence of the pixels's z-coordinate on the w-texture coordinate relative to the u-coordinate can be set. Note that it defaults to 0 if not provided.
Related
Examples
Standard Texturing of a Building
Default use caseThe first rule snippet shows how the setupProjection operation is used in the facade rule to define the texture coordinate system (also called "uvw" system to avoid confusion with the xyz system for the geometry) for the subsequent projectUV operations (= texture projections).
Lot -->
    ... Building

Building -->
    ... Frontfacade ...

Frontfacade -->
    setupProjection(0, scope.xy, 1.5, 1, 1)
                   # setup 1.5m x 1m texture tiles
    setupProjection(2, scope.xy, scope.sx, scope.sy, 1)
                   # using dirtmap (uvSet #2)

    split(y){ groundfloor_height    : Groundfloor
            | {~floor_height        : Floor}* }
In the second snippet we show how the projectUV operation computes new texture coordinates for the wall asset. Already existing texture coordinates on this channel are replaced. projectUV uses the uvw coordinate system previously defined by setupProjection and projects the assets vertices along the w-axis to get the new texture coordinates.
... rules for floors and facade tiles ...
Wall -->
    color(wallColor)
    set(material.colormap, wall_tex)
    set(material.dirtmap, dirt_tex)
    projectUV(0) projectUV(2)
In contrast, note how the rule for the door does not use any projectUV operation to apply the texture, it just uses the generic texture coordinates from the cube asset.
Door -->
    s('1,'1,0.1)
    t(0,0,-0.5)
    set(material.colormap, frontdoor_tex)
primitiveCube()This is an example if we put the setupProjection command next to the projectUV in the rule on the facade level. |  |
When the setupProjection command is next to the projectUV on the wall rule, the brick texture does not span over the whole facade anymore; there are visible seams. |  |
Planar texture projection along the w-axis sometimes results in artifacts like on this doorframe |  |
For this reason the setupProjection command has an optional parameter uwFactor which allows for the projection of the texture also along the w-direction. The value of the uwFactor specifies the tile width relative to the u-direction. This feature is sometimes useful to "bend" textures around corners and avoid excessive use of component splits. |  |
Global Texture Projection
This example demonstrates how to quickly create textured mass models from an areal picture.
|
First, an attribute layer is created with the picture. This attribute layer is shown on the left. Below are the details of the attribute layer setup. 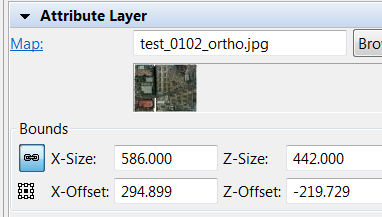 |  |
A number of initial shapes are manually drawn (following the countours of the buildings). Then the initial shapes are extruded to basic mass models using the extrude operation. |  |
The Roof rule is added. It projects the same texture as shown in the attribute layer onto the top faces of the mass models. The global x-axis is chosen as the u-axis, and the global z-axis as the v-axis. This results in an inverted texture along the v-axis and is corrected with the scaleUV() operation. Depending on the coordinate system there might be artifacts in the texture due to numerical issues. These can be avoided by using the offset parameters of the setupProjection() operation. |  |