Note:
You need the following account and license types to use this workflow:
- Microsoft license—You need a Microsoft 365 license, role Contributor or higher, to connect SharePoint lists to ArcGIS for SharePoint.
- ArcGIS account type—You must sign in to an ArcGIS account to perform this workflow.
You can connect a Microsoft SharePoint web part to ArcGIS for SharePoint.
See Maps to learn about maps and layers.
The dynamic data feature allows you to interact with an ArcGIS for SharePoint web part through a SharePoint list or another client-side Microsoft SharePoint web part added by your administrator.
When you add ArcGIS for SharePoint and another SharePoint web part to a SharePoint page, you can connect the two web parts and interact with the map layers using the added list or client-side web part. Once a link is established between the two web parts, you can use the SharePoint list or other web part to interact with the map. For example, you can select rows from a SharePoint list web part and view the filtered features on the map.
For more information about client-side SPFx web parts, see the Using dynamic data extensibility blog article or the SharePoint Extensions Sample wiki.
Note:
A SharePoint list web part can be independent of layers added to the ArcGIS for SharePoint map.
Set up the connections
To connect a SharePoint web part to ArcGIS for SharePoint, complete the following steps:
- Ensure that the page is in edit mode.
- Sign in to an ArcGIS account.
- From the map tools, click Layers
 .
.The Layers pane appears.
- Add data from SharePoint or add content from ArcGIS.
- Add a SharePoint list or client-side web part.
- On the ArcGIS for SharePoint web part, click Edit web part
 .
.The ArcGIS pane appears.
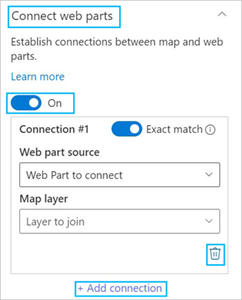
- Expand the Connect web parts section.
The toggle button is turned off by default. Turn it on to activate the Add connection link. You can add up to five connections.

- Click Add connection.
The Exact match toggle button is turned on by default.
If you turn it off, the query results are filtered to show a fuzzy match.
- For Web part source, click the Web Part to connect drop-down arrow and choose a connecting web part.
You can add multiple layers to the map. You can also add multiple lists and web parts from SharePoint. The Web Part to connect drop-down menu reflects the web parts that have been added.
- If you connected to a list web part, click the Choose list column drop-down arrow and choose a column name.
The list column is connected to the selected map layer.
- For Map layer, click the Layer to join drop-down arrow and choose a map layer.
- Click Choose layer column and choose a column in the map layer to connect the two web parts.
The connections are automatically made.
- Repeat steps 8 through 12 to set up multiple web part connections.
Caution:
You cannot duplicate connections.
- If you connect to a list web part, click the Validate button to verify that matching records exist.
Note:
You can only validate connections between a SharePoint list web part and an ArcGIS map web part.
You can perform validation for each connection. The top 100 unique records from the columns you specified are matched. A percentage bar appears indicating a percentage match. If there is no match, a warning message appears. You can cancel the validation process at anytime.
- Optionally, click Delete to remove a connection.
Interact with the map
When you select rows from the list or other web part, each selection reflects the number of matches on the map. A notification appears on the map showing the number of matches or that no rows were matched. If there are hidden layers in the Layers pane, the notification reflects that as well.
Tip:
You can filter rows in the list using the column drop-down arrows. Once filters are applied, the list shows only the filtered rows.
Publish and share
As a Contributor, if you share a published ArcGIS for SharePoint page with your organization but the Connect web parts toggle button is turned off, members who have Viewer privileges can only view the page; they cannot filter SharePoint lists, view the filtered features on the map, or interact with the map using a connected list.
Members with Contributor privileges can enable edit mode to turn on the Connect web parts toggle button and interact with the map using the SharePoint lists.
Select features or filter a SharePoint list web part
When you use a selection tool in the Select features pane, only selected features on the map are highlighted; unselected features are not available.
When you select records from a connected SharePoint list, unfiltered features are not available so only the filtered features are shown on the map.