To map SharePoint lists or document libraries in ArcGIS for SharePoint, the rows in the list or library must contain x,y coordinates or Esri JSON geometry. If the SharePoint list contains addresses without coordinates or shape data, the data must be geocoded or spatially enabled. You can use the Geoenable button  in a SharePoint list or library to run ArcGIS geocoding services directly in SharePoint or create a spatial join, which links a SharePoint list to an ArcGIS feature layer through a shared attribute. You can also set up a Microsoft Power Automate flow that allows automatic geoenablement of new or modified items in a SharePoint list or document library.
Tip:
To use the Join data functionality, ensure the ArcGIS layer contains attributes that are identical to those in the SharePoint list or library.Geocode a list or library by address
You can use the ArcGIS World Geocoding Service or your own custom geocoder to spatially enable a SharePoint list or document library.
Note:
Using the ArcGIS World Geocoding Service consumes credits.
To geocode a SharePoint list or document library, complete the following steps:
- Open the SharePoint document library or list that contains address information or points of interest.
- Select the row or rows you want to geocode.
To select the entire list, continue without selecting any rows.
- Click Geoenable.

The Geoenable pane appears and prompts you to sign in.
- Sign in to your ArcGIS organizational account.
- Under Rows to geoenable, select either Entire list or Selected rows.
Tip:
Check the Exclude geoenabled rows check box to ensure any rows that were previously geoenabled are not repeated.A count of the rows available to geocode is displayed.
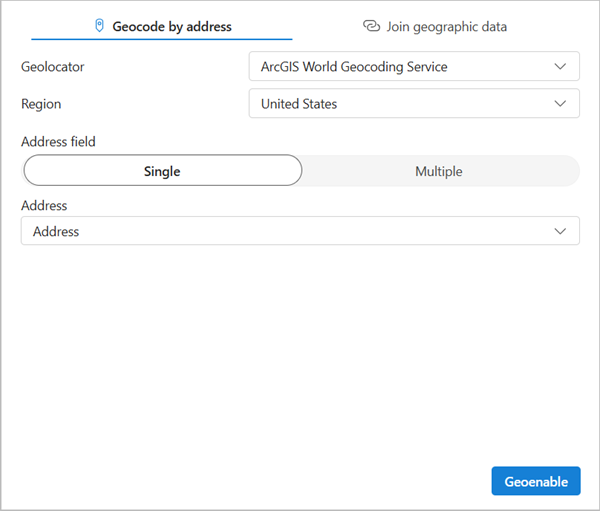
- In the Geocode section, choose a locator from the Geolocator drop-down menu.

- Optionally, choose the country in which your addresses are located from the Region drop-down menu.
If the addresses in your list or library are located in different countries, select World from the drop-down menu.
- Select whether your address data is in a single column or multiple columns.
- From the drop-down menu or menus, select the corresponding address information columns.
- Click Geoenable.
The geocoding workflow runs and a progress window appears. In the list or library, a Geoenablement status column appears, and the column populates with either a check mark
 or a warning sign
  to indicate which rows were successfully geocoded.
 - Click Finish.
Your SharePoint list or library is geographically enabled and ready for mapping.
Join geographic data
To join items from a SharePoint list or document library to a geographic data layer, complete the following steps:
- Open the SharePoint document library or list that contains address information or points of interest.
- Select the row or rows you want to join.
To select the entire list, continue without selecting any rows.
- Click Geoenable.
The Geoenable pane appears and prompts you to sign in.
- Sign in to your ArcGIS organizational account.
- Under Rows to geoenable, select either Entire list or Selected rows.
Tip:
Check the Exclude geoenabled rows check box to ensure any rows that were previously geoenabled are not repeated.A count of the rows available to join is displayed.
- Click Join data.
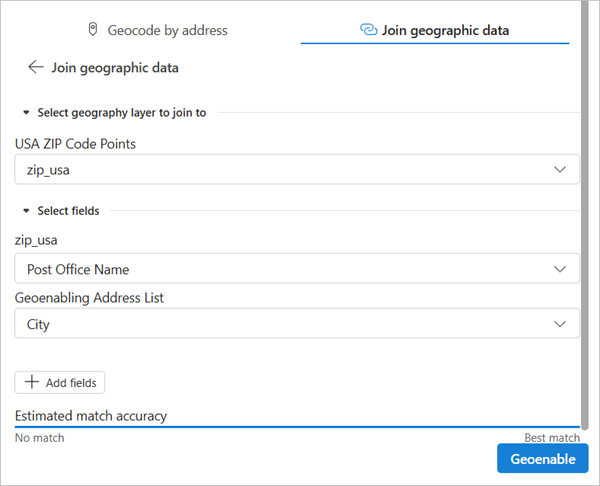
- From the drop-down menu, choose an ArcGIS layer.
Ensure that the layer from ArcGIS contains attributes that match at least one in the SharePoint list or library.
The layer name appears in the Select geography layer to join to section and a Select fields section appears and automatically loads possible join fields.
- On the drop-down menu below the geography layer, ensure the field you want to use as a match is selected.
- On the drop-down menus in the Select fields section, ensure the fields you want to use from both the layer and the list/library as a match are selected.
The Estimated match accuracy progress bar updates.
- Optionally, click Add fields to add more matching attribute fields.

- When you have matched all desired attributes, click Geoenable.
The join workflow runs and a progress window appears. In the list or library, a Geoenabling status column appears, and the column populates with either a check mark
 or a warning sign
  to indicate which rows were successfully joined.
Your SharePoint list or library is now geographically enabled and ready for mapping.
Automate geocoding for new and updated items
You can use Power Automate to trigger a flow to automatically geocode when a new item is added to the list or document library. The flow also automatically runs when an item is updated.
Note:
Ensure you are signed in with the correct accounts and connections in the flow panel to access necessary geocoders and credits.
To set up the geoenablement Power Automate flow, do the following:
- Complete steps 1-9 in the Geocode a list or library by address workflow or steps 1-10 in the Join geographic data workflow.
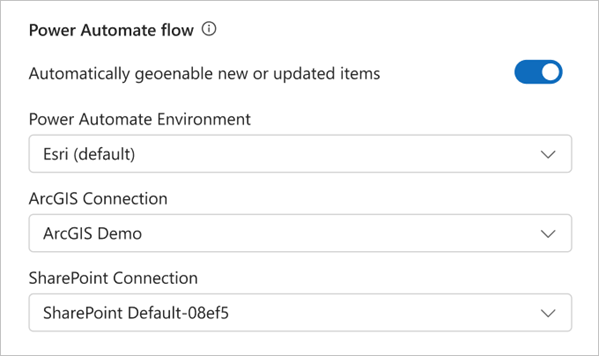
- In the Power Automate section, turn on the toggle button.
Note:
If the toggle button is disabled, you do not have the privileges to turn on or off the flow. Contact your administrator for details.
The settings for the flow appear.

- Turn on the Automatically geoenable new or updated items toggle button.
- On the Power Automate Environment drop-down menu, select the Power Automate environment in which you want the flow to exist.
- On the ArcGIS Connection drop-down menu, select the desired ArcGIS account connection.
To use the Power Automate flow, you must have the correct privileges and premium Power Automate license. Ensure you are selecting the correct account and connections to access the necessary geocoders and credits. There may be multiple connections listed. This is a known issue in Power Automate.
- On the SharePoint Connection drop-down menu, select the SharePoint account connected to the site.
- Click Geoenable.
The geocoding workflow runs and a progress window appears. In the list or library, a Geoenabling status column appears, and the column populates with either a check mark
 or a warning sign
  to indicate which rows were successfully geocoded or joined. Click the hyperlink next to items that were not successfully geocoded or joined to view the flow.
 Note:
The Power Automate flow page may indicate that the flow ran successfully even if some items were not successfully geocoded.
- Click Finish.
Your geoenablement and flow are complete. New and updated items will now automatically be geocoded.