Create location definition identifiers
In this topic
Your MicroStrategy project may have attributes—for example, customer name or store name—that are not associated with location data such as addresses or longitude and latitude values. If these attributes are used in a report grid without associated location data, they cannot be displayed on a map.
For example, a report may have a grid with the following columns: Customer name and Revenue. Without location values, such as addresses, to define where the customers are located, Esri Maps for MicroStrategy will not have the necessary information to plot the customer locations on a map.
With Location Architect, you can create a relationship between an attribute in your project and the necessary location data by mapping the attribute to an existing location definition in the model. When the attribute is mapped to a location definition, a location definition identifier (LDI) is created. An LDI defines a relationship between the attribute and the location fields specified in the location definition. A location definition can have more than one LDI, but each LDI should only be associated with one location definition.
LDI example
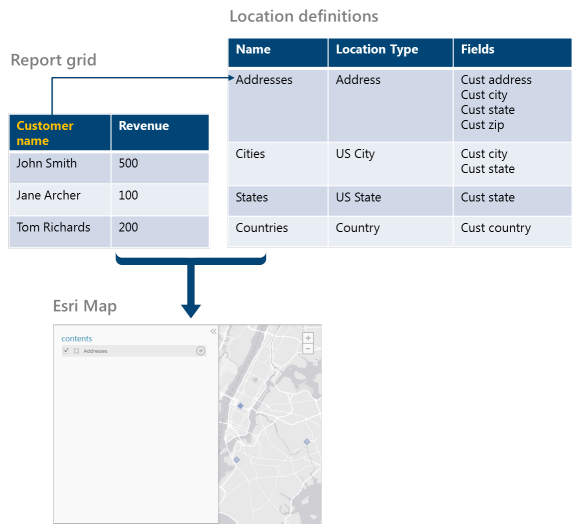
Consider the example of a report grid showing Customer name and Revenue. Suppose you create a model in Location Architect that contains the following location definitions:
| Name | Location type | Fields |
|---|---|---|
Addresses | Address | Cust address, Cust city, Cust state, Cust zip |
Cities | US City | Cust city, Cust state |
States | US State | Cust state |
Countries | Country | Cust country |
In your Location Architect model, you could create an LDI on the Addresses location definition, which would associate the Customer name attribute with the address fields (Cust address, Cust city, Cust state, and Cust zip) specified in the location definition. With this LDI created, the report grid could be visualized as a map layer showing customers based on the associated address data as shown below.

Considerations for LDIs
Before creating an LDI, it is important to consider how the attribute relates to the location definitions in the model. In this example, there is one customer name per address row—a one-to-one relationship. Therefore, associating Customer name to the Addresses location definition would generate a layer showing one address feature for each customer name, which is an appropriate representation of the grid.
However, suppose you instead associated Customer name to the Cities location definition. If you had more than one customer row per city (a many-to-one relationship), the generated layer would display multiple city features corresponding to the number of individual customer rows associated with each city. This would not be an appropriate representation of the data in the report.
To learn more about location types, see Location types.
Create an LDI
After creating location definitions, you can create LDIs for attributes in the project that are not associated with location data. This allows the attributes to be displayed on a map.
- In Location Architect, press the Location definitions tab.
- In the table, select the location definition for which you want to create an LDI.
- On the details page, beside Identifiers, press the Add new location definition identifier button.
- Browse to and select the attribute you want and press OK.
The LDI is created.
- Repeat steps 2 through 4 to create additional LDIs as needed.
Note:
To remove an LDI you created, press the Delete (x) button beside the LDI you want to delete.