ArcGIS for Teams Live Share is a collaborative tool that helps you share, synchronize, and engage with publicly available ArcGIS spatial content in real time during Microsoft Teams meetings.
Live Share is much like the existing Microsoft Teams meeting option Share content: participants in a meeting can see the presenter's screen. However, a key difference is that each participant can explore the shared content independently from the presenter.
The Teams Live Share function is designed for real-time collaboration. One participant at a time has the presenter role, but all participants can independently explore shared spatial data, synchronizing back to the presenter as needed.
Start an ArcGIS for Teams Live Share
To begin sharing ArcGIS Online public content in a Teams channel, it is recommended—but not required—to have previously installed ArcGIS for Teams from the Microsoft AppSource in the target channel. Use the following steps to add a content item for a collaborative Live Share:
- In a Microsoft Teams meeting or call, click the Add an app button
 in the Teams meeting ribbon.
The Add a new app pane appears.
- In the Search for apps text box, type ArcGIS.
ArcGIS appears in the search results.
- Click ArcGIS.
The Sign in to ArcGIS prompt appears.
- Follow the sign in steps for your ArcGIS account type or click Continue as guest.
If you sign in, click Continue as <your username>.
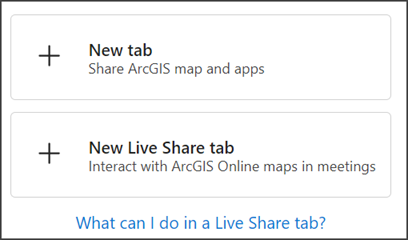
- A prompt appears, asking what type of tab you want to install. Select New Live Share tab.

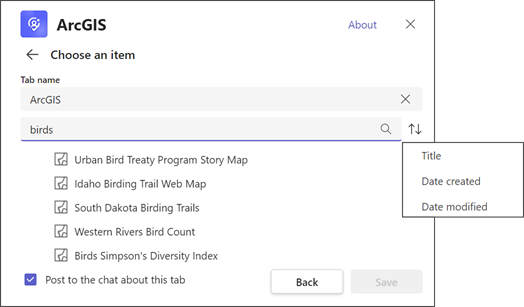
The Choose an item window appears. From here, you can search for publicly available ArcGIS Online content.

- Enter a name in the Tab name field, if applicable.
Note:
The default Tab name is ArcGIS; it is shown on the Teams meeting ribbon to all participants. - Enter a word or phrase in the Search field to refine your search.
As you narrow the search parameters, the results list updates automatically.
- Click the Sort button
 to sort the results list by Title, Date created, or Date modified.
 - Choose an item from the results list and click Save.
The item you select is added to the channel as a tab.
- If you leave Post to the chat about this tab checked (the default setting), a notice about the content item is shared in the channel's Chat tab.
- A new tab (named ArcGIS by default or your Tab name option) is added to the Teams meeting ribbon.

- You can now present this Live Share content item in the meeting.
Present an ArcGIS for Teams Live Share content item
Once you have added a content item as a Live Share tab to a Microsoft Teams meeting ribbon, you can share the content in a Live Share presentation. A Live Share content item can be explored by all participants independently during your presentation. Use the following steps to present a Live Share content item:
- Click the Live Share tab you created on the Teams meeting ribbon in Start an
ArcGIS for Teams Live Share.
A Live Share tab (named ArcGIS by default or your Tab name option) opens to the right of the meeting pane.
- Click the Live Share button
 on the tab.
The Live Share content opens in the meeting pane.
- Participants can begin exploring the shared content independently—for example, by zooming and panning a shared map, exploring a spreadsheet, or clicking a layer's properties.
- Participants click Live - Sync to presenter to re-orient the content shown on their screen to the presenter's perspective.

- The Presenter
 is identified by username on the lower left.
- Click Stop control at the bottom of the meeting pane to stop presenting and allow another participant to take control of the Live Share content item.

All participants see the message Take control at the bottom of the meeting pane.

- Click Take control to become the presenter.
- Click Stop sharing in the Teams meeting ribbon to stop sharing the Live Share content item.
- To remove the Live Share tab from the meeting, right-click the More options button
 on the Live Share tab in the Teams meeting and click Remove.
 - To add a new Live Share tab, repeat the Start an ArcGIS for Teams Live Share workflow steps.
- To remove the Live Share tab from the meeting, right-click the More options button