As a Microsoft SharePoint user with the correct permissions, you can use location-based tags on your SharePoint documents to find the documents when you click features on a data layer on a map.
When you drag a document (or multiple documents) from the list of documents on your SharePoint site to a location on the map, ArcGIS for SharePoint automatically generates and saves geotags for those documents.
You can then find the geotagged documents by clicking that location on the map or by searching for specific keywords.
You can goetag documents either by coordinates or by attributes. After you add layers to a map from Microsoft SharePoint or content from ArcGIS, you can setgeotagging attributes for each feature layer in the map. You can then geotag the SharePoint content so that it can be quickly located by clicking a relevant feature on the map. Alternatively, you can geotag documents to any point on the map and that geographic information will be stored with the document in SharePoint. With this method, you can also save the document and coordinate information to a new layer in ArcGIS.
For example, a manager who oversees several sites around a region, each with unique safety documents, can add an ArcGIS layer of construction sites to a map and drag the documents to their relevant location on the layer to geotag them. Later, visitors on the SharePoint site can click the location and see relevant tagged documents.
Note:
Your SharePoint site administrator must first set up an ArcGIS term store before you begin geotagging.
Content that can be geotagged
You can geotag the following types of SharePoint content from your SharePoint site collection:
- Documents—Choose one or more documents to tag using a reference layer's geotagging attribute.
- Document sets—When you geotag a document set, the generated metadata applies only to the document set; the individual documents contained in the set are not geotagged.
- Picture libraries—Choose one or more digital photos or graphics to tag using a reference layer's geotagging attributes. Supported file formats are PNG, GIF, JPG, JPEG, and BMP. Audio and video files are not supported in picture libraries.
- Videos—Choose one or more videos to geotag. Supported formats are MP4, QT, SWF, and GIF.
- Folders—When you geotag a folder, only the files in the folder are tagged using the layer's geotagging attribute; the folder cannot be tagged. When the selection includes a folder, all items in the folder are tagged recursively. To tag specific documents in the folder, open the folder and select the documents.
Any file that has been added to a document library or document set can also be geotagged.
Set up geotagging by coordinates
You can geotag documents directly to the basemap without needing a feature layer. You can also create a new feature layer on which you can save tagged documents.
Note:
You must be signed in to set up geotagging by coordinates.
To set up geotagging by coordinates, complete the following steps:
- From the map tools, click Geotag and geosearch
 .
.The Geotag and geosearch pane appears with the Geotag documents tab open.

- Ensure Coordinates is selected.
You can begin geotagging by coordinates to save documents' location information only to SharePoint. To save document geographic information to ArcGIS, proceed to step 4 before beginning to geotag.
- To save your geotagged points to a new feature layer as well as SharePoint, use the Save to ArcGIS toggle button.
This feature allows users who do not use ArcGIS for SharePoint to view document links using ArcGIS Online or ArcGIS Enterprise.
- Activate edit mode for the page.
- Turn on the Save to ArcGIS toggle button.
- In the Storage layer name text box, enter a name for your new layer.
- In the Save in folder drop-down menu, select the folder in which you want to save the layer.
- In the Sharing level drop-down menu, select a sharing level for the layer.
- In the Group sharing drop-down menu, select any groups with which you want to share the layer.
- Click the Create layer button to create the layer in your ArcGIS content.
- To stop new points from being saved on the feature, turn off the Save to ArcGIS toggle button.
Set up geotagging by attributes
After you add data to the map, you can specify the attribute from a layer's data to use for geotagging. When a user in edit mode drags documents onto a configured layer, the selected attribute is used to generate a geotag for those documents. This allows you to find documents related to a specific location when you click that location on the map.
You can specify one spatial attribute for each layer in a map. To set geotagging attributes, complete the following steps:
- Activate edit mode for the map.
- From your SharePoint or ArcGIS content, add the layer containing the attribute you want to use for geotagging to the map.
- From the map tools, click Geotag and geosearch
 .
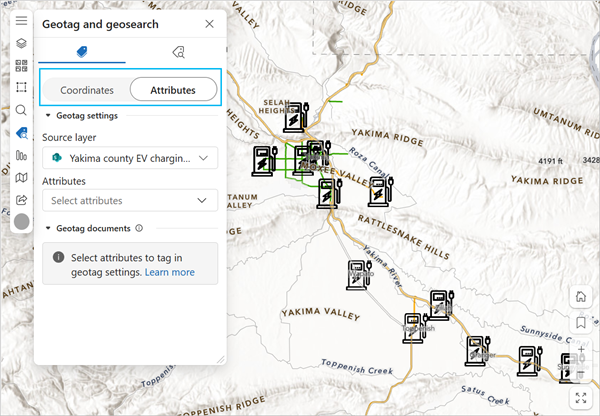
.The Geotag and geosearch pane appears with the Geotag documents tab and the Coordinates settings open.
Note:
The map must contain at least one feature layer before documents can be geotagged.
- At the top of the pane, click Attributes.

- Choose the layer to use for geotagging from the Source layer drop-down menu.
The layer's attributes are listed.
- Select attributes from the Attributes drop-down menu to use it for geotagging.
Tip:
Hover over an attribute to see a preview of its tags. The first five unique values are shown.
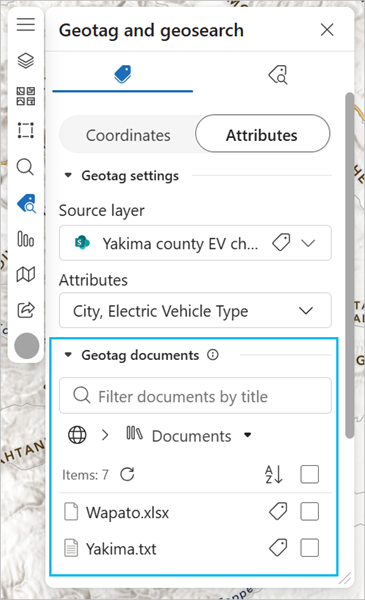
Once an attribute is selected, the Geotag documents section of the pane is enabled. You can now geotag documents.
Make document links available in ArcGIS
With the SharePoint page in edit mode, ArcGIS organization administrators or layer owners can turn on the Add document URLs toggle button when geotagging by attributes. This button allows any users who geotag documents while the page is in edit mode to add the links of the documents to an ArcGIS feature layer. This creates a column in the feature table for the layer and displays the link in the pop-up of a feature when viewed in Map Viewer, for example. This allows users who do not use SharePoint frequently to access document links in Map Viewer.
Note:
Editing must be enabled for the feature layer and the layer must be shared with your organization or group members who you want to have access to the layer.Click the Update URLs button to synchronize the links in ArcGIS with the documents in SharePoint. This button automatically removes links from the ArcGIS feature table for documents that have been deleted in SharePoint.
Turning off the Add document URLs toggle button does not remove existing links in the feature table, but newly geotagged documents will not be stored in the feature table.
Geotag documents
To geotag documents, complete the following steps:
- From the map tools, click Geotag and geosearch
 .
.The Geotag and geosearch pane appears.
- Click Geotag documents to expand the section.
A list of document libraries from the current SharePoint site appears.
- Optionally, click the Site picker button
 to change the subsite or hub site and browse for other content.
- Choose a document library (folder) to view its contents.
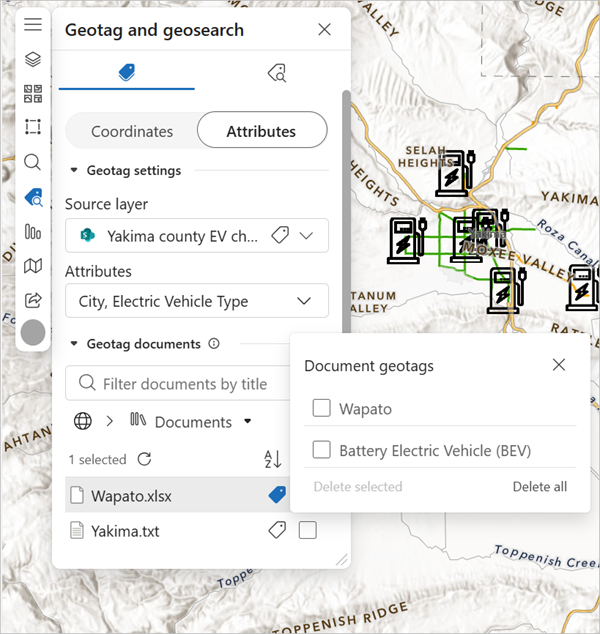
- If an item is already geotagged, click the Document geotags button
 to view the document tags associated with the item.
Tip:
To remove document tags, select a geotag in the Document geotags pane and click Delete selected to remove selected tags or Delete all to remove all tags.
- Click the Close button
 to close the Document geotags pane.
 - Select an item and drag it to a location on the map to geotag it.
The item is tagged and a pop-up appears with information about the tags to be used.
Note:
You can continue working with the map while tagging is in progress. When an item is successfully tagged, a confirmation message appears.