With ArcGIS Data Appliance 2025, the Terrain and Terrain 3D services are available to use for visualization and analysis. The following sections explain how to use the services:
Use the Terrain service
Once you've published the terrain image service, you can use it in ArcGIS 10.9.1 or later, ArcGIS Pro 3.1 or later, and ArcGIS Online. Terrain is a dynamic image service comprising multiple sources and resolutions ranging from 1,000 meters to 0.25 meters. It can be used for visualization and analysis.
The following sections explain how to do the following:
Use Terrain in ArcGIS Desktop
The following sections explain how to do the following:
Use the Terrain service in ArcGIS Pro
To use the Terrain service in ArcGIS Pro, complete the following steps:
- Start ArcGIS Pro and choose the Map project template.
- On the Insert tab, click Connections and choose New ArcGIS Server.
- Provide the URL of the server where you published the Terrain service.
- On the Map tab, click Add Data, and click Data.
- Click Servers, double-click the server connection, and select the Terrain service.
The Terrain service is added to the map. By default, the service renders as an elevation (DEM) raster.
- Right-click Terrain, and click Properties > Processing Templates.
- From the Processing Template drop-down list, choose one of the functions defined on the service.
- Click OK.
The map dynamically renders the elevation derivative selected from the drop-down list.
Use Terrain for analysis in ArcGIS Pro
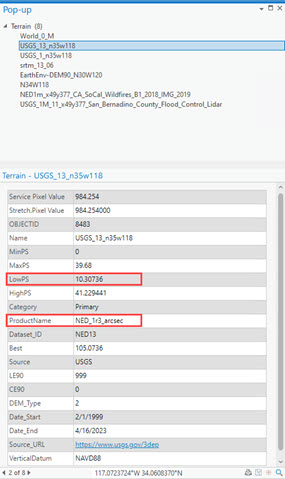
The Terrain service includes data with resolutions ranging from more than 1,000 meters to approximately 0.25 meters in some limited areas, and each record (raster item) is populated with the Dataset_ID and ProductName values, which can be used for filtering. Since the service is composed of multiple-resolution datasets, it is recommended that you filter a single resolution (or dataset) before consuming it for analysis. The following steps are for creating a temporary layer using the Make Image Server Layer geoprocessing tool for a particular area of interest.
- Add the Terrain service to a map in ArcGIS Pro.
- Zoom to Crafton Hills, CA, USA at scale of 1:18000.
- Click Identify on the Terrain service.
A list of raster items is returned.
- Examine the LowPS (cell
resolution in meters) values of rasters in the Identify result
window.

- Determine the resolution you need to work with and note the ProductName field value.
This example is for the NED_1r3_arcsec dataset, which has a resolution of approximately 10.3 meters.
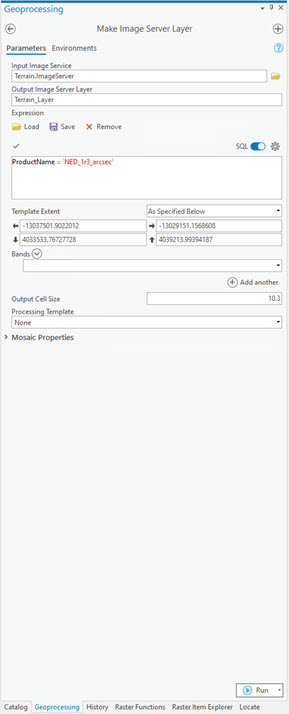
- Open the Make Image Server Layer tool.
- Define the parameters.
- For Input Image Service, browse to the server connection for the TerrainImageServer image service.
- Set Expression to "ProductName" = 'NED_1r3_arcsec'.
- Optionally, set the output coordinates from the environment setting, if the request being made is different from the image service coordinates (Web Mercator).
- Specify the extent. It should be less than 5000 x 5000 pixels. If the pixel size is 10 meters, the max extent should be 50,000 meters x 50,000 meters.
Note:
The request size of the output layer is limited to 5,000 by 5,000 pixels (property defined on mosaic datasets and service). The administrator or publisher can increase this limit on the mosaic and service, if required. - Specify the Output Cell Size value as 10.3.

- Click Run to run the tool.
On successful completion, a temporary layer is generated and added to the Contents pane with cell size, coordinate system, extent, and expression parameters defined in the tool. This temporary elevation layer can now be used in other geoprocessing tools (for example, Contours) for further analysis.
For information about using mosaic datasets and image services in geoprocessing tools, see Using mosaic datasets and image services in geoprocessing tools in the ArcGIS Pro help.
Use Terrain in ArcGIS Online or Portal for ArcGIS
To use the Terrain service in ArcGIS Online or Portal for ArcGIS, complete the following steps:
- Go to the REST endpoint of the Terrain service, for example, https://localhost:6443/arcgis/rest/services/Terrain/ImageServer.
- Click ArcGIS Online Map Viewer.
The Terrain service opens in Map Viewer in a browser. By default, it renders as elevation (DTM).
- In the right side pane, click the Processing templates button
 .
. The Processing templates pane appears, listing all the processing templates associated with the Terrain layer.

- Choose Grayscale_Hillshade and click Done.
The map renders the hillshade.
Use the Terrain3D service
Once you've published the Terrain 3D service, you can use it in ArcGIS 10.9.1 or later, ArcGIS Pro 2.9 or later, and ArcGIS Online. The following sections explain how to use the Terrain 3D service:
Use the service in ArcGIS Pro
To use the Terrain3D service in ArcGIS Pro, complete the following steps:
- Start ArcGIS Pro and choose the Global_Scene project template.
- On the Insert tab, click Connections and choose New ArcGIS Server.
- Provide the server URL where you published the Terrain3D service.
- On the Map tab, click Add Data > Elevation Source.
- Click
Servers, double-click the server connection, and
select the
Terrain3D service.
The elevation source is added to the ground.
- Optionally, turn off or remove the default ArcGIS Online elevation layer (WorldElevation3D/Terrain3D) from Ground.
- Zoom to any location and tilt the scene to view the oblique views.
With ArcGIS Pro, you can add your unique 2D and 3D data layers to the scene. Your data is added to the elevation surface. If your data has defined elevation (z-coordinates), this information is honored in the scene. You can then share your work as a web scene with others in your organization or with the public.
For information about scenes in ArcGIS Pro, see Scenes in the ArcGIS Pro help under Maps and scenes > Author maps and scenes.
Use the service in ArcGIS Online or Portal for ArcGIS
To use the Terrain3D service in ArcGIS Online or Portal for ArcGIS, complete the following steps:
- Sign in to ArcGIS Online or your organization's Portal for ArcGIS.
- Open Scene Viewer.
- On the Designer toolbar, click Add Layers
 to add layers, and click ArcGIS web service
  to open the Enter Layer URL pane.
 - In the Enter Layer URL pane, in the Layer URL text box, enter the REST endpoint of the Terrain3D service published on your server, for example, https://localhost:6443/arcgis/rest/services/Terrain3D/ImageServer.
- Click
Add to add the layer to your scene.
The Terrain3D elevation layer is added as Ground.
Using Scene Viewer in ArcGIS Online, you can create and interact with 3D scenes. Your data is added to the elevation surface. If your data has defined elevation (z-coordinates), this information is honored in the scene. You can then share your work as a web scene with others in your organization or with the public.
For information about using the 3D scene viewer, see Get started with Scene Viewer in the ArcGIS Online help.