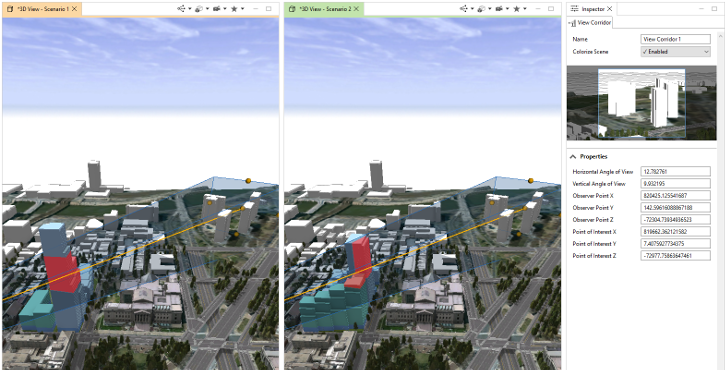
View corridors protect established views from a given observer against building development obstruction. For example, there are multiple view corridors in the city of Seattle that keep the Space Needle clear of buildings. The use of view corridors is a well-known and accepted practice to keep views of landmarks from being blocked or compromised.
Tip:
- To use the CityEngine tools, ensure the Tool Options window
 is open by clicking Window > Tool Options in the main menu.
 - Not all CityEngine tools have options under Tool Options.
You can open the View Corridor Creation tool  the following ways:
- Click the Viewshed tool
 and then click the View Corridor Creation tool
  in the Tool Options window
  .
. - Click Analysis > View Corridor Creation in the main menu.
Create a view corridor
To create a view corridor, do the following:
- Click a point in the Viewport to create an observer point.
This starts the View Corridor Creation tool
 , which dynamically displays the view corridor as you move.
 - Drag the tool to set the point of interest.
- Click again to anchor the Point of Interest property in the view corridor.
The view corridor is added to the Scene Editor and is automatically selected. You can directly adjust its properties, such as the Angle of View and View Distance parameters, in the Viewport using the handles or in the Inspector using input fields.

All parts of scenario objects that lie in the view corridor and are visible from the observer point are colored with a chosen color (the default is red). To see the Scenario A objects in a view corridor, you can activate Scenario A with the Scenario tool
 in the Viewport tool. See scenarios for more information.
Tip:
A view corridor is designed to analyze scenarios. It is recommended that you create scenarios before creating objects, because only buildings in a scenario are colorized by the View Corridor Creation tool  .
.
Tool Options

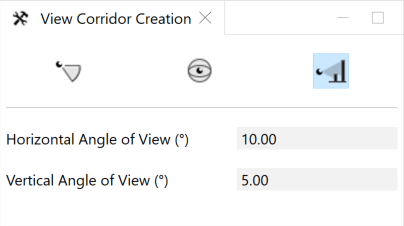
The  View Corridor Creation tool includes the following options:
 View Corridor Creation View Corridor Creation | |
| Horizontal Angle of View (°) | The value determines the horizontal angle of view for the next view corridor that is placed. Once placed, you can adjust the view corridor. |
| Vertical Angle of View (°) | The value determines the vertical angle of view for the next view corridor that is placed. Once placed, you can adjust the view corridor. |
Adjust the view corridor
You can adjust the view corridor in the following ways:
- In the Viewport, you can drag any of the orange handles to modify the Observer point, Point of Interest, or Angle of View properties.
- In the Viewport, you can edit any of the properties.
Properties
The following is a list of the View Corridor Creation properties in the Inspector:
Horizontal Angle of View | Horizontal angle of view, or field of view, from observer |
Vertical Angle of View | Vertical angle of view, or field of view, from observer |
Observer Point X | X-coordinate of observer |
Observer Point Y | Y-coordinate of observer |
Observer Point Z | Z-coordinate of observer |
Point of interest X | X-coordinate of point of interest |
Point of interest Y | Y-coordinate of point of interest |
Point of interest Z | Z-coordinate of point of interest |
Tip:
The Colorize Scene property in the Inspector allows you to choose whether to color the scenario objects that are in the view corridor. The preview helps the placement of the view corridor and shows which active scenario objects alter the protected view.