3D content can be below the ground surface, such as geological volumes, well paths, and earthquake points. Choosing how to effectively display this kind of content in 3D depends on two things—the type of data, and the chosen viewing environment.
The three general types of data you could be working with are:
- Vector data, such as points, lines, multipatches, and 3D object feature layers
- Surface data, such as single-band rasters and TINs
- Volumetric data, such as voxels
There are also multiple 3D applications available to you, including ArcGIS Pro on desktop, Scene Viewer on the web, and ArcGIS Earth on desktop and mobile. All these applications support underground navigation.
Workflows
The best practices for showing subsurface content will depend on the combination of data and the 3D application to view and explore.
Displaying underground vector data
Vector data is well supported, with many options in ArcGIS Pro, the Scene Viewer, and ArcGIS Earth for defining 3D symbology. For example, 3D point features representing the underground position of an earthquake can be authored as different sized spheres. The elevation values for underground data can be relative to the ground, such as negative 100 meter meaning 100 meters below the surface, or they can be using absolute heights above sea level, like how 5,000 feet could mean 280 feet below the ground at Mile High Stadium in Denver, USA.
Viewing subsurface vector data can be difficult if you need to interpret the relative depth of different objects, especially if they are of varying sizes. In ArcGIS Pro, you can use a procedural cage symbol to draw a set of labeled boundary lines to indicate the 3D extent of the data. To consume this symbol in the Scene Viewer or ArcGIS Earth, the layer can be converted to a fixed 3D data type using the Layer 3D to Feature Class geoprocessing tool.

Displaying underground surface data
Surface data is supported at different levels across ArcGIS. For ArcGIS Pro, you can add multiple elevation surfaces in the scene, such as a ground surface plus multiple subsurface geological strata layers. Other ArcGIS clients consuming web scenes like Scene Viewer or ArcGIS Earth only support the definition of a single elevation surface. When publishing a web scene with multiple elevation surfaces from ArcGIS Pro, only the ground as elevation surface will be stored in the web scene.
Use ArcGIS Pro to view multiple surfaces. For surfaces that are quite close together, or that only have small differences in height, you may need to apply vertical exaggeration to visually separate them into distinct slices. One other option is to use the Extrude Between geoprocessing tool to convert the elevation layer into either cross sections or enclosed multipatch volumes, and then publish and consume these as 3D vector data, per the section above.

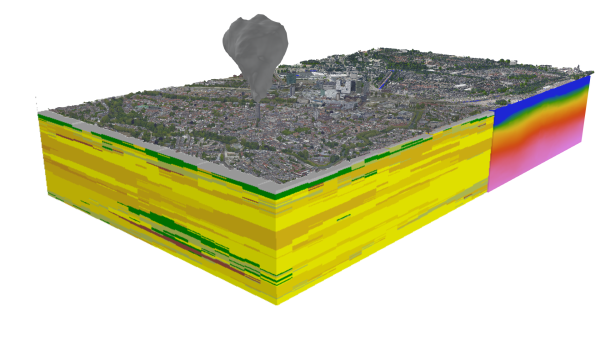
Displaying underground volumetric data
The best option for displaying subsurface volumetric data is as voxel layers. These layers require cell-based data that is regularly gridded in XY . For example, a geological subsurface model may have a voxel size in XY of 10 meters but the height Z of the voxel is 50 centimeters.
There are multiple ways to process point data into a voxel layer. For example, you can use geostatistical analysis tools to create a voxel layer base on probes taken from an area. A voxel layer can only be displayed in a local scene to assure the voxel layer can be visually analyzed. You can publish as a voxel scene layer as a web later or within a web scene and view it in the Scene Viewer. You can display the voxel layer as volume or surface and use interactive exploratory tools like the slice or measure tool.
Interacting with scenes containing subsurface data
ArcGIS Pro allows you to restrict the navigation in a scene to above ground or you can turn on navigate underground.
In the Scene Viewer, you will also need to enable underground navigation to allow scene navigation under the ground surface. It is recommended to author a local scene and clip the viewing extent. This way the subsurface features are visible and an optimal user experience can be achieved. You can use the Interactive Slice Tool to reveal subsurface content, like stormwater pipes under a cityscape.
ArcGIS Earth supports web scenes. The layers of the web scene will draw both above ground and below ground, and scenes with clipped extents will reveal any data under the ground. ArcGIS Earth also provides an underground navigation mode that enables you to move the camera under the ground in order to get the best viewing position.
Considerations
While ArcGIS Pro supports field values and expressions to define elevation values for feature layers, to publish these layers as web layers, you will need to store the z-values directly in the feature’s geometry. Use the Feature to 3D by Attribute geoprocessing tool to add the z-values and set the elevation property of the layer or the absolute height using the new z value field.
Required software
You will need ArcGIS Pro with the 3D Analyst extension to work with subsurface and geological features. You will need an ArcGIS Online or ArcGIS Enterprise account to work with Scene Viewer. Use ArcGIS Earth mobile to work with subsurface and geological features on mobile devices.
Explore the following resources to learn more about subsurface workflows in ArcGIS.
ArcGIS help documentation
Reference material for ArcGIS products:
ArcGIS blogs, stories, and technical papers
Supplemental guidance about concepts, software functionality, and workflows:
Tutorials
Guided, hands-on lessons based on real-world problems:
Esri Training
Authoritative learning resources focusing on key ArcGIS skills:
Esri community
Online 3D community to connect, collaborate, and share experiences:
- Ask the 3D community questions