You can use this model in the Classify Pixels Using Deep Learning tool available in the Image Analyst toolbox in ArcGIS Pro. Follow the steps below to use the model for forecasting earth surface temperature. Fine-tuning this model is currently not supported.
Recommended imagery configuration
Prithvi Weather and Climate is a 2.3-billion-parameter model trained on 160 variables from the MERRA-2 dataset. To use this model, the MERRA-2 dataset, including the 160 variables used during training, is required.
Use the model
Complete the following steps to forecast earth surface temperature:
- Download the pre-processed MERRA-2 data provided at Hugging Face.
The files are in netcdf format with daily preprocessed data. You can download multiple files of consecutive dates. Each day's dataset must include the surface variables (MERRA2_sfc_.nc) and its corresponding pressure variables (MERRA_pres_.nc).
- Alternatively, run this script in Jupyter Notebook to download the data.
The following example shows a script to download two days of data:

- Download the Prithvi - Weather And Climate Forecasting model and the CreatePrithiviW&CRaster.atbx in your local drive.
- Open ArcGIS Pro, and create an ArcGIS Pro project.
- Expand the Toolbox on the Insert tab and click Add Toolbox to open the dialog box.

- On the Add Toolbox dialog box, browse to the CreatePrithiviW&CRaster.atbx file. Select it and click OK to add it to Toolboxes.

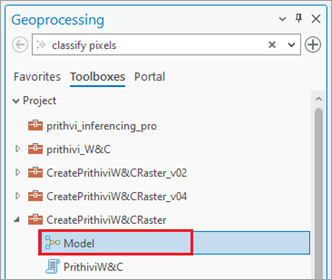
- Click the Toolboxes tab in the Geoprocessing pane, and inside Project, select and expand the CreatePrithiviW&CRaster tool.

- Right-click the Model file, and click Edit to add the toolbox in ArcGIS Pro.


- Double-click the Input MERRA-2 parameter to open the dialog box. Browse and add the folder where the MERRA-2 netcdf files were downloaded, and click OK.

- Double-click the Time range parameter to open the dialog box. Add the time range in the format shown, and click OK.
![Time range: Multiple Value [String] Time range: Multiple Value [String]](GUID-563E867F-051B-4E44-88CA-1A0C32A5FB6F-web.png)
- Double-click the Lead time parameter to open the dialog box. Add the number of time steps you want to forecast and click OK.
Note:
This value must be higher than 1.

- Double-click the Input time parameter to open the dialog box. Add the time interval you want to forecast and click OK.
Note:
The minimum value is 3. It must be a multiple of 3.

- Double-click the Output parameter to open the dialog box. Browse to the output folder where the intermediate file will be saved. Click OK.

- On the ModelBuilder tab, click Validate, and then click Run.


The intermediate file prithviW&C_inference_raster.tif is added to the map.

- Browse to Tools on the Analysis tab.

- Click the Toolboxes tab in the Geoprocessing pane, select Image Analyst Tools, and browse to the Classify Pixels Using Deep Learning tool under Deep Learning.

- On the Parameters tab, set the variables as follows:
- For Input Raster, select the prithviW&C_inference_raster.tif imagery layer.
- For Output Raster Dataset, set the output raster that will contain the forecasted results.
- For Model Definition, select the pretrained model .dlpk file.
- Optionally, for Arguments, change the values of the arguments if
required
- output_variable—The variable to be forecasted. Use t2m since you are forecasting surface temperature.
- lead_time—This flag sets the target time for the model. It is a single value and must be a positive integer and multiple of the input time. It should be same as the value used earlier in step 10.
- input_time—This can be set to True to get back bounding boxes.
- smoothing—Performs smoothing while forecasting. First, run the process with smoothing disabled (False) which is default setting, to process the entire image. If the results are satisfactory, no further adjustments are needed. However, if artifacts appear, set it to True and rerun. Though this will significantly increase processing time.
Note:
Inference runs only on the full image and does not support predefined extents.
- tile_size—The width and height of image tiles into which the imagery is split for prediction. Use 64 for optimum forecast quality and processing time.

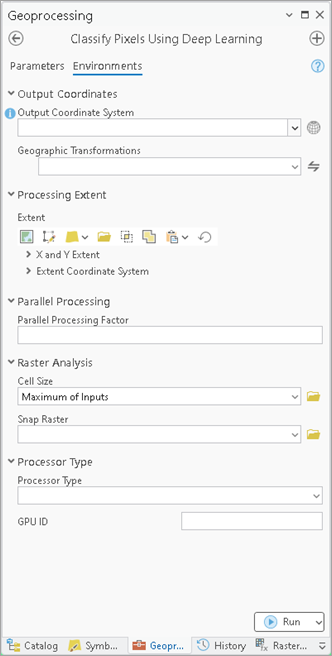
- Set the variables under the Environments tab as follows:
- For Processor Type, select CPU or GPU as needed.If GPU is available, it is recommended that you select GPU and set GPU ID to specify the GPU to be used.

- For Processor Type, select CPU or GPU as needed.
- Click Run.
Once processing is complete, the output forecasted raster is added to the map.
