ArcGIS for Microsoft Planetary Computer brings hundreds of ready-to-use analysis tools from ArcGIS to Microsoft Planetary Computer so you can observe, analyze, and monitor the earth. ArcGIS for Microsoft Planetary Computer spins up an ArcGIS Pro virtual machine (VM) on demand in the cloud. It offers all the capabilities you have licensed for ArcGIS Pro, including raster analytics tools, geoprocessing tools, and publishing tools, as well as any extensions you have purchased.
You can use ArcGIS for Microsoft Planetary Computer to apply image processing and analysis tools from ArcGIS Pro to support workflows such as the following:
- Change detection to locate areas impacted by disasters, identify new urban development, monitor sea level changes, and update trend forecasts
- AI and machine learning workflows such as land-cover classification and object detection
- Susceptibility analysis to identify areas at risk of fires, floods, landslides, and other disasters
- Suitability assessment to find the best sites for land-use prescriptions, conservation, and agriculture
Configure the ArcGIS for Microsoft Planetary Computer
Microsoft Planetary Computer is an analysis platform that allows you to access and use cloud computer services and catalogs of petabytes of earth science data layers. To access these resources using ArcGIS, you need a Microsoft Azure cloud account. Refer to the Microsoft Azure documentation or technical support team for help setting up and configuring the Azure account before you proceed.
To create an ArcGIS for Microsoft Planetary Computer instance, complete the following steps:
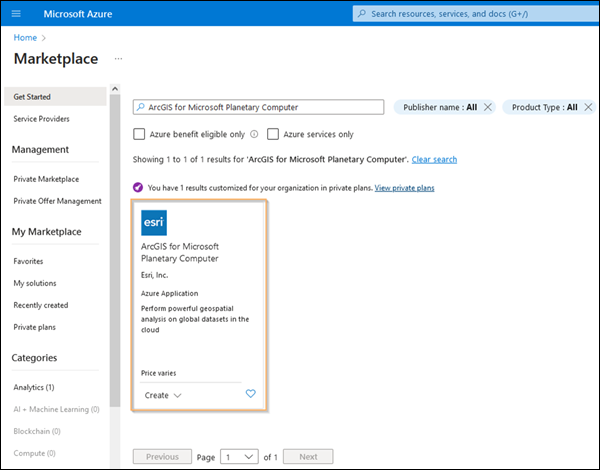
- Browse to the Azure Marketplace and search for ArcGIS for Microsoft Planetary Computer.
A page with the ArcGIS for Microsoft Planetary Computer card appears.
- Click the card.
The Create this app in Azure window appears.
- Under Software plan, select which version of ArcGIS Pro you want to use.
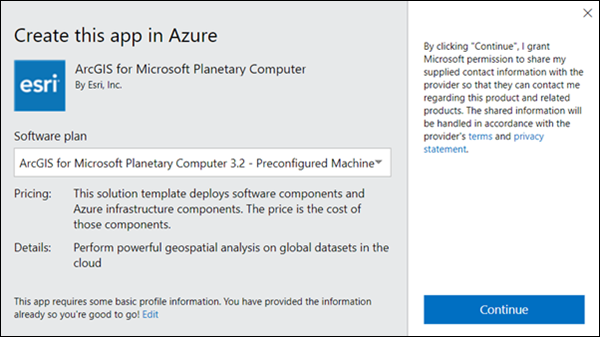
The offering requires that you supply your own licenses to ArcGIS Pro and the ArcGIS Image Analyst extension. The available offering is a preconfigured machine with ArcGIS Pro 3.1 and ArcGIS Pro 3.2, available with preinstalled workflow patterns, deep learning libraries, and scripts for geospatial analysis on Microsoft Planetary Computer datasets such as NAIP, Sentinel, and Landsat.
You also need an active Azure subscription to get started. It is recommended that you connect with the Azure administrator in your organization to ensure that you have the necessary credentials for set up. If you do not have the necessary credentials, you cannot create the ArcGIS for Microsoft Planetary Computer instance.
- Click Continue in the Create this app in Azure window.
This accepts the terms of use and initializes your setup.
- For Plan, choose a version of the preconfigured machine in the drop-down list. Click Create.
The version number corresponds to an ArcGIS Pro version number.
The solution template wizard opens for you to create your new instance.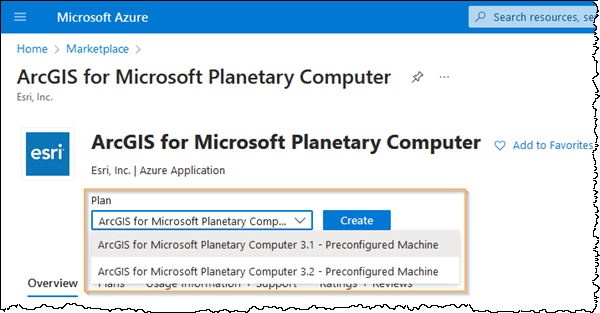
The tabs at the top of the Create ArcGIS for Microsoft Planetary Computer window are Basics, Virtual Machine Settings, Management Settings, and Review + create. This is the configuration sequence you will follow as you proceed through the template.
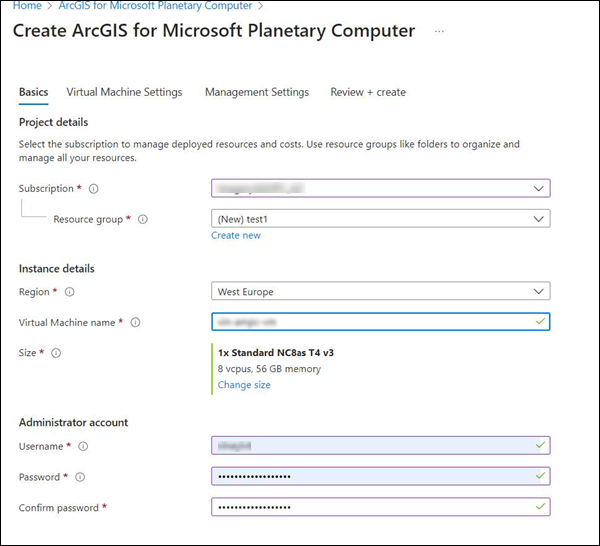
Basics tab
On the Basics tab, set up the ArcGIS for Microsoft Planetary Computer offering. Under Project details, choose the subscription to manage deployed resources and cost.
Set the subscription
To set the subscription, complete the following steps:
- Choose the Azure subscription to use for the VM in this project.
This is also the account that will be billed by Microsoft for use of this instance.
- Choose a Resource group value.
This is usually defined by an administrator for accounts with predetermined permissions or policies. You can also create a Resource group value.
To organize and manage all your resources, use the resource groups as you use folders.
Set the instance details
Under Instance details, the Regions option is not selectable. Because the Planetary Computer data catalog resides only in the West Europe region, creating and using a VM in the same region eliminates latency in data transfer and removes data movement charges.
To set the instance details, complete the following steps:
- Provide a name for the VM.
A predefined name is set by default.
Tip:
It can be helpful to include some metadata in the name for easy differentiation, such as user_gpus_project. If you have multiple machines, you can individually track their usage.
- For Size, set a value.
The default size (NC8as T4 v3) is an 8-core 56 GB RAM dedicated GPU instance. Some analysis tasks may require a higher level of compute resources, while other tasks may not require such a level of compute resources. To adjust compute resources, click Change size and choose a compatible size.
Tip:
It is recommended that you start with a smaller size for exploring your data because you can increase the size of your GPUs at a later time but cannot decrease the size of the GPUs.
Set up the administrator account
To set up a new administrator account for the VM, complete the following steps:
- Provide your username and password.
- Click Next.
Configure the Virtual Machine Settings tab
To configure the settings on the Virtual Machine Settings tab, complete the steps below.
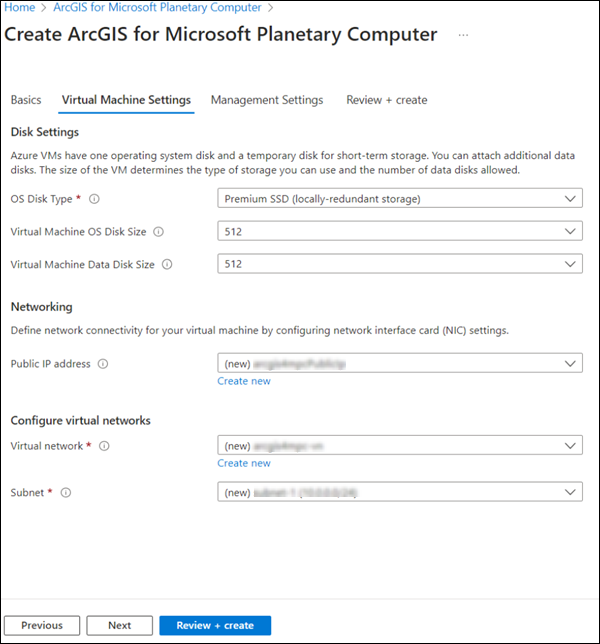
- Under Disk Settings, specify the disk type and sizes.
The default settings should be adequate for most tasks. At a later point, you can attach disks using the Azure console.
- Under Networking, set a value for Public IP address.
Unless otherwise indicated by your organization, use the default setting for this option.
System administrators can restricting the inbound IP addresses to enhance performance using the Azure user dashboard.
- Under Configure virtual networks, choose an existing network from the Virtual network drop-down list, or create a network if you have the appropriate organizational permissions.
- Specify a value for Subnet.
This is part of the virtual network configuration and should be predefined by your system administrator.
- Click Next.
Configure the Management Settings tab
To configure the management options for the VM, complete the steps below.
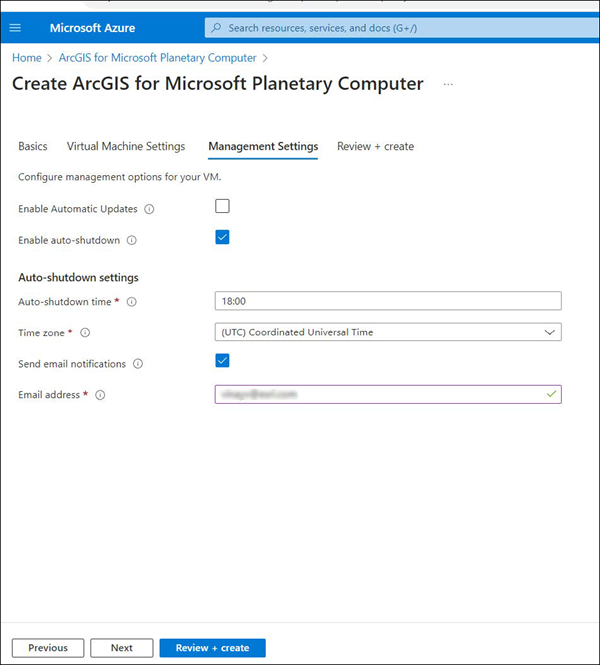
- Check the Enable auto-shutdown check box.
It is recommended that you keep this option checked. Automatic shutdown ensures that an instance does not run longer than it should, which can lead to additional compute costs.
- Under Auto-shutdown settings, provide an email address where you want to receive notifications about the instance.
- Click Review + create.
The Create ArcGIS for Microsoft Planetary Computer review window will open.
Evaluate settings on the Review + create tab
You can review the settings and confirm they are correct on the Review + create tab.
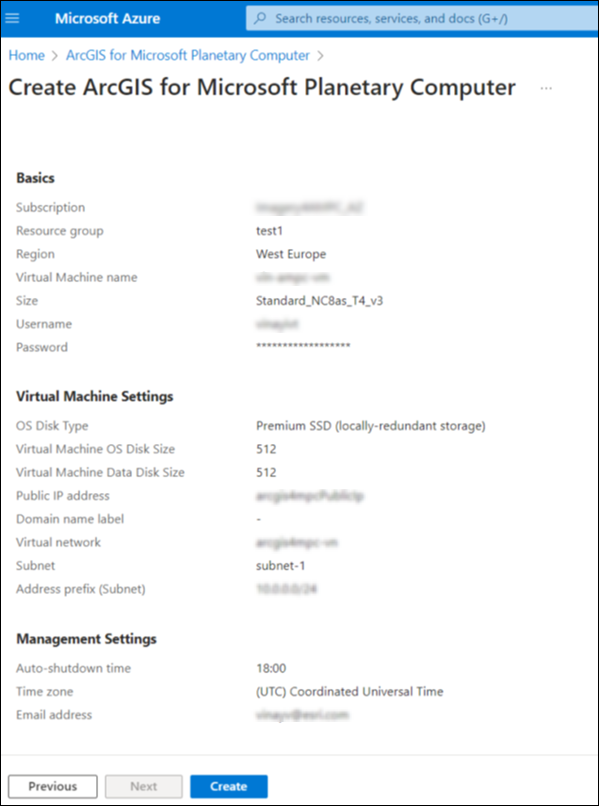
- Review and evaluate the settings in the Create ArcGIS for Microsoft Planetary Computer review window.
The settings are automatically validated by the system for any errors.
- Click Create to complete the process.
It may take several minutes for the new virtual machine to be created.
The status window is displayed. You may see many additional resources being created to support the VM.
- When your VM deployment is completed, click Go to resource group.
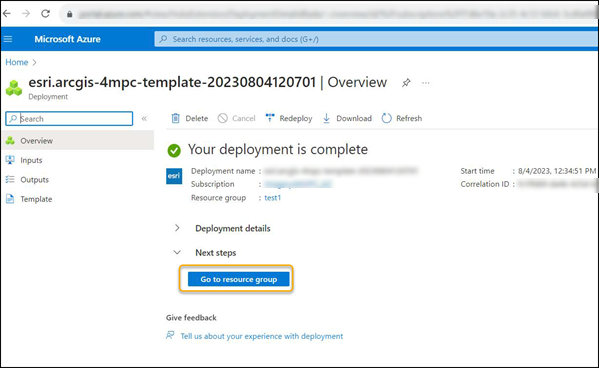
The resource group page appears.
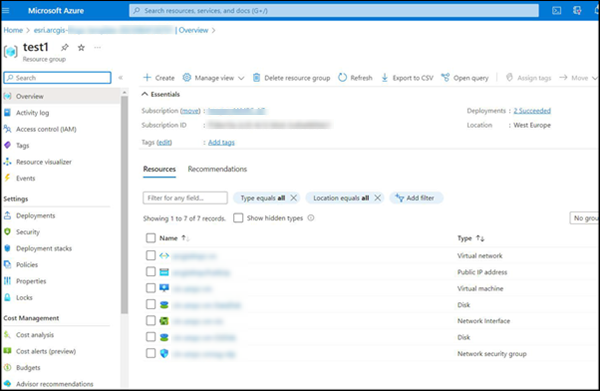
- On resource group page, click the virtual machine (ampc-gpu-8).
It’s the name you specified when creating the instance.
The dashboard appears.
- Review the information on the dashboard, where you can manage the instance, and, optionally, delete it, start it, connect to it, and so on.
- Click Connect.
The remote desktop protocol (RDP) connection file is downloaded to your local machine.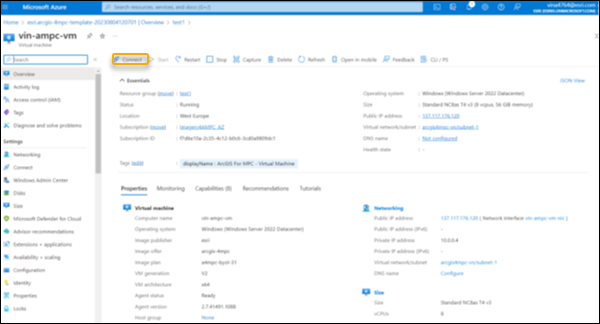
- Once the RDP connection file is downloaded, connect to the new virtual machine by keying in your Administrator credentials (username and password) that you specified when creating the instance.
Once you have connected to your VM instance, you can process and analyze datasets available on the Microsoft Planetary Computer.
Note:
When you first create a machine it will begin running, so make sure to turn off if not needed.
Start and stop the VM
You can start or stop a VM at any time. Ideally, you'll stop a machine when it is not in use to prevent additional cost, and start it when you're ready to work.
To start and stop a VM, complete the following steps:
- Browse to the Azure portal (https://portal.azure.com/).
The Azure services Resources page appears.
- Click the name of the VM.
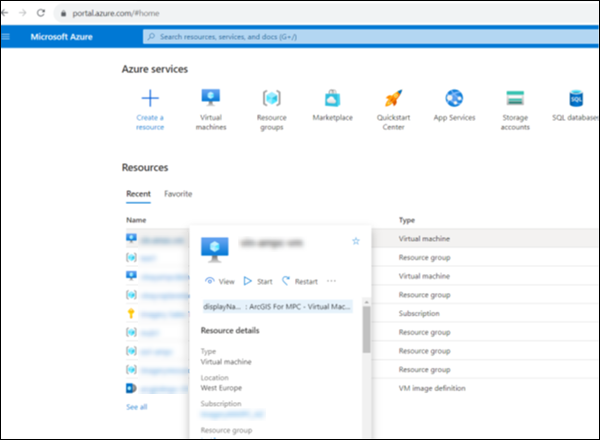
The instance dashboard (see step 6 above) appears.
Manage the VM
To manage the VM, complete the following steps:
- Browse to the Azure portal web page (portal.azure.com).
- Click Virtual Machines.
The machine you created using the VM configuration template is displayed.
- Click the instance.
A new dashboard appears where you manage the VM. You can modify settings, start the instance, delete the instance, review logs, attach disks, and so on.
Delete the VM
When you have completed your raster analysis using the ArcGIS for Microsoft Planetary Computer VM, you can delete the instance using the same portal dashboard where you started and connected to the machine.
Reset your password
If you forget your credentials to the VM, follow the steps below to reset your password.
- Browse to your Azure portal web page (portal.azure.com).
- Click Virtual Machines.
You will see the machines you created listed.
- Click the instance for which you want to reset the password.
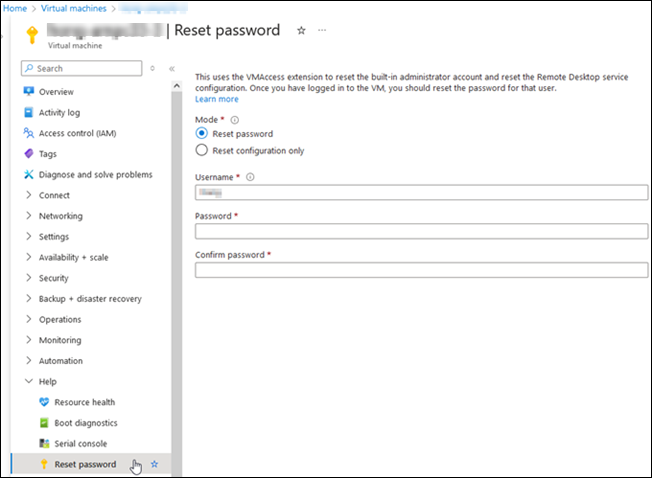
- Click Reset password under Help.
The Reset password pane appears, allowing you to reset your password for the VM.
Use ArcGIS Pro on the virtual machine
When you create an ArcGIS for Microsoft Planetary Computer virtual machine and sign in to the account, you will see what looks like a typical windows desktop configuration. However, there are still some steps to complete before you can begin your analysis.
A typical Windows desktop configuration is used with ArcGIS for Microsoft Planetary Computer. Similar to a desktop machine, ArcGIS for Microsoft Planetary Computer requires an ArcGIS Pro license. You can use your existing ArcGIS Pro license. All license types are applicable, including single user, concurrent user, and named user. The license level can be Basic, Standard, or Advanced and can include ArcGIS Pro extensions for additional processing, such as Image Analyst. The type of license you connect to this system determines the functionality that is available for processing.
The C: drive configured for the virtual machine contains two folders with specialized tools and connection files designed to work with the Microsoft Planetary Computer data.
- C:\AMPC_Resources\ACS_Files—This folder contains the pre-created cloud storage connection files (ACS) that identify the public datasets available in the Microsoft Planetary Computer Data Catalog, so they are visible in the Catalog view. These are cloud region specific, so they can only be used in this setting.
- C:\AMPC_Resources\Image_Management_Workflows—This folder contains the raster templates needed to build mosaic datasets and analyze the data catalog files within this ArcGIS Pro instance.
The C:\AMPC_Resources folder configured for the VM contains Jupyter notebook examples, specialized tools, and connection files to work with ArcGIS for Microsoft Planetary Computer data. You can make a folder connection to C:\AMPC_Resources in your ArcGIS Pro project for quick access.
The latest version of these resources can be found on the AMPC GitHub site.