


The Layer options pane can be accessed on a map by clicking the arrow  in the layer list. The options in the Layer options pane are dependent on the map type and the type of data being mapped.
Note:
Link maps have unique configurations in the Layer options pane. For information on the available configurations, see the usage notes for link maps.
Legend tab
Each layer includes a legend, which can be found on the Legend tab of the Layer options pane. The legend is interactive for all maps except heat maps, meaning any selections you make in the legend will be reflected on the map. Each entry in the legend also includes a count of features and may include category or range values, depending on the symbol type.
Null values (called <No Data> in the legend) are displayed with a gray symbol for string, number, and rate/ratio fields and are listed last on the Legend tab.
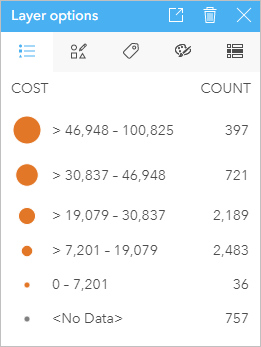
The Legend tab can be used to change the color of individual categories for unique value maps, maps with column chart symbols, and maps with pie chart symbols, or for <No Data> values. To change the color associated with a category, click the symbol and choose a color from the palette or enter a hex value.
The map legend can be added to the page as a separate card. To create a stand-alone legend, click the Pop out legend button  on the Legend tab.
Symbology tab
The Symbology tab is used to change the field and type of symbols used to style the map.
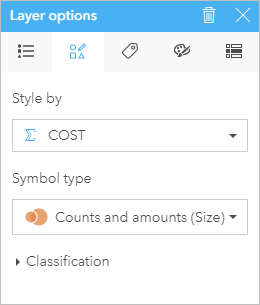
The following table summarizes the shared parameters available for multiple map types:
| Parameter | Description |
|---|---|
Style by | The Style by parameter depicts which field is being used to display the data on the map. If the map requires a statistic, such as count of features, the statistic can also be configured in the Style by parameter. This setting is available for all features with location, string, number, or rate/ratio field types. |
Symbol type | The Symbol type parameter determines how the points, lines, or areas appear on the map. Symbol type options depend on the type of features and field type being mapped. This setting is available for all features. |
Classification | Classification is the method of grouping numeric data into ranges. The classification methods include Natural breaks, Equal interval, Quantile, Standard deviation, Unclassed, and Manual. This setting is available when using the Counts and amounts (Color) or Counts and amounts (Size) symbol type. |
Binned maps and maps with column chart symbols have additional configurations on the Symbology tab. For information on the additional configurations, see the usage notes for binned maps and usage notes for maps with column chart symbols.
Style by
The Style by parameter depicts which field is being used to display the data on the map. You can use the drop-down menu to change the Style by parameter to a different field. You can also select a field from the layer being mapped in the data pane and drag the layer to the map to change the style.
Depending on the data and map type, the Style by parameter will have statistic options including sum, minimum, maximum, and average.
Any field with a location, string, number, or rate/ratio field type can be used to style a layer. Date/Time fields cannot be styled on a map.
Symbol type
Symbol types determine how symbols are rendered on a map. Options in the Symbol type parameter reflect the supported map renderers in Insights. Smart mapping defines how symbol types are shown on a map based on the type of field you are showing. The following table lists smart mapping symbol types supported by Insights, as well as the applicable field types, and the maps they produce:
| Symbol type | Features | Description |
|---|---|---|
Counts and amounts (Color) | Feature types: Points, lines, and areas Field types: Number and rate/ratio | The Counts and amounts (Color) symbol type uses graduated colors to style numeric values. The color ramp used can be either sequential or diverging:
Using Counts and amounts (Color) as the symbol type results in a choropleth map. This is the default symbol type for rate/ratio fields. |
Counts and amounts (Size) | Feature types: Points, lines, and areas Field types: Number and rate/ratio | The Counts and amounts (Size) symbol type uses graduated symbols to style numeric values. The symbol size will reflect the size of the numbers, with the smallest numbers being styled with the smallest symbols and the largest numbers being styled with the largest symbols. Using Counts and amounts (Size) as the symbol type results in a graduated symbol map. This is the default symbol type for number fields. |
Types (Unique symbols) | Feature types: Points, lines, and areas Field types: Location, string, number, and rate/ratio | The Types (Unique symbols) symbol type uses a different color for every unique value in the field being symbolized. It is most common to use Types (Unique symbols) when mapping categorical data (string fields) with relatively few unique field values. Using Types (Unique symbols) as the symbol type results in a unique values map. This is the default symbol type for string fields. |
Location (Single symbol) | Feature types: Points, lines, and areas Field types: Location | The Location (Single symbol) symbol type uses uniform symbols for all features. Styling features by location only helps you to focus on the distribution of features, rather than field values. Using Location (Single symbol) as the symbol type results in a location map. This is the default symbol type for location fields. |
Bins | Feature types: Points Field types: Location and number |
The Bins symbol type uses points in the layer to calculate and display the relative density of points on the map as a set of polygonal bins. Binned maps are styled by graduated colors. The color ramp used can be either sequential or diverging. |
Heat map | Feature types: Points Field types: Location, string, number, and rate/ratio | The Heat map symbol type uses points in the layer to calculate and display the relative density of points on the map as smoothly varying sets of colors ranging from cool (low density of points) to hot (many points). |
While smart mapping symbol types provide effective maps right away, sometimes you may want your map to use a predefined symbol type from an ArcGIS dataset (for example, an ArcGIS feature layer that shows crime incidents as point data in red). If your dataset originated from Portal for ArcGIS or ArcGIS Online, you'll see the Original symbol type. This option allows you to revert to the original symbol settings for symbol color, shape, size, and transparency.
Classification
When you map numeric data using Counts and amounts (Size) or Counts and amounts (Color), numbers are automatically grouped into classes using the natural breaks classification method. Classification allocates observations into each class and uses graduated symbol size or color to represent the classes.
Learn more about map classification
Divide by calculates a rate/ratio by dividing the number field you used to style your map by the number field you select from the list. Dividing the number field allows you to calculate a rate/ratio on the fly if your dataset doesn't already contain fields with rates, ratios, or proportions.
Note:
The Divide by parameter is not available when a map is created using a rate/ratio field.
Annotation tab
Note:
The Annotation tab is not available on heat maps or link maps.
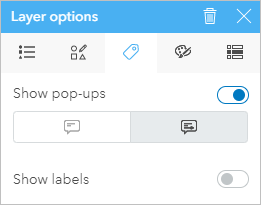
The Annotation tab is used to turn pop-ups and labels on and off.
Show pop-ups
The Show pop-ups parameter allows you to turn pop-ups on or off when hovering over features on a map. If pop-ups are on, there is an additional option to view the pop-ups with statistics (for example, minimum, maximum, and average values) or without statistics (display field and feature value only).
Show pop-ups is available on all map types except heat maps. The With statistics button  and Without statistics button
  are available for all map types except location maps and heat maps.
Show labels
Note:
Show labels is not available for heat maps, binned maps, maps with pie chart symbols, maps with column chart symbols, or link maps.
The Show labels parameter allows you to turn labels on or off for features on the map. If labels are on, there are additional options to configure the labels. The following table summarizes the label configurations:
| Setting | Description |
|---|---|
Label by | The field used to create the labels. The default Label by field is the same as the Display field. The Label by field can be a string, number, or rate/ratio. |
Font | The font variant, color, and size of the label text. Note:Labels using non-Latin characters may not support all fonts. A font name will appear in a muted color in the font menu if the font is expected to have characters missing in your current locale. If an unsupported font is chosen, the labels may appear incorrectly or revert to the default font. |
Placement | The position of the labels in relation to the labeled features. The nine placement options are a combination of horizontal alignment (left, center, and right) and vertical alignment (above, center, and below). This setting is only available for point features. |
Curve text | Turn curved label text on or off. If turned on (default), the labels follow the shape of the lines. If turned off, the labels appear straight regardless of the shape of the line. This setting is only available for line features. |
Offset | The distance between the labels and their associated features. The Offset setting includes both a horizontal offset (x) and a vertical offset (y). This setting is available for point and polygon features. For point features, the offset distance is in addition to the offset from the Placement setting. |
Show halo | Turn a text halo on or off. If turned on, you can choose the color and size of the halo. |
Visible range | The scale range at which map labels are visible. The slider shows descriptions of the scale values and the arrow beneath the slider shows the current scale of the map. By default, the labels are visible at all scales. Note:The scale descriptions are a guideline to indicate how the change in scale corresponds to the visible extent on the map. Depending on the size of the map card, the descriptions may not match exactly with the extent of the map. |
Allow overlap | Turn overlapping labels on or off. If turned on, a label is displayed for all visible features on the map. If turned off (default), overlapping labels are removed. |
Reset | Reset the labels to the default settings. |
Appearance tab
The Appearance tab is used to change the symbol style and add layer effects.
Symbols
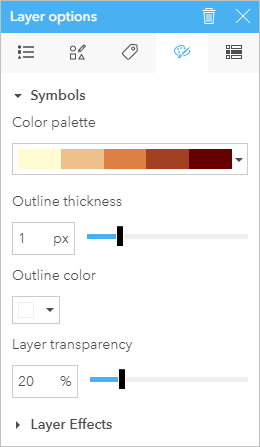
The symbol options on the Appearance tab are used to adjust the style settings, such as color, shape, and transparency. The available options depend on the symbol type and the type of features.
Maps styled with Counts and amounts (Color), Bins, and Heat map symbols support changing the color palette. To filter the color palette options (available for Counts and amounts (Color) and Bins), choose a color palette category from the drop down menu—for example, Best for dark backgrounds and Colorblind friendly—and optionally click the Reverse palettes button  to change the direction of the colors in the palette.
Layer effects
Note:
Layer effects are supported for all maps except link maps.
Layer effects are used to create eye-catching maps and draw attention to specific features. The available layer effects include bloom and drop shadow.
| Effect | Description | Settings |
|---|---|---|
Bloom | The Bloom effect adds a colored neon-like glow. It produces fringes of light extending from the borders of bright areas in a layer. This effect is useful for mapping fires, volcanic eruptions, and so on. | Bloom has the following preset options:
Bloom has the following settings:
|
Drop shadow | The Drop shadow effect makes objects look like they are floating. It applies a drop shadow that follows the outline of the feature. This effect is useful when you want some features to stand out from the rest of the features on a busy map. For example, you can apply this effect to elevate proportional symbols above the basemap and make them more legible. | Drop shadow has the following preset options:
Drop shadow has the following settings:
|
All effects | Layer effects are automatically adjusted when the map is zoomed in and out based on the map scale at the time they were set. The Base effects on current scale button recalibrates the scaling based on the current map scale. | |
Attributes tab
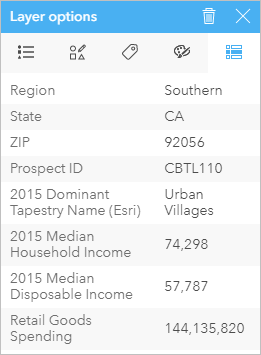
The Attributes tab is used to view a list of attributes and values for one or more features selected in the layer. The Attributes tab will only list simple attributes for selected features in the current layer.
Resources
Use the following resources to learn more: