Available with the ArcGIS Indoors Maps extension.
You can create a 3D scene to use in Indoors Viewer for exploration and navigation.
To create a 3D scene that conforms to the Indoors model, do one of the following:
- Convert the indoor layers used in the 2D map to multipatch features in ArcGIS Pro by setting the relative elevation of the units and details, and converting the facility polygon to a textured facade.
- Import a subset of 3D features using the appropriate import tool for the type of BIM data files that contain the floor plans. Use the Import BIM To Indoor Dataset tool for Revit models or the Import IFC To Indoor Dataset tool for .ifc files.
Note:
Indoors Viewer only supports 3D mode if an accompanying web map has been published. For this reason, you do not need to publish the stand-alone tables with the web scene.
Voxel layers and 3D tiles layers are not supported in Indoors Viewer.
Create a 3D scene using BIM data
You can use the Create Indoor 3D Dataset tool to create a dataset for maintaining 3D features and 2D floor plan data and import data using the Import BIM To Indoor Dataset tool for Revit models or the Import IFC To Indoor Dataset tool for IFC files. You can also append additional data from other BIM data or 2D datasets after importing data.
Note:
Indoors Viewer honors the Set Ground Elevation to Zero parameter setting for 3D scenes created from importing Revit or IFC floor plans.
To create a scene for Indoors Viewer using imported BIM data, complete the following steps:
- Start ArcGIS Pro and open the project that contains the Indoors workspace.
- On the Insert tab, click the New Map drop-down arrow, and click New Global Scene.
- Add the Levels layer and any other 2D layers you want to include.
Note:
If you've published a web map for use in Indoors Viewer, you can add these layers from the published feature service.
- Add the following 3D layers to the scene: Facilities 3D, Units 3D, and Details 3D.
Note:
If the Revit model contains multiple design options for exterior features, or exterior features were not attributed as exterior in the Revit model, the Facilities 3D layer may not meet your requirements.
You can use the rule package detailed below to create a facility shell if necessary.
- Configure the symbology for the 3D layers.
Optionally, enable edge rendering for the Details 3D and Facilities 3D layers by choosing White (use textures) with Edges for the layer in the Symbology pane.
- Configure the scene as floor aware.
- If the coordinate system of the data is not in metric units, project the data into a coordinate system in metric units by doing the following:
- Run the Project tool to project the horizontal coordinate system into a metric coordinate system such as Web Mercator (Auxiliary sphere).
- Run the Adjust 3D Z tool with the Adjust Z Value parameter set to 0 and convert the units of the vertical coordinate system from feet to meters.
- Configure the Units 3D layer, Details 3D layer, and any additional layers with indoor features as floor aware.
- Confirm that the name of the Facilities 3D layer matches one of the following naming conventions for the layer to be recognized in Indoors Viewer:
- Facilities
- Facilities Textured
- Facilities3D
- Facilities 3D
The scene is populated with 3D data imported from BIM.
Create a 3D scene by converting 2D features to 3D features
Before preparing units for 3D, the 2D features must be converted to 3D features.
To create an Indoor 3D dataset from a floor-aware scene, complete the following steps:
- Start ArcGIS Pro and open the project that contains the 2D map you prepared for use in Viewer.
- On the Insert tab, click the New Map drop-down arrow, and click New Global Scene.
- Copy all the layers, with the exception of the basemap and stand-alone tables, from the completed 2D indoor map to the scene you just created.
- Configure the scene as floor aware.
As you configure symbology for the scene, you can use the floor filter to switch between sites, facilities, and levels.
Note:
Scenes must be floor aware to be used in the Viewer app.
- Run the Create Indoor 3D Dataset tool to create a 3D dataset in the Indoors geodatabase.
The output 3D dataset must have the same spatial reference as the existing Indoors feature dataset. Features may not align correctly if the spatial reference is different.
- In the Contents pane of the scene, uncheck the WorldElevation3D/Terrain3D layer check box to turn off the Elevation Surfaces layer.
The scene is populated with 3D data imported from 2D features.
Prepare units for 3D
To prepare units for a 3D scene, complete the following steps:
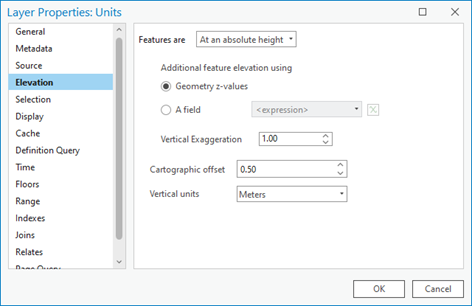
- In the Contents pane, right-click the Units layer and click Properties.
The Layer Properties dialog box appears.
- On the Elevation tab, set the Features are parameter to At an absolute height.
- Set the Additional feature elevation using parameter to Geometry z-values.
- Set the Cartographic offset parameter to 0.50 and set the Vertical units parameter to Meters.

- On the Definition Query tab, create a definition query using Where, Use Type, and does not Include the value(s), and specify field values that represent stairway or elevator units.
- Click Apply.
- Click OK.
- Run the Layer 3D To Feature Class tool by doing the following:
- For the Input Feature Layer parameter, choose the Units layer.
- For the Output Feature Class parameter, name the output file Units_Multipatch and choose the indoor 3D dataset as the output location.
The name of the Units layer in the web scene must be either Units 3D or Units. The output feature class for this step can have a different name, but the scene layer for units must have a valid name.
- Click Run.
- Remove the Units 3D or Units layer from the scene.
- Run the Append tool by doing the following:
- For the Input Datasets parameter, choose the Units_Multipatch layer.
- For the Target Dataset parameter, choose the Units 3D layer.
- For the Field Matching Type parameter, choose the Use the field map to reconcile field differences option.
- Verify that the following fields are mapped for the Field Map parameter: UNIT_ID, USE_TYPE, NAME, NAME_LONG, LEVEL_ID, and AREA_GROSS.
You can map more fields if they already exist in the Units3D feature class.
- Click Run.
- Remove the Units_Multipatch layer from the scene.
- Set the Floors property to LEVEL_ID to make the Units 3D layer floor aware.
- Enable pop-ups for the Units 3D layer.
The configured pop-ups should include all available attributes. If they don't, configure pop-ups to display the desired attributes.
The Units 3D layer is populated with data and is ready to be used in a 3D scene.
Prepare details for a 3D scene
To prepare details for a 3D scene, complete the following steps:
- Right-click the Details layer and click Properties.
The Layer Properties dialog box appears.
- On the Elevation tab, set the Features are parameter to At an absolute height.
- Set the Additional feature elevation using parameter to the Geometry z-values option.
- Set the Cartographic offset parameter to 0.50 meters.
- On the Definition Query tab, use the Where Use Type includes the value(s) definition query and specify field values that represent detail features you want to be visible as extruded features in the scene, such as walls, doors, windows, and columns.
Note:
Do not include elevators, stairs, and annotation features.
- Click Apply.
- Click OK to close the Layer Properties dialog box.
- Set the extrusion on the Details layer by doing the following:
- On the Feature Layer tab, in the Extrusion group, choose the Min Height option
 for the Feature Extrusion Type parameter.
 - Click Extrusion Expression
 .
.The Expression Builder dialog box appears.
- Type the height that you want to extrude features at in the Expression text box, and click OK.
It is recommended that you extrude features to 50 percent of the height of the level. This allows you to visualize the details on a level without the view of interior details being obstructed by walls that are the full height of a level.
- Set the Unit parameter to the appropriate unit of measure.
- On the Feature Layer tab, in the Extrusion group, choose the Min Height option
- Run the Layer 3D To Feature Class tool by doing the following:
- For the Input Feature Layer parameter, choose the Details layer.
- For the Output Feature Class parameter, name the output file Details_Multipatch and choose the indoor 3D dataset as the output location.
- Remove the Details line layer from the scene.
Note:
Leave only the Details_Multipatch and the Details 3D layers.
The Details 3D layer is populated with data and is ready to be used in a 3D scene.
Separate details into feature classes
You can separate details into multiple feature classes for more control over visualization. You can separate walls, doors, windows, and other detail features into different layers and use different symbology for each.
To separate details for walls, doors, windows, and other detail features into four separate feature classes, complete the steps below.
Note:
Alternatively, if you don't separate detail features into multiple 3D feature classes, you can run the Append tool to append detail features from the Details_Multipatch layer to the Details 3D layer using a query to include all the detail features you want to visualize as 3D.
- Run the Append tool by doing the following:
- For the Input Datasets parameter, choose the Details_Multipatch layer.
- For the Expression parameter, set the Where Use Type Includes the value(s) query and specify any field values that represent walls or columns that are not made of glass.
- For the Target Dataset parameter, choose the Walls 3D layer.
- For the Field Matching Type parameter, choose Use the field map to reconcile field differences.
The field map appears with the LEVEL_ID field mapped. Include the following additional mappings:
- Map the WALL_ID field to the DETAIL_ID field.
- Map the WALL_TYPE field to the USE_TYPE field.
You can map more fields if they already exist in the Walls3D feature class.
- Click Run.
- Set the Floors property of the Walls 3D layer to the Level ID field to make it floor aware.
- Repeat steps 1 and 2 for the Details_Multipatch layer to separate details for door features. Set the expression to include USE_TYPE field values that apply to doors, and choose the Doors 3D layer as the target dataset.
- Repeat steps 1 and 2 for the Details_Multipatch layer to separate details for windows. Set the expression to include USE_TYPE field values that apply to windows, and choose the Windows 3D layer as the target dataset.
- Repeat steps 1 and 2 for the Details_Multipatch layer to separate details for any additional features you want to visualize in the 3D scene. Set the expression to include USE_TYPE field values that represent these features, and choose Details 3D layer as the target dataset.
- Optionally, change the transparency of the doors and windows features:
- Select the layer for which you want to update the transparency.
- On the Feature layer contextual tab, in the Effects group, set the Transparency parameter to 70%.
- Remove the Details_Multipatch layer and any unused 3D layers from the scene before publishing.
3D details are organized into multiple 3D layers, populated with data, and ready to be used in a 3D scene.
Convert a facilities polygon to a 3D facade
To convert a facility polygon to a 3D textured facade, complete the following steps:
- Right-click the Facilities layer and click Properties.
The Layer Properties dialog box appears.
- On the Elevation tab, set the Features are parameter to At an absolute height.
- Set the Additional feature elevation using parameter to the Geometry z-values option.
- Set the Cartographic offset parameter to 0.50 meters, and click OK.
- Click the symbol for the Facilities layer in the Contents pane to open the Symbology pane.
The Format Polygon Symbol pane appears.
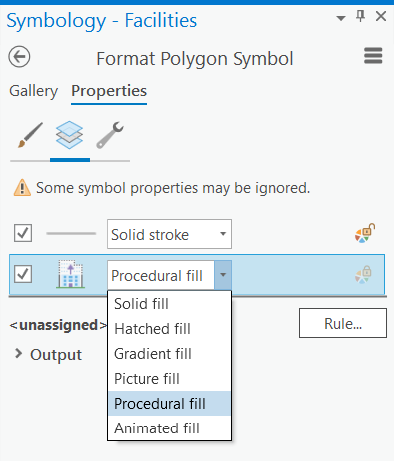
- Click the Properties tab.
- Click Layers
 and choose Procedural fill.
- Click Rule to assign a procedural rule package (*.rpk) and choose the Indoors_TexturedFacade.rpk file in the Symbology folder that is included in the Indoors product data files.
Note:
You can use your own rule package or textured multipatch building models for a more customized look and feel. The provided sample rule package uses the Relative Height and Levels Above Ground attributes to create a simple 3D textured facade, split by floor.
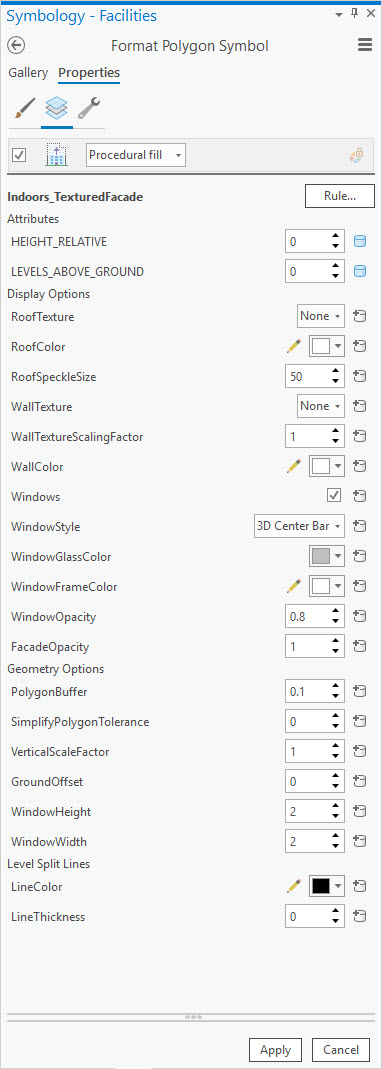
The procedural fill parameters appear. Hover over each parameter for information about how the value changes the look of the finished building facade.
In the Attributes section in the Format Polygon Symbol pane, the HEIGHT_RELATIVE and LEVELS_ABOVE_GROUND attributes are read directly from the Facilities polygon, as indicated by the database connection symbols and shown in the following image:

The Display Options section allows you to customize the roof, wall, and window styles and textures.
- Click Apply after each Procedural fill parameter change to show the result in the scene.
- In the Geometry Options section, use the options to simplify the polygon, buffer it slightly, or alter the window size.
- Click Apply to create the final 3D textured facade model.
- Run the Layer 3D To Feature Class tool by doing the following:
- For the Input Feature Layer parameter, choose the Facilities layer.
- For the Output Feature Class parameter, name it Facilities_Multipatch and place it in the Indoor3D feature dataset.
The Facilities_Multipatch layer is added to the scene.
- Run the Append tool by doing the following:
- For the Input Datasets parameter, choose the Facilities_Multipatch layer.
- For the Target Dataset parameter, choose the Facilities 3D layer.
- For the Field Matching Type parameter, choose the Use the field map to reconcile field differences option.
- Verify that the following fields are mapped for the Field Map parameter: FACILITY_ID, NAME, NAME_LONG, and SITE_ID.
You can map more fields if they already exist in the Facilities3D feature class.
- Click Run.
- Rename the Facilities 3D layer to one of the following:
- Facilities
- Facilities Textured
- Facilities3D
- Facilities 3D
Note:
The name of the Facilities 3D layer in the web scene must match one of the options above.
- Remove the Facilities polygon layer and the Facilities_Multipatch layer from the scene.
- Enable pop-ups for the Facilities Textured layer.
The configured pop-ups should include all available attributes. If they don't, configure pop-ups to display the desired attributes.
- Set the Indoor Layers properties for the scene to make the scene floor aware:
- Choose Facilities Textured for the Facilities parameter.
- Choose Levels for the Floors parameter.
The Facilities 3D layer is populated with data and is ready to be used in a 3D scene.
Enable edge rendering
Indoors units and walls can appear washed out when viewed in ArcGIS Pro or as published scene layers. To enhance the edges and contrast of multipatch features by enabling edge rendering, complete the following steps:
- For the 3D layers containing details and units features, expand the layers if necessary in the Contents pane and click the color square under the layer to open the Format Mesh Symbol pane.
- Click the Gallery tab and choose White (use textures) with Edges.
You can share the scene to your ArcGIS organization for use in the Viewer app.