In order to more easily manage the sample collections of 2005 and 2010 Oregon imagery, you'll use the geoprocessing tools included in the Managing Preprocessed Orthophotos workflow to create mosaic datasets. In this topic, you will accomplish the following tasks:
- Create a source mosaic dataset for each data collection (2005 and 2010)
- Create a derived mosaic dataset to manage the full dataset
- View the derived mosaic dataset using Time Slider
Create source mosaic datasets
You will use the Create Source Mosaic tool included in the downloaded workflow zip file to create one source mosaic dataset to manage each data collection. To streamline data management, this tool will set recommended parameters, create the mosaic dataset, build overviews, and add essential metadata to your records.
- Open ArcMap. Click
 to open the Catalog.
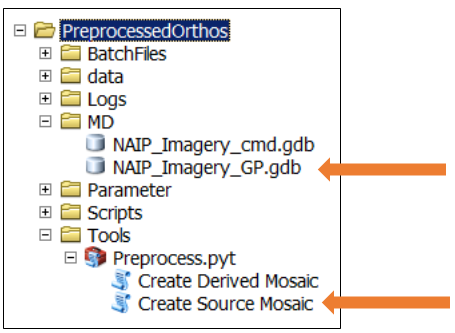
- In the Catalog, locate the NAIP_Imagery_GP.gdb geodatabase in the MD folder and the Create Source Mosaic tool in the Tools folder.
- Double-click Create Source Mosaic to run the geoprocessing tool. To create a source mosaic for the 2005 imagery, complete the dialog to match the image below . Select OK.
- Click
 to open the Spatial Reference Properties window.
 - Click the arrow
 and select Import…
 - Navigate to an image in the …/data/NAIP_2005/ folder and click Add to import the spatial reference of that image.
- Run the Create Source Mosaic tool again to create a source mosaic for the 2010 imagery, completing the dialog to match the image below. Select OK. The NAIP_Imagery_GP geodatabase now contains two source mosaic datasets, one for the NAIP 2005 imagery, the other containing the Ortho Tiles from 2010.
Note:
You can import the spatial reference of your input dataset from one of the images:

Note:
What does "Remove black edges around imagery" mean?
Orthophotos in County Compressed Mosaic (CCM) format provide imagery for a county in a single file. USDA NAIP imagery is often provided in this format. However, it also includes an irregular black border that must be removed before creating a mosaic dataset. The Create Source Mosaic tool does this automatically when you select Remove black edges around imagery.

Note:
What does "Do not trim tiles as they are edge matched" mean?
Another common orthophoto format is edge-matched tiles. Unlike County Compressed Mosaics, there is no black NoData around the edges, so the footprint is simpler and does not need to be trimmed the same way.
Create a derived mosaic dataset
The next step is to combine the two source mosaic datasets (one for each image collection) into one derived mosaic dataset.
- In the Catalog, go to the Tools folder. Double click Create Derived Mosaic to run the geoprocessing tool.
- Complete the dialog to match the image below. (You will use the same geodatabase you used to create the source mosaic datasets). Select OK.
Note:
To add input data, either navigate to the mosaic dataset by clicking  , or drag and drop the S_CountyCompressed2005 and S_TiledOrthos2010 mosaic datasets from the Catalog into the Input Data section of the tool dialog.

View the derived mosaic dataset using the Time Slider
Use the Time Slider to explore your full dataset.
- Load the derived mosaic dataset into ArcMap by dragging and dropping the D_NAIP_2_Years mosaic dataset into the map. Imagery from both 2005 and 2010 will be visible, with the more recent data collection appearing on top.
- Right click on the D_NAIP_2_Years layer in the Table of Contents and select Properties.
- On the Time tab in the Layer Properties dialog window, do the following:
- Check the box next to Enable time on this layer
- Select Year as the Time Field
- Click the Calculate button to set the Layer Time Extent (Should be 2005 to 2010)
- Change the Time Step Interval to 5 Years
- Click OK.
- Turn the Time Slider on by clicking
 .
. - Open the Time Slider Properties and set the Time Window to 0.3 Years. Click OK.
- Zoom in to an area and use the Time Slider to switch between 2005 and 2010 to explore how the landcover changed over time.


You have now created source mosaic datasets for your two orthophoto collections, and combined them into one derived mosaic dataset to make it simpler to manage your data. In the next section, you'll learn how to deploy batch files to automate this workflow.