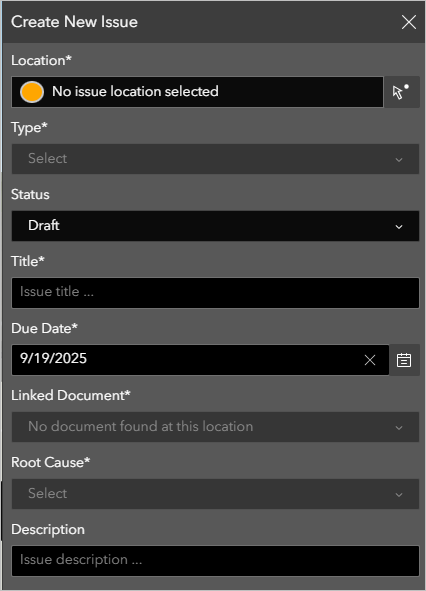
Issues are synced to your ArcGIS GeoBIM project from Autodesk Construction Cloud (ACC) using the Add Project Issues tool and are added to your ArcGIS GeoBIM project maps and scenes as point features. The Create New Issue widget allows you to create project issues within an ArcGIS GeoBIM project, and uploads them directly to the associated Autodesk project. The ability to create issues is also extended to the field through the ArcGIS Field Maps integration with ArcGIS GeoBIM.
Note:
Issue synchronization in ArcGIS GeoBIM is one way. Issues created or edited in the source ACC project are not automatically synced to ArcGIS GeoBIM. Frequently run the Add Project Issues tool to sync the latest project issues created outside of ArcGIS GeoBIM or ArcGIS Field Maps.Use cases
The Create New Issue widget allows you to perform tasks such as the following:
- View the geographical context of new issues to determine any further implications before finalizing the issue description and uploading them to ACC.
- Link to source ACC documents by placing issues on top of Document layer polygons.
- Set the Type, Status, Title, Due Date, Root Cause, and Description fields for each new issue.
Create a project issue
To create an issue in an ArcGIS GeoBIM app, complete the following steps:
- Click the Create New Issue widget
 .
.The Create New Issue widget panel appears.

- Click the Click to place issue on map button
 .
. The issue point now displays when you hover the mouse over the map or scene and is ready for placement on a Document layer polygon.
- Click a location on the map that contains a Document layer polygon to specify the issue location.
The Linked Document setting updates in the Create New Issue widget panel to show the document the issue was placed on.
Note:
If the area where you placed the issue point contains multiple overlapping Document layer polygons, click the Linked Document drop-down arrow, and select the specific document you want to link the issue to.
- Click the Type drop-down arrow, and choose an issue type.
- Optionally, click the Status drop-down arrow, and choose a status.
- Provide a name for the issue in the Title text box.
- Click the Due Date text box, and choose a due date for the issue.
- Click the Root Cause drop-down arrow, and choose the cause.
- Optionally, provide a description of the issue in the Description text box.
- Click Create.
The issue is created on the map and is added to the Issues layer in the Table widget.
The issue is also uploaded to the associated ACC project.
To view the details of the new issue and open it in ACC, see View an issue.