Note:
You need the following account and license types to use this workflow:
- Microsoft license—You need a Microsoft 365 license to use this workflow.
- ArcGIS account type—You must sign in to an ArcGIS account to add ArcGIS layer data to Excel. This functionality is available with ArcGIS member roles of Publisher, Facilitator, and Administrator.
See Layers to learn about maps and layers.
See the Esri Community blog article for more information and a video about adding an ArcGIS layer to Excel.
You can add and edit an ArcGIS Online or ArcGIS Enterprise layer attribute table in a Microsoft Excel worksheet. Any edits made to the ArcGIS layer attribute data in the Excel worksheet directly update the hosted layer in ArcGIS.
Note:
This functionality is only available for feature layers. Inserting new features to the ArcGIS layer in the Excel worksheet is not supported.
Add a feature layer or group layer to a map and an Excel worksheet
Complete the following steps to add a feature layer or group layer to a map and an Excel worksheet:
- From the map tools, click the Layers button
 .
.The Layers pane appears.
- In the Layers pane, click ArcGIS.
The Add from ArcGIS pane appears.
- Click to select a remotely hosted ArcGIS Online or ArcGIS Enterprise feature layer from the drop-down menu.
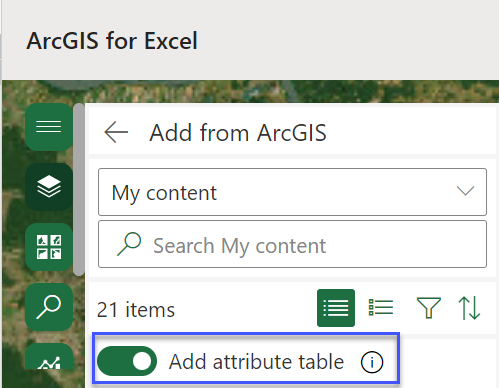
The Add attribute table toggle button is turned on by default.

If the layer added is a feature layer or a group layer with feature layers, the connected attribute table is shown and reflected in Excel with the features populating the map.
- Optionally, turn off the toggle button to prevent the attribute table from being added to Excel.
Only the map is updated with the feature layer.
View and edit single layer attributes
Complete the following steps to add and edit attributes of a single a feature layer:
- In the Layers list, click Layer options > Show layer details
 to view the layer details in ArcGIS Online.
 - On the ArcGIS Online details page, click the Data tab.
The tab shows the default Table view of the attributes.
- Click Settings and ensure that the Enable editing check box is checked in the Feature layer (hosted) section.
Note:
When editing is enabled, you can edit a remotely hosted feature layer in the Excel table.
- Add the remotely hosted feature layer to Excel.
Once you edit the table in Excel, it automatically synchronizes with the hosted layer in ArcGIS.
View and edit group layer attributes
Complete the following steps to view and edit group layer attributes:
- In the Layers list, click Layer options > Show layer details
 to view the layer details in ArcGIS Online.
 - On the ArcGIS Online details page, click the Data tab.
The tab shows the default Table view of the attributes.
- Click Settings and ensure that the Enable editing check box is checked in the Feature layer (hosted) section.
Note:
When editing is enabled, you can edit a group layer in the Excel table.
- Add the group layer to Excel.
In Excel, check a check box or boxes from the Select attribute tables widget.
- Click Add.
The attribute table for each feature layer in the group layer opens in a new, separate worksheet. All layers are added to the map at once.
- Optionally, click Cancel to exit the widget and select another feature layer or group layer.
- Optionally, click the Visualization tab in the remote web map layer to view the layers that were added to the map in Map Viewer. This is identical to your map in Excel.
Edit feature layer fields
In ArcGIS Online and ArcGIS Enterprise, all field management operations remain the same when added to the Excel worksheet. In the ArcGIS Fields view, for example, if you set Unique to Yes in the Settings table and attempt to add a duplicate value in the Excel worksheet, you may receive an error message.
Complete the following steps to edit feature layer fields:
- In the Layers list, click Layer options > Show layer details
 to view the layer details in ArcGIS Online.
 - On the ArcGIS Online details page, click the Data tab.
The tab shows the default Table view of the attributes.
- Optionally, click Settings and ensure that the Enable editing check box is checked in the Feature layer (hosted) section.
Note:
When editing is enabled, you can edit the feature layer in the Excel table.
- On the Data tab, click the Fields view next to the Table view.
In the Fields view, you can edit ArcGIS feature layer fields settings. The feature layer details, such as objectID, Description, Field Value Type, and Settings, appear in a list. You can create lists in the remote hosted layer. Different ArcGIS products have different names for this functionality, for example, Create list in ArcGIS Online and Coded value domain in ArcGIS Pro.
Once a list is created in the remote hosted layer, you can modify it in Excel. Every feature layer added to Excel can be refreshed with a layer refresh interval in the layer options. Refreshing the layer brings the latest ArcGIS updates to Excel.
ArcGIS for Excel supports ArcGIS Pro layers containing a SubType field published to ArcGIS. You can bring that field as a layer to the Excel worksheet for editing. Currently, ArcGIS for Excel does not support editing SubType group layers. You can add SubType group layers to an ArcGIS for Excel map; however, the attribute data is not added to the Excel worksheet.
Remove a hosted feature layer
Complete the following steps to remove a hosted feature layer from the Layers list:
- From the map tools, click the Layers button
 .
.The Layers pane appears.
- In the Layers pane, click the Remove button next to the layer you want removed.
The layer is removed from the map and the Excel worksheet.
Format feature layer pop-ups and labels
You can format pop-ups and labels for hosted feature layers in ArcGIS for Excel. The formatting that is added to Excel is saved in the ArcGIS Online or ArcGIS Enterprise layer automatically in real time.
