Deep learning projects can vary depending on the type of data being used, the work completed outside the app, and the desired output. Given this variability, there are three common usage patterns that exist for ArcGIS Deep Learning Studio.
Complete deep learning analysis
This usage pattern is based on the requirement that the deep learning project requires, collecting training samples, training a model, and creating output thru an inferencing tool. In this usage pattern, all of the tasks will be completed.
For this usage pattern, follow the general steps below to complete the project.
- Upload input data
Identify the data will be used in the deep learning project. Imagery data is required for the deep learning process.
Any feature data that the project requires will need to be uploaded to the ArcGIS Enterprise portal. - Create a Deep Learning Studio project.
Each Deep Learning Studio project is used to manage the deep learning process and this step creates the container for the analysis.
- Choose the task to Prepare training samples.
A complete deep learning project requires the deep learning model to be created. Since the deep learning training process requires image chips, the first step is to choose the option to Prepare training samples task.
- Configure project for training
- Choose the imagery for the project
This step allows you to choose any imagery layer that you have in your content or has been shared with you.
- Define the label schema for the samples
Create a label for each class needed for the deep learning project.
- Alter the symbology of the training samples
Change the symbology of each training label by clicking the box next to the name to differentiate the training samples and symbolize them as desired.

- Invite members to the project
For larger deep learning projects, work distribution is handled by using groups in ArcGIS Enterprise. This step allows you to specify which groups will participate in the project.
- Setup the work units for the project
The training sample collection process will be conducted on individual work units. Depending on the size of the input imagery layer, the number of work units created by default. You can configure the work units by defining a custom size for the grid cells.
Preview - Complete the configuration by saving it.
- Choose the imagery for the project
- Collect samples
- The first available work unit will be selected and the Training sample viewer will be focused on that work unit.
- Using the collection tools, collect the training samples.

- Review and approve training samples
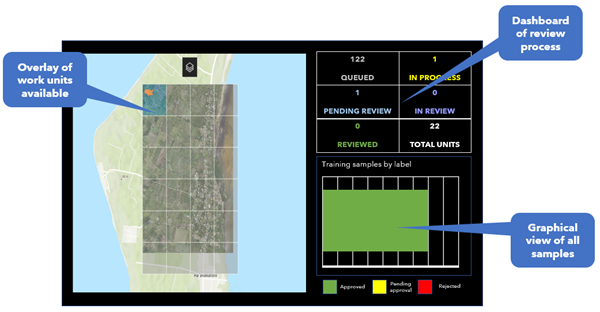
Once the samples have been created, there is a quality control measure in the project that requires the samples to be reviewed and approved. The Review Training Samples Dashboard will open showing information about all of the training samples in the project.
- Using the review dashboard, select the work unit to be reviewed.
A dialogue window with specific information about that work unit will open.

- Click Review this work unit to review the samples within the work unit.
- Approve or reject the samples individually or as bulk selection.
- Proceed through all of the training samples and when finished mark as complete.
- Using the review dashboard, select the work unit to be reviewed.
- Export image chips
Once the training samples have been approved, the next step is to export the image chips to train the model. Consider the options available within the tool to generate the desired image chips for the deep learning model.
- Train the model
Modify the parameters and create the deep learning model. Once created, the model can be published as a deep learning package for use in other applications.
- Review training model
After the model is created, there will be a graphic that indicates the comparison of training and validation rates. The report will also show examples of the ground truth compared to the predicted results.
- Use inferencing tool to create output
The inferencing tool will be either object detection, object classification, or pixel classification depending on which option was chosen during project creation. Modify the options according to your desired analysis to generate output.
Note:
The environment settings can be accessed by selecting the Settings button
.
- Review output
Once the process is complete, the output can be reviewed to determine how well the inferencing tool results meet the expectations.
Using ArcGIS Enterprise resources for deep learning
ArcGIS Enterprise raster analysis is a powerful resource when processing data. The resources available within Enterprise allow for larger areas to be processed and more intensive processes to be complete quickly. Deep learning analysis is a resource heavy process and Enterprise resources increase the performance of the analysis.
- Upload input data
Identify the data will be used in the deep learning project. Imagery data is required for the deep learning process.
Any feature data that the project requires will need to be uploaded to the ArcGIS Enterprise portal. - Create a Deep Learning Studio project.
Each Deep Learning Studio project is used to manage the deep learning process and this step creates the container for the analysis.
- Use inferencing tool to create output
The inferencing tool will be either object detection, object classification, or pixel classification depending on which option was chosen during project creation. Modify the options according to your desired analysis to generate output.
Note:
The environment settings can be accessed by selecting the Settings button
- Review output
Once the process is complete, the output can be reviewed to determine how well the inferencing tool results meet the expectations.
Update deep learning model
For some deep learning projects, there are models that have been previously created or are general models that need to be localized. This usage pattern allows for the model to be augmented with local data or created from previously collected training samples. There aredeep learning packages from ArcGIS Living Atlas of the World that can be used immediately or augmented with local data.
- Upload input data
Identify the data will be used in the deep learning project. Imagery data is required for the deep learning process.
Any feature data that the project requires will need to be uploaded to the ArcGIS Enterprise portal. - Create a Deep Learning Studio project.
Each Deep Learning Studio project is used to manage the deep learning process and this step creates the container for the analysis.
- Choose the task to Train model
This tasks opens the Model iteration tool where a new deep learning model can be trained. To setup the iteration, follow these steps:
- Choose the New Iteration button to start the training of the model.
- When prompted, choose Yes to export or register image chips.
- Depending on the project, choose the most appropriate choice and locate the data.
- The image chips registered or exported will now appear in the list.
- Click the Back button to return to the Iteration options.
- Click New Iteration button to start the process.
- Modify the settings if necessary.
- Click Start training to train the model.
- Review training model
After the model is created, there will be a graphic that indicates the comparison of training and validation rates. The report will also show examples of the ground truth compared to the predicted results.
- Use inferencing tool to create output
The inferencing tool will be either object detection, object classification, or pixel classification depending on which option was chosen during project creation. Modify the options according to your desired analysis to generate output.
Note:
The environment settings can be accessed by selecting the Settings button
- Review output
Once the process is complete, the output can be reviewed to determine how well the inferencing tool results meet the expectations.