You can explore the contents of an investigation in ArcGIS AllSource, including the entities and relationships defined in the investigation's knowledge graph. An investigation can have data loading configurations to support adding content from relational tables to a knowledge graph and also saved queries. In addition to entities and relationships, a knowledge graph can reference documents that support information recorded in the knowledge graph.
Open an investigation
You can see an overview of an investigation's contents in the catalog view and the Catalog pane in ArcGIS AllSource. This includes a list of the types of entities and relationships in the investigation's knowledge graph. However, you must open the investigation in an investigation view to fully explore, analyze, and update the contents of its knowledge graph.
By browsing into the investigation in the catalog view and the Catalog pane first, you can open the investigation view directly to the set of entities or relationships in the knowledge graph that you want to explore.
- Browse to the collection of investigations in your project.
- In the Catalog pane, on the Project tab, double-click Investigations
 .
. - In a catalog view, click Investigations
 in the Contents pane.
- In the Catalog pane, on the Project tab, double-click Investigations
- Double-click an investigation
 to see its contents in either the catalog view or the Catalog pane.
An investigation contains a knowledge graph
 , and can also contain Collections
  of saved queries, Data Loading Configurations
  , and Filtered Find Paths Configurations
  .
. - Double-click the knowledge graph
 and the Entity types knowledge graph folder
  .
.The entity types
 defined in the knowledge graph are listed.
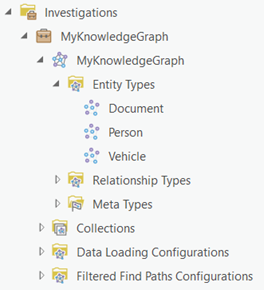
- In the knowledge graph, double-click the Relationship Types knowledge graph folder
 .
.The relationship types
 defined in the knowledge graph are listed.
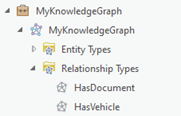
- If the knowledge graph is configured to include provenance records, double-click the Meta Types knowledge graph folder
 .
.The object defined in the knowledge graph that captures provenance
 is listed. Provenance is listed as a meta type because it provides supplemental information. Provenance records are not included by default when you search and query a knowledge graph, and they cannot be added to a link chart.
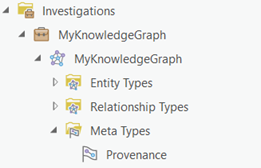
- To see the properties defined for an entity type
 , a relationship type
  , or a meta type such as provenance
  , right-click the type, point to Data Design, and click Fields
  .
.The Fields view
 opens, showing all properties of the selected type.
 - List the entities and relationships defined in the knowledge graph in the investigation view using one of the following methods:
- Right-click the investigation
 or the knowledge graph
  and click Open
  . All entities and relationships in the knowledge graph are listed.
 - Right-click Entity types
 or Relationship Types
  and click Open
  . All entities or relationships in the knowledge graph are listed.
 - Right-click an entity type
 or a relationship type
  and click Open
  . All entities or relationships in the knowledge graph of that specific type are listed.
- Right-click the investigation
The investigation view opens and the selected contents of the knowledge graph's content are listed.
Browse the contents of a knowledge graph
The investigation view allows you to see the types of entities and relationships defined in the knowledge graph's data model, and list the entity and relationship instances that have been created. You can also define new types of entities and relationships in the data model, create instances of entities and relationships in the knowledge graph, and update properties for existing entities and relationships.
If provenance is enabled for the knowledge graph, you can add provenance records that define the source of information stored in properties of entities and relationships. Provenance records can be accessed from the entity or relationship they describe, or you can explore the collection of provenance records in the investigation view.
View entity and relationship types in the Contents pane
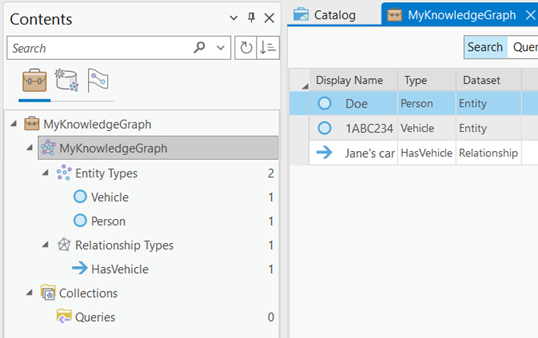
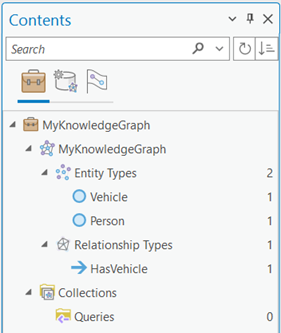
The Contents pane allows you to explore entity types and relationship types in the knowledge graph  . The total number of entities and the total number of relationships present in the knowledge graph appears next to the Entity Types
  and Relationship Types
  headings. The total number of instances that exist for individual entity types
  and relationship types
  appears next to that type.
An investigation's Contents pane has at least two tabs. The types of entities and relationships for which instances exist in the knowledge graph are listed on the By Type tab  ; this tab is selected by default.
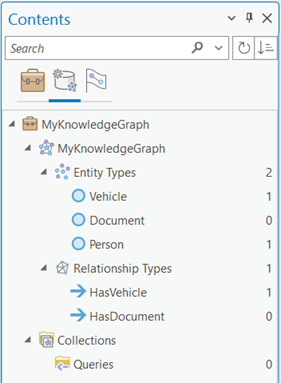
The Data Model tab  lists all types of entities and relationships defined in the knowledge graph's data model, including types for which no instances exist yet in the graph.
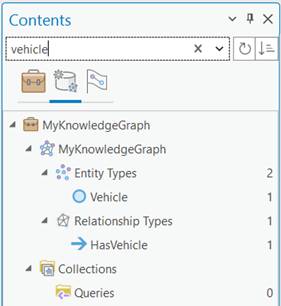
If you are working with a complicated knowledge graph, you can search for specific entity and relationship types with the Search text box at the top of the Contents pane. As you type, the list of entities and relationships is filtered to include only types whose names match your text.
Click the Sort button  next to the Search text box to change the order in which the entity and relationship types are listed.
View entities and relationships in the investigation
The knowledge graph is selected by default in the investigation's Contents pane. The status bar at the bottom of the view shows how many items are listed. Basic properties for each item appear in columns.
- Display Name—Each instance of an entity or a relationship is identified using the value in this column. For example, entities might be identified by name if a name property has been defined for the given entity type. If a name or similar property isn't available, entities and relationships are identified by their Globally Unique Identifier (GUID).
- Type—These values indicate the type of entity or the type of relationship represented by the item as determined by the data model.
- Dataset—These values indicate whether the item is an entity or a relationship.
By default, the first 1,000 items are listed. You can choose to include all items in a category, or select a few items and show only the selected items in the list.
- Click Entity Types
 or Relationship Types
  in the Contents pane.
The number of entities or relationships of all types that are listed is indicated in the status bar.
- Click a specific type of entity or relationship in the Contents pane.
The number of instances of the specific entity type or relationship type that are listed is indicated in the status bar.
- Click the Rows drop-down list and click All.
If there are more than 1,000 entities or relationships of the selected type in the knowledge graph, all instances will be listed. Alternatively, you can click in the drop-down list and type the number of entities or relationships you want to retrieve, such as 2,000, and press Enter.
Note:
If it takes too long to list all instances, you can stop building the list by clicking the busy indicator at the bottom of the contents list. When ArcGIS AllSource is finished generating the contents list, the busy indicator stops and you see the Refresh View button
 .
. - Press Ctrl and click several instances of entities or relationships to select them.
The status bar in the investigation view is updated to indicate how many items are selected.
- Click the Show selected records button
 to include only selected entities in the list.
View provenance records
If provenance is enabled for the knowledge graph, the Contents pane also has a Provenance tab  that lets you explore provenance records. Each provenance record defines the source of a property value. Each property of an entity or relationship can be associated with many provenance records.
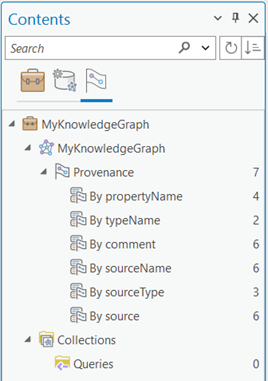
You can explore provenance records by selecting the different headings in the Contents pane. The heading names are determined when the knowledge graph is created, based on how provenance record properties are configured. When you click a heading, a summary of the values associated with each provenance record's property is listed in the investigation view.
- On the Provenance tab
 in the Contents pane, click the Provenance
  heading in the list.
The total number of provenance records in the knowledge graph is listed next to the heading.
By default, the first 1,000 provenance records are listed in the investigation view. The current number of provenance records listed in the investigation is indicated in the status bar. Basic properties for each provenance record appear in the list.
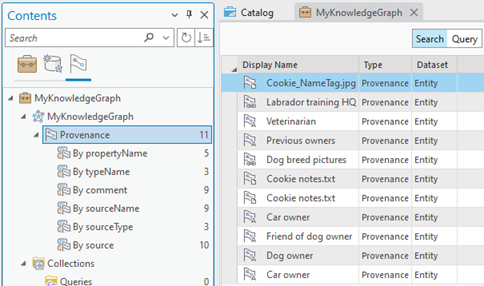
Each provenance record is identified using the value in the Display Name column. It shows the record's sourceName property value. The icon next to the display name indicates if the source associated with the provenance record is a document
 , a URL
  , or text
  .
. - Click a heading associated with one of the provenance record's properties such as the By sourceName heading
 . The following headings are available by default.
By propertyName
When this heading is selected, the name of each entity or relationship property with a provenance record is listed in the investigation, along with a count of the provenance records associated with that property. The default name for this provenance record property is propertyName. The total number of properties associated with provenance records is listed in the Contents pane next to the heading.
By typeName
When this heading is selected, the name of each entity type or relationship type with a provenance record is listed in the investigation, along with a count of the provenance records associated with that type. The default name for this provenance record property is typeName. The total number of entity and relationship types associated with provenance records is listed in the Contents pane next to the heading.
By comment
When this heading is selected, all comments are listed in the investigation along with a count of the provenance records associated with that comment. The default name for this provenance record property is comment. The total number of unique comments in all provenance records is listed in the Contents pane next to the heading.
By sourceName
When this heading is selected, all source name values are listed in the investigation, along with a count of the provenance records associated with that source name. The default name for this provenance record property is sourceName. The total number of unique source names in all provenance records is listed in the Contents pane next to the heading.
By sourceType
When this heading is selected, all source type values are listed in the investigation, along with a count of the provenance records associated with that source type. The default name for this provenance record property is sourceType. The total number of unique source types in all provenance records is listed in the Contents pane next to the heading.
By source
When this heading is selected, all source values are listed in the investigation, along with a count of the provenance records associated with that source. The default name for this provenance record property is source. The total number of unique sources is listed in the Contents pane next to the heading.
The values associated with each provenance record's property are listed in the investigation view, along with a count of the provenance records associated with the property.
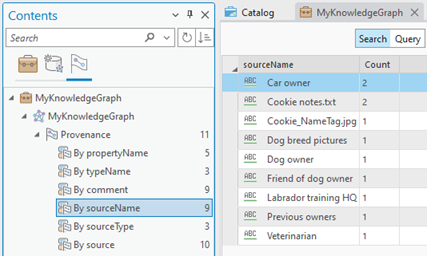
- Click a property value in the investigation view's contents list.
By default, the first 1,000 provenance records associated with the property value are listed in the details panel. The current number of provenance records listed in the investigation view is indicated under the list.
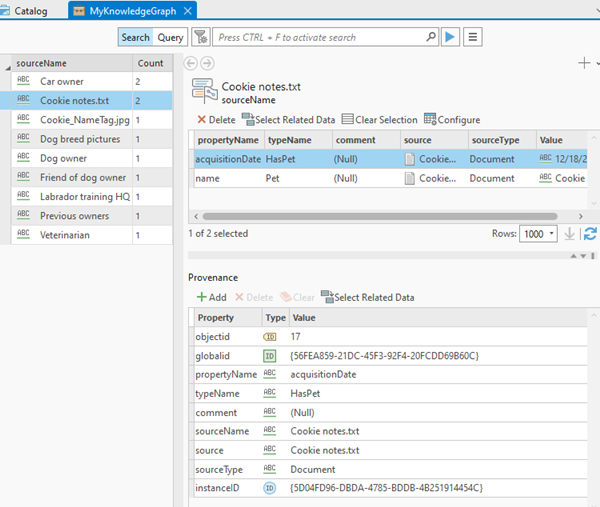
- Click one or more provenance records in the list at the top of the details panel.
The properties associated with the selected records are listed at the bottom of the details panel. If many provenance records are selected, values are displayed for each property if all selected records have the same value. Text such as (Different Values) appears if any selected provenance record has a different value for a given property.
Reopen the Contents pane
The Contents pane is open in every new project by default. However, if it has been closed, you can reopen the pane from the ribbon.
- Click the View tab on the ribbon.
- In the Windows group, click Contents
 .
.
Get recent updates
When you open a project that includes an investigation, the data model represented in the Contents pane and the data in the contents list reflects the current state of the knowledge graph. If the knowledge graph is edited by someone else, the list of entity types and relationship types in the Contents pane and the list of entities and relationships in the investigation may be out of date. How you get recent updates depends on how the data in your knowledge graph is managed.
If you previously added data from your knowledge graph to a map or a link chart, those knowledge graph layers are not updated to reflect the current status of the knowledge graph. Add new entities and relationships of interest to a map or a link chart by selecting them and adding them to the other view.
Get updates for hosted knowledge graphs and ArcGIS-managed data
As others on your team update data in the knowledge graph, your queries and searches will always return the most recent results. However, the results you get may not match the data model types listed in the investigation's Contents pane, or the histograms representing the knowledge graph in the Search and Filter pane, or the properties listed in the details panel.
- Update individual views and panes to reflect the current data model and data as needed using any of the following methods.
- In the Contents pane, click the Refresh button
 next to the Search text box.
 - Click the Refresh View button
 at the bottom of the investigation's contents list, the details panel, or the Search and Filter pane.
- In the Contents pane, click the Refresh button
- On the Investigation tab, in the Tools group, click Refresh All
 to update the data and the data model for your knowledge graph at once.
Note:
This button is not available if the knowledge graph uses a NoSQL data store with user-managed data.
The entity types and relationship types in the Contents pane, the contents list in the investigation, and the histograms in the Search and Filter pane are all updated in one step.
Get updates for user-managed data
As others on your team update data in the Neo4j database, the information used by ArcGIS AllSource to communicate with the database goes out of date. ArcGIS AllSource can list new entity types and relationship types, and queries will return the most recent data. However, histograms and searches won't know about new types or new properties and won't include new data.
A warning symbol appears in the investigation's Contents pane to indicate an entity type or a relationship must be updated. Similarly, a warning symbol appears in the investigation's details panel to indicate a property is out of sync.
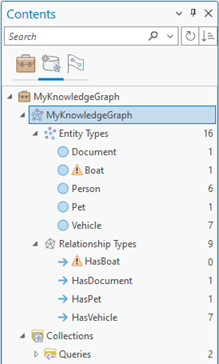
On the Investigation tab, in the Tools group, click Synchronize Data Model  to update the information maintained by ArcGIS Knowledge about the data and the data model in your Neo4j database.
Note:
This button is not available if the knowledge graph uses a hosted graph store or a NoSQL data store with ArcGIS-managed data.Explore various parts of the investigation at once
The same investigation can be displayed in multiple investigation views. For example, you can look at the instances of a Person entity type in one investigation view, and look at the instances of a HasVehicle relationship type in another investigation view. Each view associated with the same investigation has access to all the investigation's content. If you add a new HasPet relationship type to the investigation in one view, it is immediately available in the other view as well.
- In the investigation's Contents pane, right-click an entity type and click Open
 .
.The investigation opens. The entity type is selected in the Contents pane and entities of this type are listed.
- Click the original investigation's tab to make it active.
- Click a relationship type in the Contents pane.
Relationships of this type are listed.
Each investigation provides a different view of the knowledge graph's content.