Disponible con licencia de Business Analyst.
Business Analyst Enterprise comes with geocoding data for workflows such as place searches and batch geocoding of point locations. An address locator for the USA is provided and can be published and shared as a geocode utility service in your organization.
Check with your organization's license administrator or Esri Customer Service if you do not have both StreetMap Premium for ArcGIS Pro and ArcGIS Enterprise StreetMap Premium authorization file.
These new locators are only supported in ArcGIS Pro and ArcGIS Enterprise, use in ArcMap is not supported. Business Analyst Enterprise users will receive authorization files for StreetMap Premium for ArcGIS Pro and StreetMap Premium for ArcGIS Enterprise.
Nota:
All data needed for street address geocoding and network analysis are included with the 2019 USA data bundle for Business Analyst Enterprise on My Esri.
StreetMap Premium for ArcGIS product downloads for Pro and Enterprise may appear in your My Esri list. These files are not needed and should not be downloaded. Please follow the steps for downloading the street data below.
Authorizing the Geocoding Data for ArcGIS Pro
The USA address locator is available for geocoding in ArcGIS Pro if you are licensed for the proper regional StreetMap Premium extension (North America). Upon purchase of Business Analyst Enterprise an authorization code for StreetMap Premium for ArcGIS Pro is made available through My Esri.
See Enable a StreetMap Premium extension and Review license information in ArcGIS Pro for additional licensing information.
Nota:
If your account in ArcGIS Pro has not been provisioned with the StreetMap Premium North America extension, a red exclamation point will appear next to the country locator name in the Catalog pane under Project > Locators. In the Locate pane under Settings the country locator name will also be unavailable. See Enable a StreetMap Premium extension for information on how to have your ArcGIS Pro account set up with a StreetMap Premium for ArcGIS extension.
Downloading the geocoding data
- On the My Esri site, click My Organizations then click Downloads.
- Verify that you are in the Products section. In the Quick Search text box, enter Business Analyst or Business.
- Look for ArcGIS Business Analyst Enterprise with 2019 U.S. Data and ensure the version is 10.7.1. Click View Downloads.
- Click the Download Components tab then click Data and Content to expand the list of files.
The geocoding data consists of one file.
- Locate ArcGIS Business Analyst Enterprise 2019 Geocoding Data (U.S.A) and click Download.
- In the Esri Download Manager dialog, click Click to download your file now.
The Destination Folder for Files dialog will appear.
- Keep the default location or click Browse to choose a different location to save the file.
Authorizing the geocoding data for ArcGIS Enterprise
To publish a Geocode service to ArcGIS Enterprise, the StreetMap Premium North America extension must be authorized for ArcGIS Server. Upon purchase of Business Analyst Enterprise, an authorization code is provided through My Esri.
To install the authorization, follows the steps below:
- Sign into My Esri and navigate to My Organizations > Licensing > View Authorizations.
- In the Quick Search text box, type Business Analyst.
The results below are populated with all Business Analyst products available.
- In the Version drop-down menu select 10.7 - 10.7.1 to filter the results.
- Locate the Esri Business Analyst NA for Server authorization. Click the product name or the Details link to view the Authorization Number.

- Click the Authorization Number to see the details.
Copy the Authorization Number and use it to activate your license using the ArcGIS Server software authorization wizard.
Sharing the locator as a hosted service
- Extract the geocoding data locally to the machine where it will be published. Contained within the zip file is the USA locator.
- Follow the Share a locator workflow in ArcGIS Pro to publish the USA locator as a hosted service.
- Start ArcGIS Pro. In the Map view, on the Share tab, in the Share As group, click Locator and click USA.

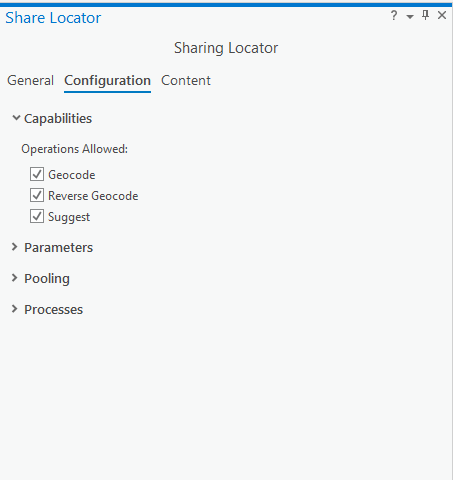
The Share Locator pane is launched.

- Click Configuration and enable all options.
Nota:
The Geocoding Data folder should be registered with the data store before publishing so that the large dataset is not copied to the server. - Check the Share with ArcGIS Enterprise check box.
Analyze, before sharing, to make sure the data is not copied to the server.
- Click Publish.
Configuring as a utility service
- Sign into the portal as an administrator and click through to Organization > Settings > Utility Services.
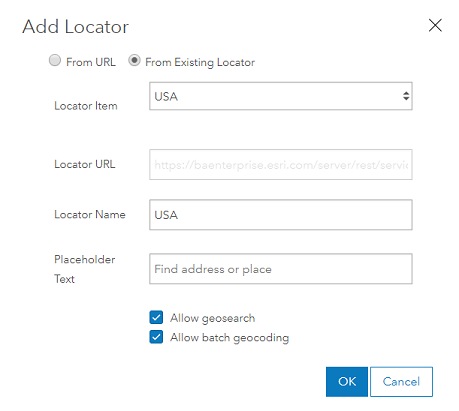
- From the Add Locator dialog:

- Select the From Existing Locator option.
- Select USA locator from the Locator Item drop-down list.
- Ensure the Allow geosearch and Allow batch geocoding check boxes are checked.
- Click OK.
Configuring a geocode utility service from ArcGIS Online
You have the option to configure your portal to use utility services from ArcGIS Online instead of publishing them to your own server. This has the added benefit of providing geocoding coverage outside the United States. If you would like to use an online geocoding service provided by Esri, you must have an ArcGIS Onlineorganizational account. The account must have credits associated with it and the correct permissions to use the utility services.
The Esri World Geocoding service provides coverage for several countries or areas and can be configured in the portal following the steps below.
- Sign in to the portal website as a member of the default administrator role in your organization.
- At the top of the site, click Organization and click the Settings tab.
- Click ArcGIS Online on the left side of the page.
- Select Geocode.
- Enter your credentials for the ArcGIS Online account to be used for the utility services.
- Click Configure.
Next step