To access the tutorial projects in ArcGIS CityEngine, open CityEngine and click Help > Download Tutorials and Examples in the main menu. After choosing a tutorial or example, the project is automatically downloaded and added to your CityEngine workspace.
This tutorial was created in collaboration with Devin Lavigne of Houseal Lavigne Associates.

CityEngine is a “Procedural Modeling Application”, meaning 2D shapes go through a series of procedures (the CGA rule file) resulting in a 3D model. The power of CityEngine lies within CGA (Computer Generated Architecture). CGA, the shape grammar of CityEngine, is a unique programming language that you can specify to generate architectural 3D content. Essentially, when CGA rules are assigned or applied to shapes, 3D models are created. The complexity of the 3D models depends on the CGA rules and the instructions within them. A simple CGA file may take a building footprint shape and extrude it to give it a 3D form or mass. While a more complex CGA rule may apply textures to the façades of the mass, or split it into other pieces generating rich, detailed 3D models.
One of the keys to writing CGA, is authoring rules incrementally and building in the functionality as you go. While it is important to have a plan for the desired outcome, you don’t author 500 lines of code and then click go. Rather you begin to incrementally build your rule, testing outcomes as you go.
This tutorial will guide you through authoring a rule that creates a series of 3D buildings from a simple footprint.
Open the scene
To start, open the BasicsOfRules.cej scene in the scenes folder of the project:

Hello, World!
In coding there is something called "Hello, World!" – a way to write a simple code that outputs a simple message so you can see the basic syntax and confirm that your code is working. A simple “Hello World!” version of this in CityEngine is a simple extrusion of random heights that applies colors to the shapes.
So to create your first rule, right-click the \rules\ folder and go to New > CGA Rule File and name the rule DetailedBuilding.cga.
To begin, add the following lines below the line of code that states the version of CityEngine you are using, for example version 20XX.X, and save your rule.
@StartRule
Footprint -->
	extrude(rand(10,100))
	color(1,1,0)
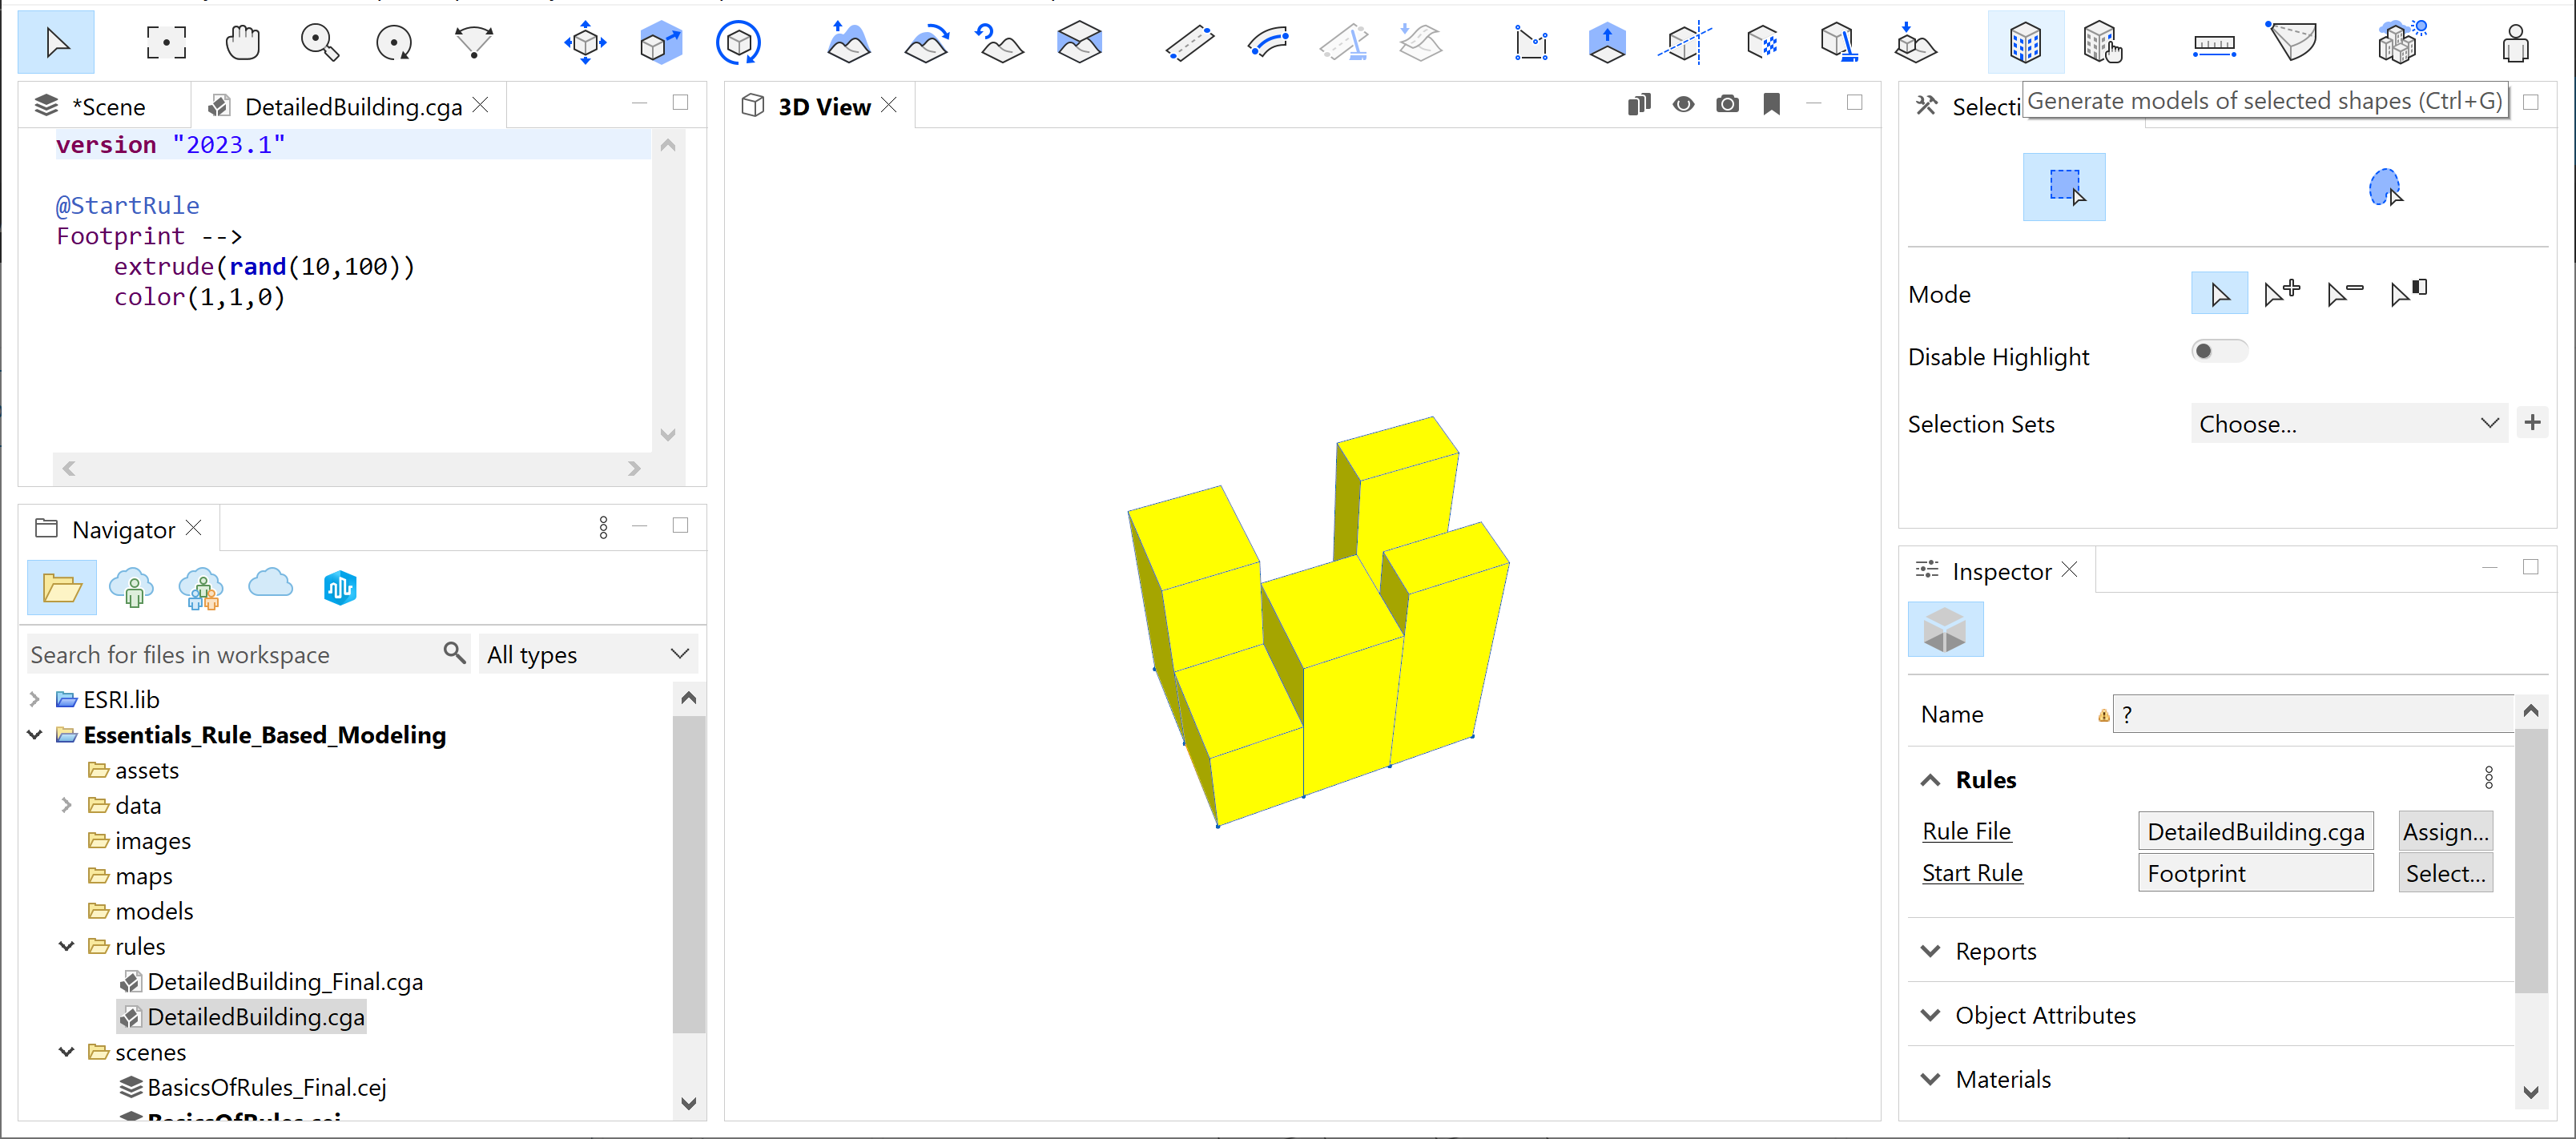
By annotating @StartRule, this makes the Footprint rule available from the picker. The next line extrudes the shape a random height between 10 and 100 meters. Finally, the last line colors the shapes yellow in RGB.
Assign the rule
After you save rule, select the shapes and assign your rule by either dragging the CGA rule file from the Navigator window directly onto the selected shapes, clicking Assign in the Rules section of the Inspector window, or clicking Shapes > Assign Rule File in the main menu. If nothing happens after you assigned the new rule, click the Generate Models tool  (Ctrl+G) or click Shapes > Generate Models in the main menu.
Add an attribute
Now that your rule is working, add the height as an attribute to give your rule some additional functionality. Remember, the key is incremental changes, so you aren’t starting from scratch, you are going to modify the rule you have already started:
@Group("Building Shell")
@Range(min=0, max=100, stepsize=1)
attr building_height = rint(rand(10,100))

@StartRule
Footprint -->
	extrude(building_height)
	color(1,1,0)
These changes moved the randomized building height to an attribute called building_height. This still generates for every shape but moves it to an attribute you can control in the Inspector window. You also added a new built-in function called rint that rounds the random number to the nearest integer.
The @Group annotation helps you organize where the attribute appears in the Inspector window. The @Range annotation controls how the slider functions. By making the building height an attribute, you now have a slider to control the height of each shape.
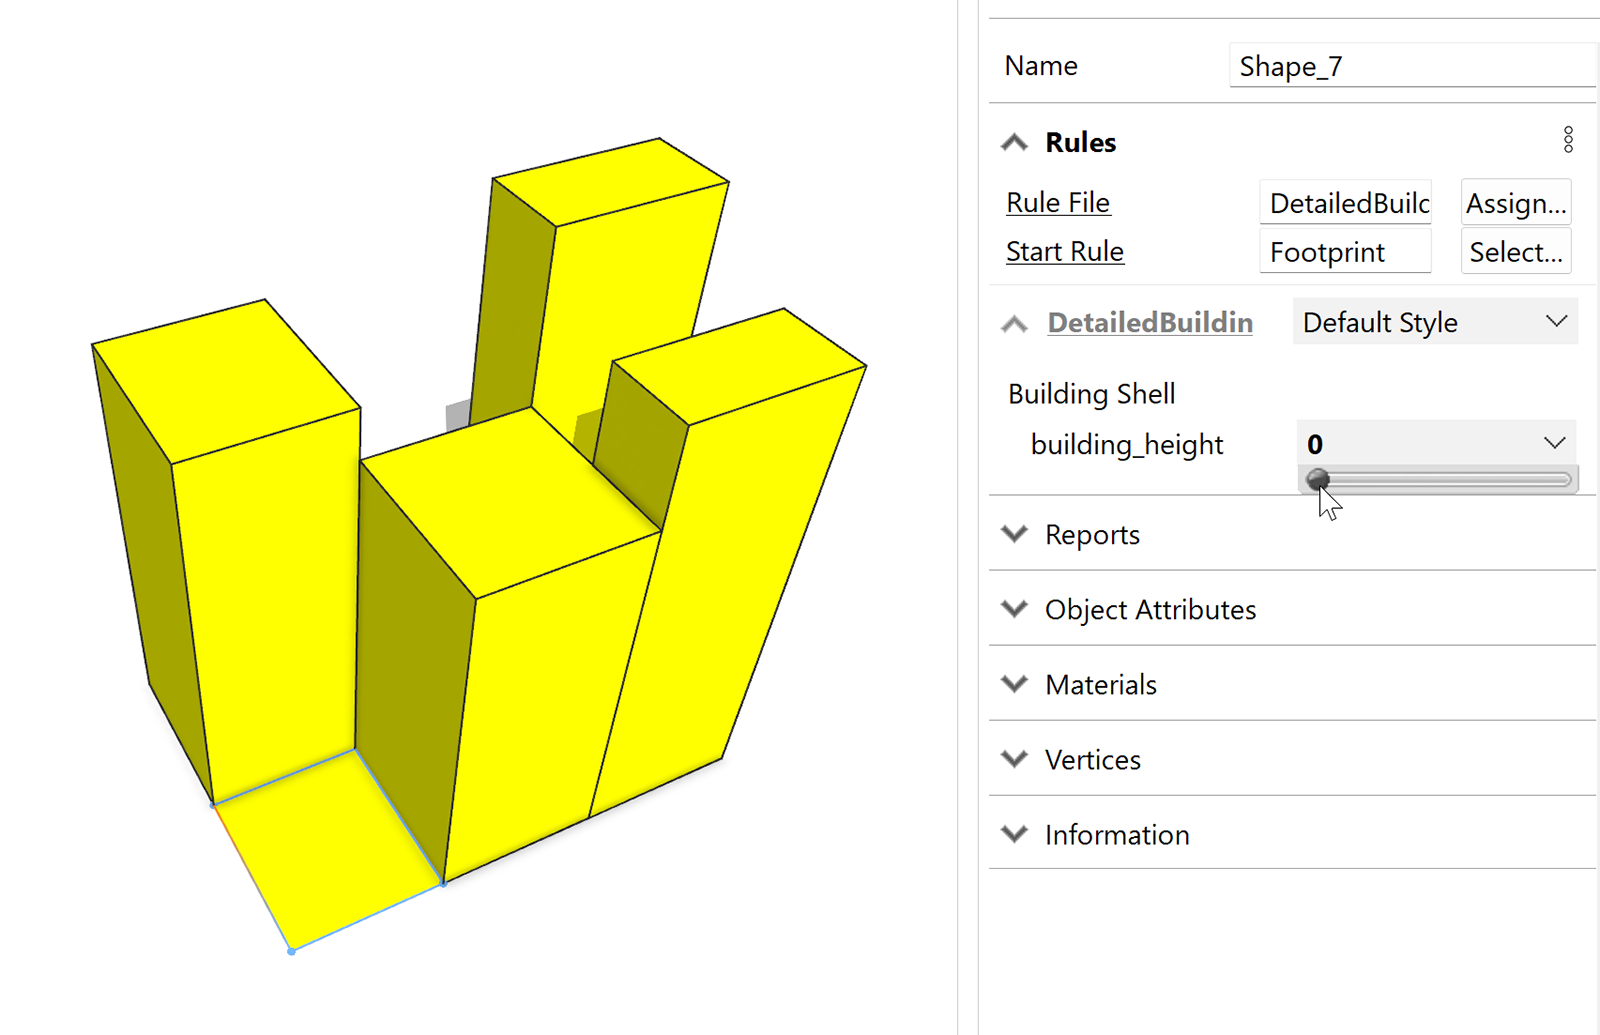
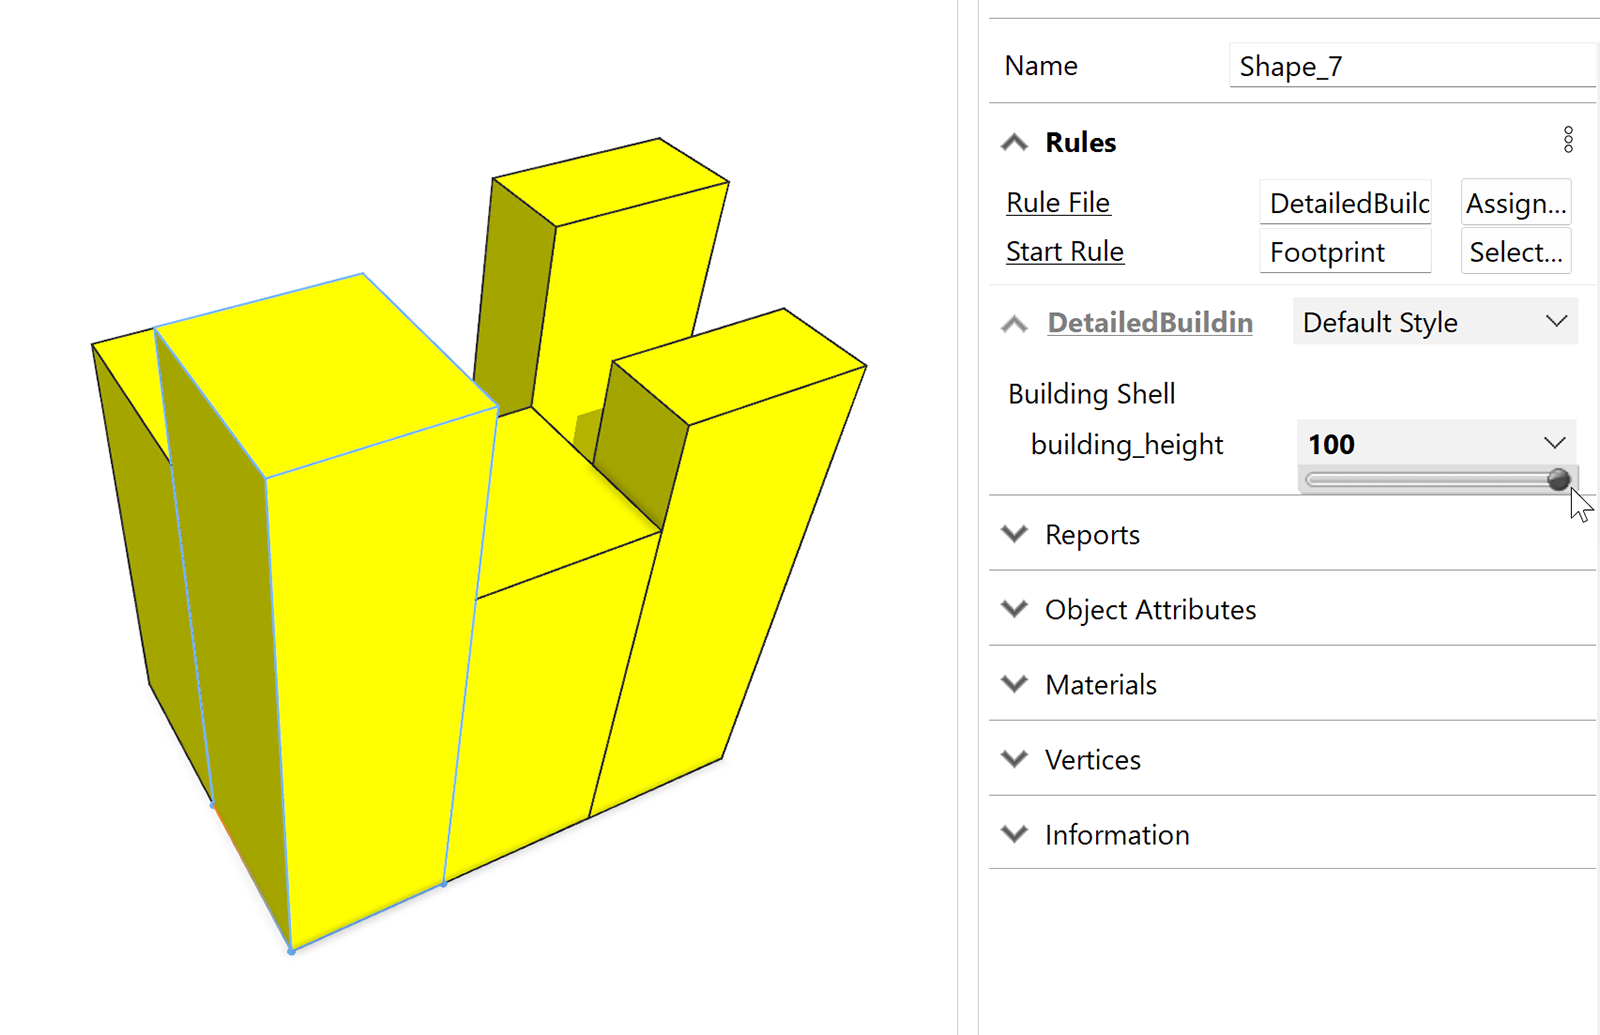
Now, if you click a building, you can adjust the height and override the random number. Also, the slider is now only between 0 and 100, the min and the max of your range.
Add handles
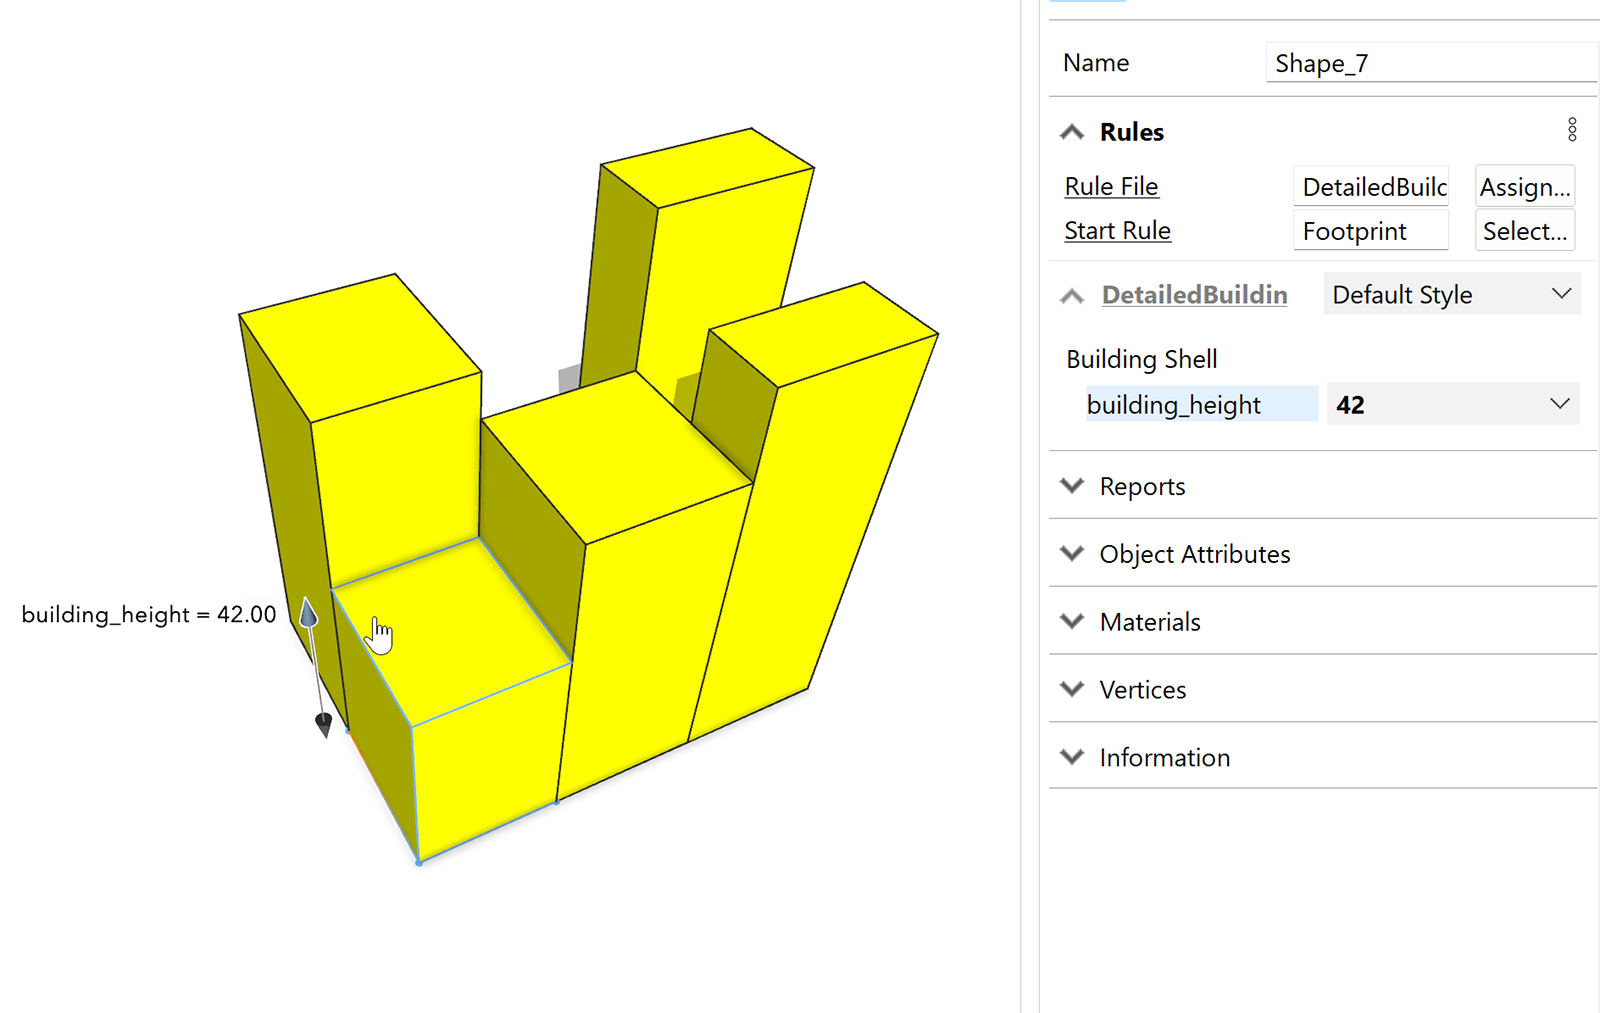
Handles expand the functionality of your attributes and bring the control into the scene in a very intuitive and interactive way.
Add the @Handle annotation and the Mass rule to include a handle that controls the height of the buildings within the model:
@Group("Building Shell")
@Handle(shape=Mass, axis=y)
@Range(min=0, max=100, stepsize=1)
attr building_height = rint(rand(0,100))

@StartRule
Footprint -->
	extrude(building_height)
	color(1,1,0)
	Mass
Remember to regenerate your models (CTRL+G) - the handles appear on your buildings allowing you to adjust the height attribute.
Add floor splits
Continuing with the incremental modification of your rule, now you will add some code to split the building vertically (along the y-axis) for every floor.
Create the Mass rule with a split operation controlled by the new floor_height attribute. Note, the default units are meters, so the code below shows 3.048 meters and the comment, denoted by the #, is just to let you know that its 10 feet.
@Group("Building Shell")
@Handle(shape=Mass, axis=y)
@Range(min=0, max=100, stepsize=1)
attr building_height = rint(rand(10,100))

@Range(min=1, max=25, stepsize=1)
attr floor_height = 3.048	# 10 feet


@StartRule
Footprint -->
	extrude(building_height)
	color(1,1,0)
	Mass

Mass -->
	split(y) { floor_height : Floor }*

You may notice that the top floor of your building has a different floor height. This is because the split starts at the bottom and splits upwards, and the top floor height is what remains after all the splits have been performed.
One way to fix this is to add a tilde character (~) in front of floor height. This tells CityEngine to use a floating size, which allows the software to adjust the split automatically. Each floor won’t be exactly 3.048 meters, but they will all be equal and there will be no left-over parts.
Mass -->
	split(y) { ~floor_height : Floor }*

Build a function for coloring by use
First, you should comment out the line in your @StartRule in which you assigned a color to the footprint. Although you can change the color multiple times as a shape is processed from rule to rule, its good practice to set a color only once.
Add the #color(1,1,0) comment:
@StartRule
Footprint -->
	extrude(building_height)
	#color(1,1,0)
	Mass
Functions are routines or chunks of code that you can use and reuse to perform a process to return a value. To colorize your floors by land-use, you can build a simple function that can be called to use the appropriate color. To do this, you will also need to create attributes to allow you to pick different land uses by floor location.
@Group("Building Shell")
@Handle(shape=Mass, axis=y)
@Range(min=0, max=100, stepsize=1)
attr building_height = rint(rand(10,100))
@Range(min=1, max=25, stepsize=1)
attr floor_height = 3.048	# 10 feet

@Group("Land Use")
@Enum("Retail","Office","Multi-Family")
attr use_ground = "Retail"

@Enum("Retail","Office","Multi-Family")
attr use_upper = "Multi-Family"
Next, between your attributes and the @StartRule, create a new function. The function below takes the use parameter and evaluates it to return the correct color for the façade. If a use parameter doesn’t match, it passes the color #FFFFFF, or white.
getColor(use) = 		case use == "Retail" : "#FF6633"
				case use == "Office" : "#6699FF"
				case use == "Multi-Family" : "#A97C50"
				else: "#FFFFFF"
Finally, you put it all together by finding the ground floor and the upper floors and then calling your function to color the floor. To differentiate the top floor from all of the upper floor splits, you use split.index and split.total which get created whenever you call a split. To do this, you will extend your code to add the Floor rule. The Floor rule first performs a conditional rule – case. If the split.index is 0, it is the ground floor, and anything else is an upper floor. Once the floor is determined, the function is called and the floor color is set.
Floor -->
	case split.index == 0:
		color(getColor(use_ground))
	else:
		color(getColor(use_upper))
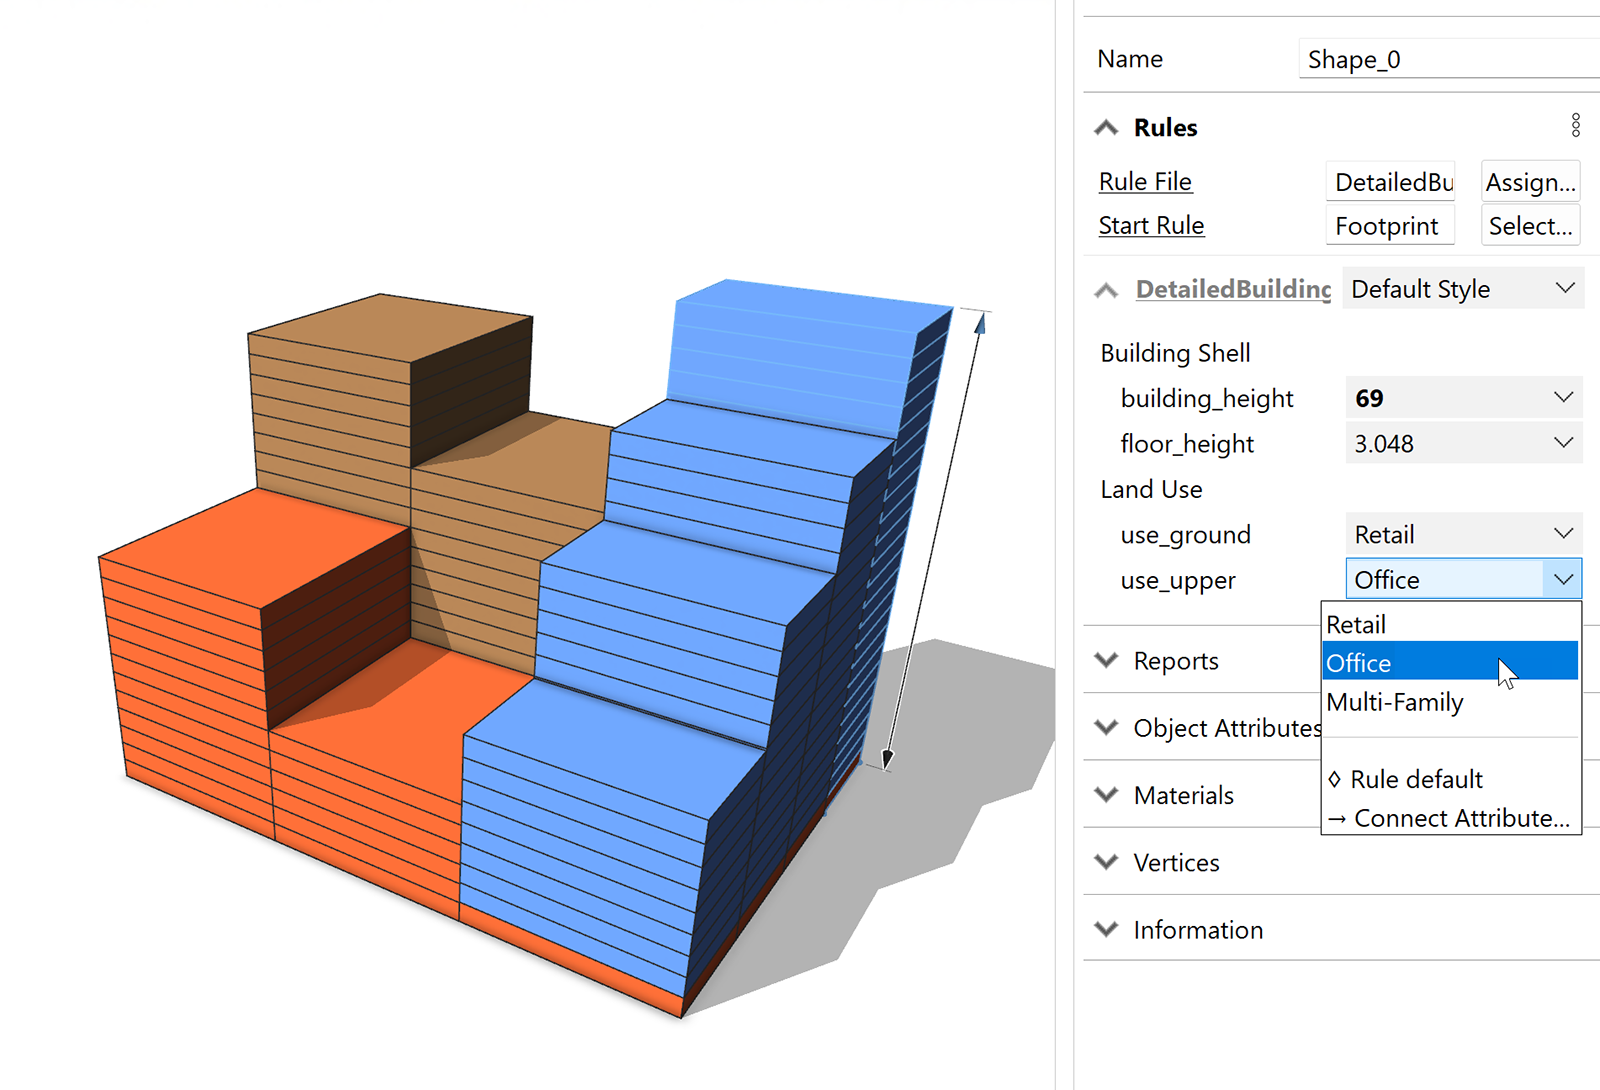
Playing around with the height and land-use attributes, you can now achieve more diverse topologies:
Create a constant
Creating constants allows you to create a static number to perform calculations against. This is helpful for several purposes, including reporting which is covered in the next part of the tutorial. The lines of code below help you calculate square feet from square meters, and the number of dwelling units in your building. But know that constants can be for anything and be placed anywhere in the code. That said, it’s a good practice to keep your constants together near the top of the page. Note, that these constants convert the CityEngine default metric values (meters) to US imperial values (feet).
const unitScale = 0.3048			# convert meters to feet
const areaScale = 10.7639			# convert square meters to square feet
const acres = 43560 			# there are 43,560 square feet in an acre
Add reports
In addition to generating 3D models, CityEngine can run and report calculations within your rules to obtain valuable data. This means that you can not only visualize your plan or development, but you can generate numerical reports – making CityEngine a powerful tool for the field of Geodesign. For example, it can include numbers, such as gross floor areas (GFA), number of units, or land-use mixes. Also, when changing a plan, including models and shapes, the reports are automatically updated.
Building on your rule, you are going to report out some data. You start simple at first, reporting only floor area. Start by modifying the Floor rule to continue it to a rule called Plate. In the Plate rule, you break the geometry into component faces (comp(f)) and then pass the bottom of your shape to a Reporting rule to calculate the geometry’s area. Note, that you need to first split out the bottom shape, otherwise your calculation includes all the surface area of every shape.
Floor -->
	case split.index == 0:
		color(getColor(use_ground))
		Plate
	else:
		color(getColor(use_upper))
		Plate

Plate -->
	comp(f) { side : Wall | bottom : Reporting | top : Top }

Reporting -->
	report("FloorArea", geometry.area)
To see the results, save the rule file (Ctrl+S), select the all the shapes (Ctrl+A), and then click Generate Models  (Ctrl+G).
Expand the Report section in the Inspector window:

This tells us there are 117 total floors, totaling 85,704.20 square meters. To convert the floor area to square feet, simply multiply the geometry.area by the areaScale constant.
Reporting -->
	report("FloorArea", geometry.area * areaScale)

Now if you wanted to find out area by land-uses, or some important and common urban planning information, like density, or floor area ratio, you can make some simple modifications to your rules, passing along land-use information as parameters. You can modify your code to pass the land-use (use_ground and use_upper) as landUse parameters to the Plate rule, which in turn, passes it along to the Reporting rule:
Floor -->
	case split.index == 0:
		color(getColor(use_ground))
		Plate (use_ground)
	else:
		color(getColor(use_upper))
		Plate (use_upper)

Plate(landUse) -->
	comp(f) { side : Wall | bottom : Reporting(landUse) | top : Top }

Reporting(landUse) -->
	report("FloorArea." + landUse, geometry.area * areaScale)

In order to calculate floor area ratio (FAR), you need to report or calculate the land area of the lot. To get this calculation add the report operation to the Footprint rule as the @StartRule.
@StartRule
Footprint -->
	report("LotArea", geometry.area * areaScale)
	extrude(building_height)
	#color(1,1,0)
	Mass

Add dashboards
Dashboards are a great way to extend the CityEngine reporting. With dashboards you can take any value reported from your rules, apply additional calculations if you’d like, and present the information with bars and charts.
Begin by clicking Window > Dashboard in the main menu.

By default, this opens the Dashboard tab in the Inspector window.
Click the Add a Chart button to open a window. Select the Pie Chart, add Land Use to the Title box, and select FloorArea.* in the Report drop- down menu. Finally, click Add Card and place in the Dashboard window canvas to add the card:

Add another card. This time select Key Number. Name the title FAR and select FloorArea.* as the report, and you will divide by LotArea. Click Add Card and add it to the canvas:
As a final step, you can add color to your charts to match the colors of the buildings on your screen. To do this, you add a second line to your Reporting rule. This calls the get color function for land-use and adds it as an attribute for your chart.
Reporting(landUse) -->
	report("FloorArea." + landUse, geometry.area * areaScale)
	report("FloorArea." + landUse + "#color", getColor(landUse))

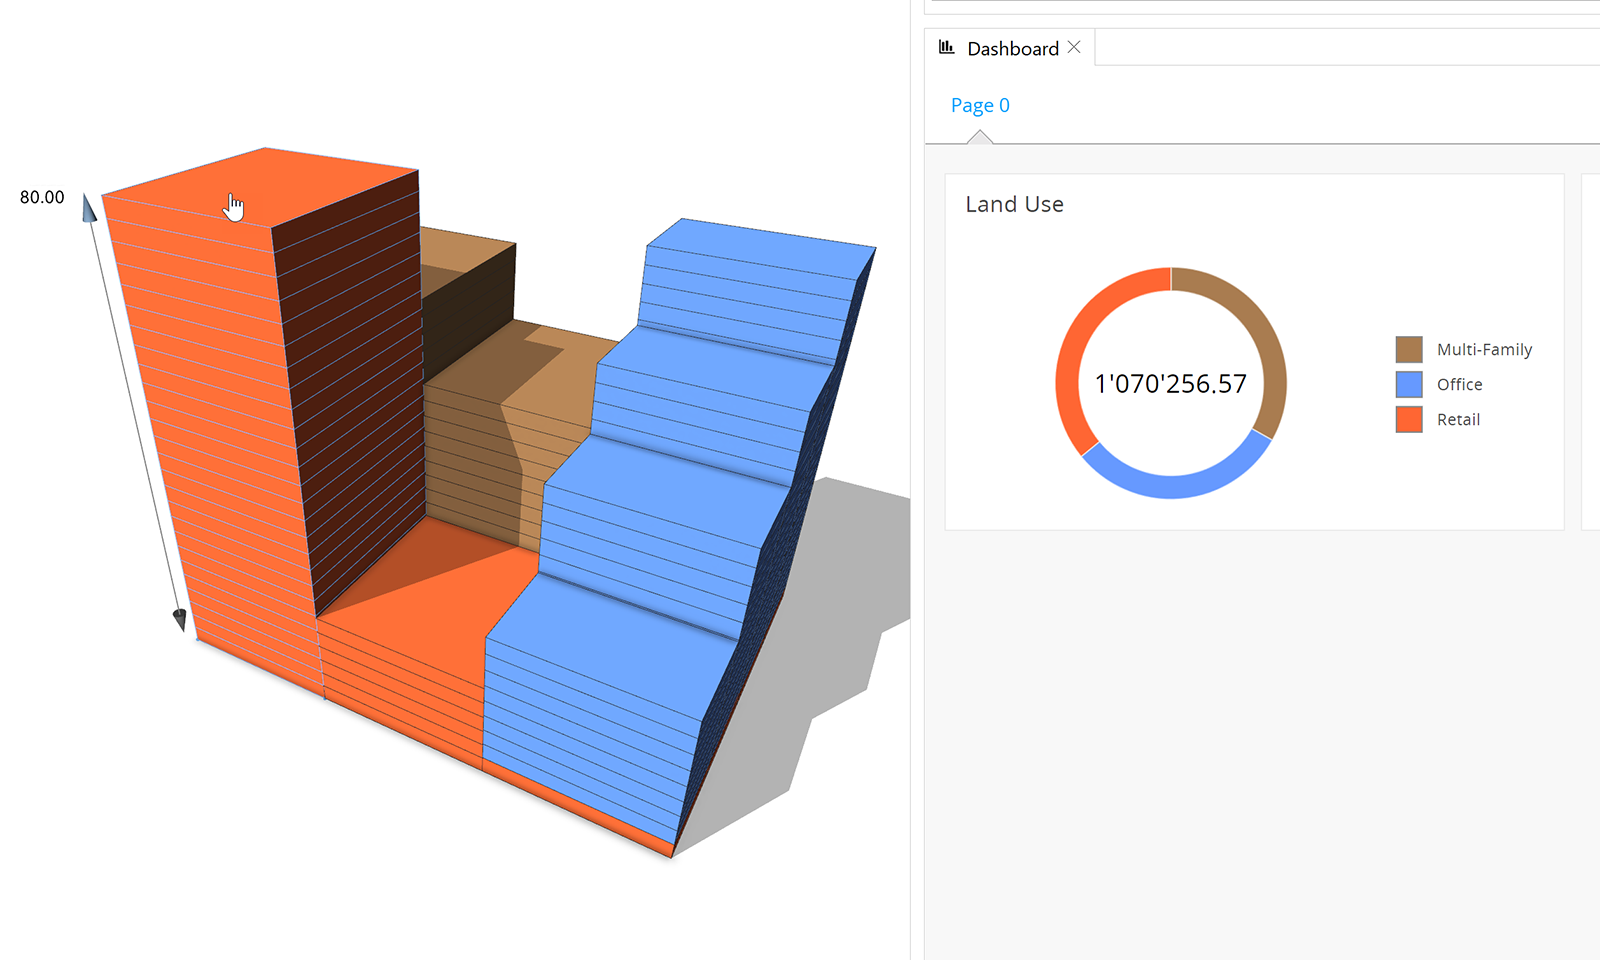
To see how powerful the dashboards can be when using CityEngine as a design tool, select a building and use the handles to change the height of a building.
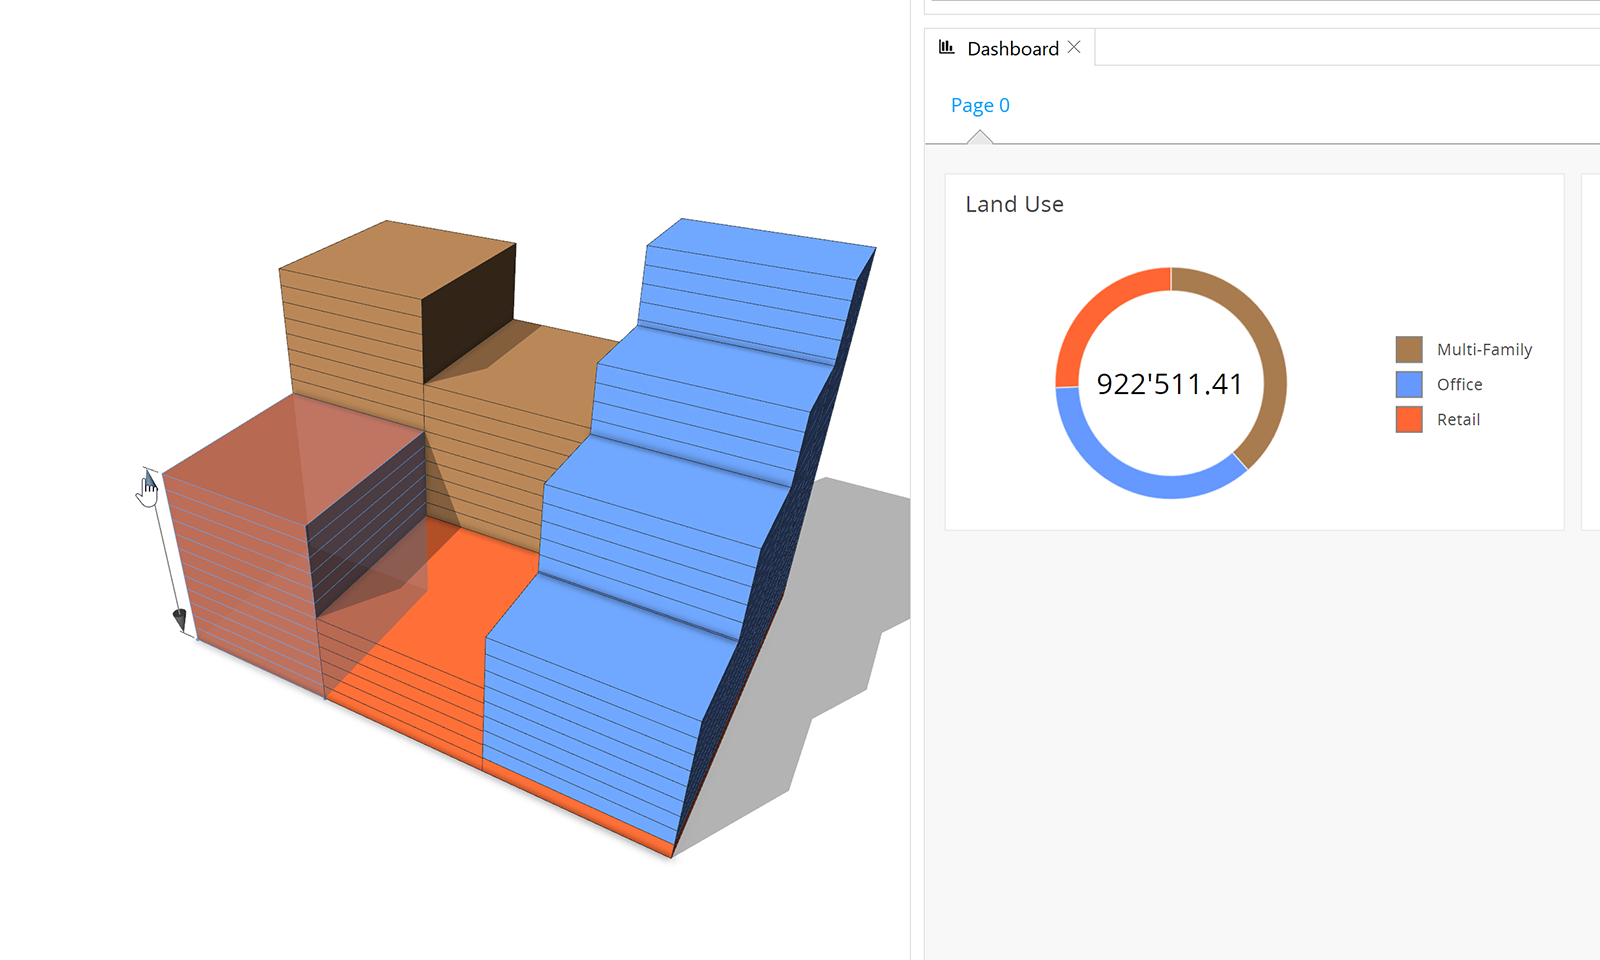
The dashboards update in real time, helping an urban planner or designer create a plan to meet local requirements or design objectives.
In this tutorial, you learned how to do the following:
- Author a rule that creates a series of buildings from a simple 2D footprint.
- Run and report calculations within your rules to obtain valuable data.
- Create dashboards that visualize report values in charts and graphs.
Be sure to check out the other Essentials tutorials: CityEngine tour, Build cities with Get Map Data, and Work with GIS data.
To continue your learning with CityEngine, see the CityEngine tutorial catalog.