The 3D Buildings solution delivers a set of capabilities that help you use existing data, develop a standard set of 3D layers, and visualize your community in an immersive way.
In this topic, you’ll learn how to use the solution by assuming the role of a user and performing the workflows below.
Note:
Use your organization's data or the provided sample data to complete the tasks included in this solution's ArcGIS Pro project.Get started
First, you will download and unzip the 3DBuildings ArcGIS Pro project.
- Sign in to your ArcGIS organization and browse to the 3DBuildings item.
- From the item page, click Download.
- Unzip the downloaded folder, and then from the unzipped folder, open the ArcGIS Pro project.
- In the Catalog pane, expand the Tasks folder.
Note:
If you do not see the Catalog pane, from the View tab, in the Windows group, click Catalog Pane.
- Expand the Tasks folder and then double-click the 3D buildings task group.
- In the Tasks pane, expand the Getting to know 3D Buildings Solution task group to see the collection of tasks.
Tip:
Click a group heading or task name to view its description at the bottom of the Tasks pane. - Double-click the Understanding the 3D Buildings Solution task.
- Double-click the Download sample data (optional) task.
- Click sample data to download sample data for Naperville, Illinois, and Philadelphia, Pennsylvania.
Using the sample data the first time will help you learn how to use the tasks and how to organize your data.
Publish ground elevation surface layer
Detailed elevation layers can be automatically generated from the input lidar data. These layers are used to create buildings and vegetation layers. The ground elevation layer can be used to enhance the existing elevation in a 3D scene.
To publish a ground elevation surface, click the Publish ground elevation surface task and follow the steps provided.
Extract elevation surfaces from LAS dataset
This task extracts three elevation surfaces from the LAS dataset: a ground elevation (DTM), a surface elevation (DSM), and a normalized surface elevation (NDSM). These surfaces are used to create buildings and vegetation layers. The ground elevation layer can also be used to improve the ground in the scene.
Publish ground elevation
This task publishes the ground elevation layer to your organization. Reprojection to Web Mercator with height in meters is only required when using the published layers in a global web scene.
Publish buildings
Buildings with simple roof structures can be generated automatically from the lidar. Attributes such as building height, eave height, and the roof form are extracted from the lidar and added to the building footprints. Procedural rules are then used to create the 3D roof structures. High-density lidar (point spacing less than 3 feet) and building footprint segmentation are needed to model complex roof structures.
Note:
The quality of the roof structures is dependent on the quality of the input lidar and building footprint data. A lidar point spacing of 3 feet or less is required, 1 foot or less is recommended. Building footprints with one roof type within their boundary (for example, suburban areas) will produce higher-quality roof structures than footprints with multiple roof types (for example, city centers). These footprints require splitting, segmentation, and updating of the roof form attributes.
To publish buildings, expand the Publish buildings group task and follow the steps provided.
Extract building footprints
Note:
This workflow is optional and doesn't need to be completed in order to work with the solution.Run the Extract building footprints (optional) task to optionally extract building footprints from lidar. It is not required if you have an accurate footprint feature class.
Preprocess building footprints
Note:
This workflow is optional and doesn't need to be completed in order to work with the solution.Run the Preprocess building footprints (optional) task to prepare the building footprints for a realistic 3D visualization. Some building footprints may contain several roof types and roof parts. To accurately represent these buildings, you must split them into their separate parts. Building footprints can be split with another feature class or by differences in elevation.
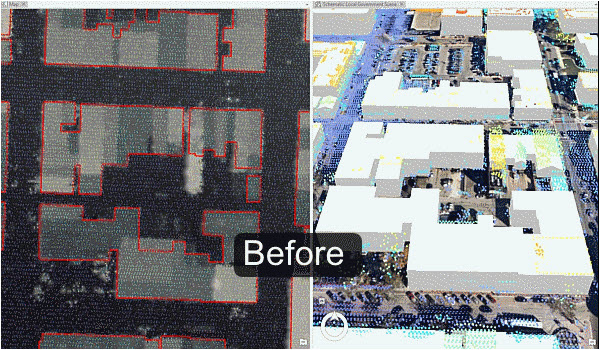
This image shows the result of building extraction before preprocessing of building footprints.
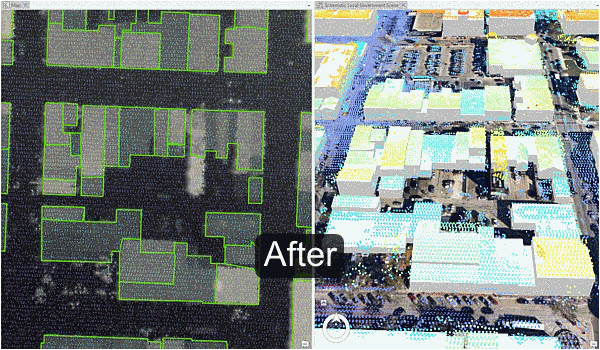
This image shows the result of building extraction after preprocessing of building footprints.
Tip:
Separate features of similar size into separate feature classes before running segmentation to improve segmentation quality. Use different spectral and spatial detail for each of these feature classes to tweak the roof segmentation for the data. Merge the feature classes when finished.
Create buildings
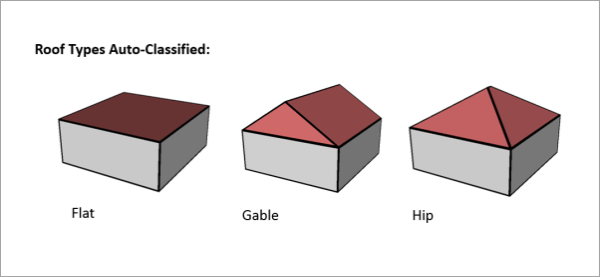
Run the Create buildings task to create a 3D building layer. This task uses the elevation surfaces and building footprints to find both flat and sloped planar areas within a roof area of a building. It estimates a standard architectural form for the roof based on the attributes collected from these planar surfaces. These attributes are then used to inform a procedural rule that generates these features in 3D.
Review buildings
Run the Review buildings task to inspect the building roof forms. The Confidence Measurement tool reports the attribute added to the building footprints.
Note:
The RMSE field shows the root mean square error of the generated building multipatch to the underlying surface model. The higher this number, the more likely that the building creation encountered an error in classification. In general, a value of 1 meter (3 feet) or less is desirable, though this depends on the required application of the output features and the resolution of the input data.
Modify buildings manually
Use the Modify buildings manually task to further improve the quality of the building roof forms. The building roof form is driven by the attributes that are generated by the Create buildings task and by the underlying the building footprint. To refine the building roof form, modify the attributes or the building footprint.
Tip:
The attributes that control the roof form are building height, eave height, the type of roof, and roof direction: BLDGHEIGHT, EAVEHEIGHT, ROOFFORM, and RoofDirAdjust, respectively. By editing these attributes, you can adjust the building models to better match the lidar data.

Building footprint attributes that control the roof form.
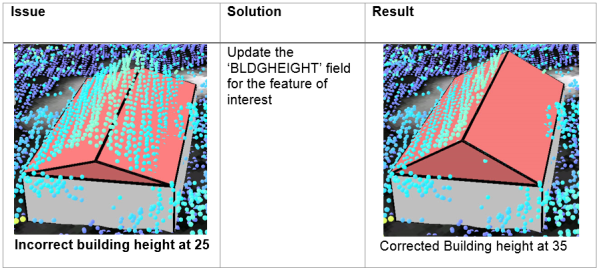
Building height
If the ridge of the building is not at the correct height, identify the elevation of a LAS point on the true ridge by clicking the LAS point while having the Explore tool active. You must subtract the BASEELEV value from the LAS elevation to get the correct BLDGHEIGHT value.
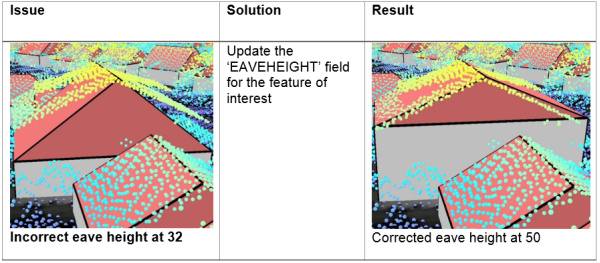
Eave height
Similar to building height, reference the lidar to obtain the correct eave height. You must subtract the BASEELEV value from the lidar elevation to get the correct the EAVEHEIGHT value.
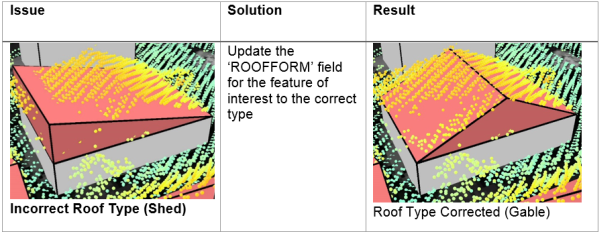
Roof form
If the roof type does not match the lidar data, change the roof type by choosing the correct roof form from the drop-down list.
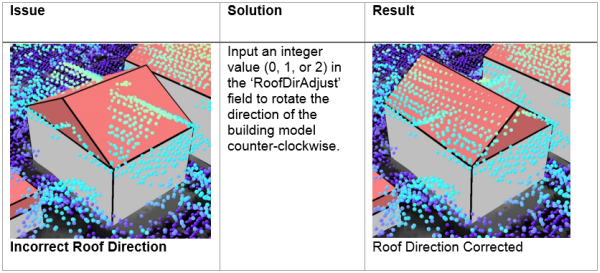
Roof direction
Adjust the direction of the roof by modifying the RoofDirAdjust field. The default value is 0. A value of 1 will rotate the roof counterclockwise 90 degrees, or a value of 2 will rotate it 180 degrees.
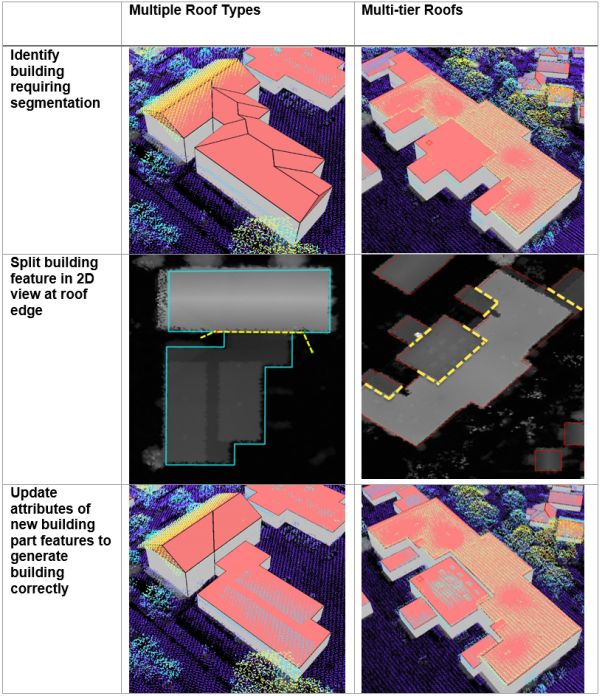
Split roof segments
Some building footprints may contain several roof types and roof parts. To accurately represent these buildings, you can split the footprints into separate features manually and update the attributes for each feature accordingly.
To edit the building footprints, complete the following steps:
- Select a feature to segment.
- Use the Modify roof segmentation tool in the Modify roof forms tools task or in the Modify Features pane to segment the selected feature.
- Edit the attributes as needed with the new sections of the building footprint.
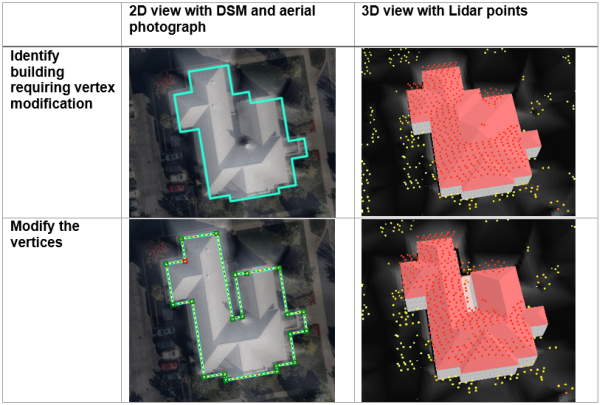
Modify building footprint vertices
Building footprints may have been created incorrectly and may not represent the building adequately, resulting in lower-quality roof forms.
To edit the building footprints, complete the following steps:
- Select a feature to modify.
- Use the Modify building footprint vertices tool in the Modify roof forms tools step or on the Edit tab to modify the selected feature.
- Edit the attributes as needed with the modified building footprint.
Create cross gable roof forms
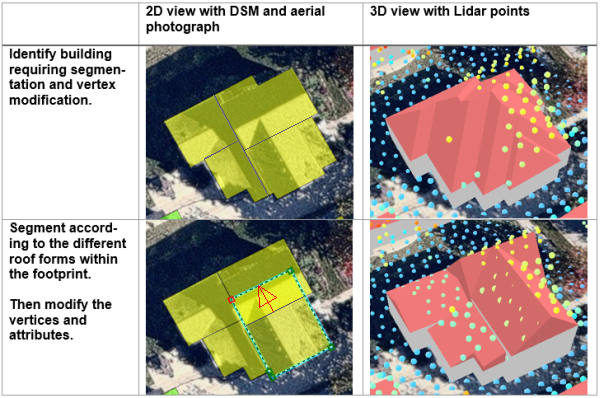
You can also use vertex editing to make cross gable roof forms. To do so, complete the following steps:
- Select a feature to modify.
- Use the Modify roof segmentation tool in the Modify roof forms tools step or on the Edit tab to segment the building footprint according to the roof forms present within the footprint.
- Use the Modify building footprint vertices tool in the Modify roof forms tools step or in the Modify Features pane to extend one gable roof into the other one.
- Edit the attributes as needed with the modified building footprint.
Fuse buildings
If you have segmented some building footprints into separate features, you can use the Fuse buildings task to fuse the building features that represent building parts back together in the resulting 3D building features.
Note:
Review and modification of buildings is done on the building footprint layer with procedural symbology. Fusing saves the modification to multipatch format for texture adding and publishing.
Add textures to buildings
Note:
This workflow is optional and doesn't need to be completed in order to work with the solution.Use this task to add realistic textures to the previously extracted buildings.
Note:
Textures depict generic usage of buildings and are applied based on footprint size. Using high-resolution textures will result in large output, potentially leading to decreased visualization performance.
Publish buildings layer
This task publishes the building layer to your organization. Reprojection to Web Mercator with height in meters is only required when using the published layers in a global web scene.
Update buildings
Note:
This workflow is optional and doesn't need to be completed in order to work with the solution.Use this task if new lidar is available. It compares an existing 3D multipatch building layer with a new lidar dataset to verify whether there are any updates required due to new construction or demolition. If changes have been detected, these can then be merged back into the original 3D building layer.
To update existing buildings, you must have the following data:
- Multipatch buildings
- Lidar with ground and buildings classified
The Update Buildings process accomplishes the following purposes:
- Detects changes between input 3D multipatch buildings and new lidar. The output is building update polygons where changes have been detected depending on the input parameters.
- Creates LOD2 update buildings using the building update polygons and the lidar.
- Merges the LOD2 update buildings with the existing 3D buildings.
Publish floors
Note:
This workflow is optional and doesn't need to be completed in order to work with the solution.Building floors can be created using the Publish floors task. The input is multipatch buildings, which can come from the Publish buildings task or from other sources such as ArcGIS CityEngine or third-party providers. The output is building floor plates and floor volumes. Floors can be created using a Building Space Use table, in which the building will be split into tiers or groups of floors, each with their own number of floors, floor height, space use, and color. Alternatively, building attributes such as number of floors, ground floor height, upper floor height, and roof height can be used to create the floors.
Note:
Splitting buildings into floors can take a long time to run, especially when the initial split failed, and a more time-intensive splitting algorithm must be used. Ensure you only split the buildings that are required. Also, factors such as building size and complexity will affect the processing time.
In the Task pane, click the Publish floors task and follow the steps provided.
Create building floors
This tool splits existing 3D buildings into floors based on building attributes. You can use the buildings created in the Publish buildings task or your own buildings.
One option to create building floors is to use the Building Space Use table to split the building into tiers or groups of individual floors with defined space use. The Building Space Use table has several attributes that describe the different tiers within the building. Each tier has an attribute defining space use, number of floors, floor color, and floor height. The BuildingTypeName attribute is the identifier that links the Building Space Use table to the building features. An example Building Space Use table can be found in the tables folder of the 3D buildings ArcGIS Pro project.
Create floor volumes
If you require floor volumes, use the Create floor volumes task to create floor volumes out of the 3D floor plates. The Extrude By Attribute geoprocessing tool requires a building feature class with space usage information that includes floor height.
Publish floors layer
This task publishes the floors layers to your organization. Reprojection to Web Mercator with height in meters is only required when using the published layers in a global web scene.
Publish integrated mesh
Note:
This workflow is optional and doesn't need to be completed in order to work with the solution.An integrated mesh is a textured continuous meshed surface capturing a current state of an area or city. They are often derived from drone, aerial, or satellite imagery by photogrammetric processing.
In the Tasks pane, expand the Publish integrated mesh group task and follow the steps provided.
Add integrated mesh
This step adds an integrated mesh to a scene. A mesh (.slpk) is typically created from photogrammetric sources, such as imagery captured by drones and processed with ArcGIS Drone2Map or Site Scan for ArcGIS. There are also several Esri partners that specialize in producing city-scale integrated mesh for purchase.
Modify integrated mesh
Use this step to make a modification to an integrated mesh layer. You can create a modification or import from an existing polygon feature layer. Mesh modifications show other 3D layers such as buildings, trees or bridges together with the integrated mesh.
Publish integrated mesh layer
This step publishes the integrated mesh layer to your organization. Reprojection to Web Mercator with height in meters is only required when using the published layer in a global web scene.
Run Share as new web scene to publish the entire scene as web scene to your organization. Remove all the layers that you don't want to publish from the scene before publishing.
Run Share as scene layer to add an integrated mesh to an existing web scene.
Modify integrated mesh in web scene
This tool modifies an integrated mesh in a published web scene without having to republish the entire mesh as a new web scene.
Publish water features
Note:
This workflow is optional and doesn't need to be completed in order to work with the solution.This task allows you to create and publish 3D water features as multipatch features and polygon features. Water features can represent flat water bodies such as lakes and coastal waters as well as rivers with a certain gradient. This task works well with flat water features and river features at city scale. Larger features with a lot of gradient result in many polygons, which may lead to performance degradation.
Create water features
This step creates water features as 2D polygons. You can skip this step if you already have a polygon feature class that defines the water features.
Modify water features
The water features must have a depth attribute that describes the average depth for each water feature. These values are used to modify the ground elevation for the area of the water features so that the water surface features display properly.
In this step, you can calculate the depth values for all water features. To use specific depth values for each water feature, open the feature attribute table and set the values manually.
Create 3D water features
This step allows you to create 3D water features from the 2D water features and a ground elevation (DTM) surface as input.
This tool outputs a multipatch layer and a polygon layer representing the 3D water level. Use the multipatch layer to visualize large areas of flooding as this format is suited for fast rendering of many features. Use the polygon layer to leverage water animation in ArcGIS Pro and the Scene Viewer.
Symbolize water features
Use this step to symbolize the water features with a water renderer.
Publish water features
This task publishes the water layers to your organization. Reprojection to Web Mercator with height in meters is only required when using the published layers in a global web scene.
Publish modified ground elevation surface layer
This task publishes a modified ground elevation surface to your organization. Reprojection to Web Mercator with height in meters is only required when using the published layers in a global web scene.
Publish 3D buildings web scene
Note:
This workflow is optional and doesn't need to be completed in order to work with the solution.These optional tasks explain how to create a web scene with the 3D layers you have created and provides a tool that combines data from a web map into a web scene.
Publish 3D buildings web scene
This task explains how combine the 3D layers published in previous tasks to create a web scene in ArcGIS Online.
Add web map to web scene
This optional task adds the layers of a web map to a web scene. This step is not necessary to complete the solution but can be helpful to quickly add other data to your 3D web scenes.
Incorporate with 3D Basemaps
Use layers created from the 3D Buildings solution with 3D Basemaps.
Use the layers from this solution in combination with any Esri hosted 3D Basemap by incorporating 3D Buildings layers directly within the scene viewer. For any 3D object, 3D Basemap, or point scene layer, you can apply spatial filters through the layer properties panel. Either select specific buildings or draw a polygon to include or exclude the buildings within. This method will create a mask in the hosted 3D Basemap, allowing your 3D data to show through.
Use the 3D layers from this solution to enhance the data for OSM Vector Basemaps and Esri Community Maps by adding or updating buildings for your areas of interest or community.