The Utility Network Package and Utility Solutions toolboxes provide tools for common workflows. These toolboxes are not shipped with ArcGIS Pro directly but they can be installed using the Package Manager by following the steps below.
Create a new project environment
To create a project environment using the Package Manager in ArcGIS Pro, complete the following steps:
-
Start ArcGIS Pro and click Settings
 .
. - On the left, click Package Manager.
- In the upper right, click the Environment Manager button
 .
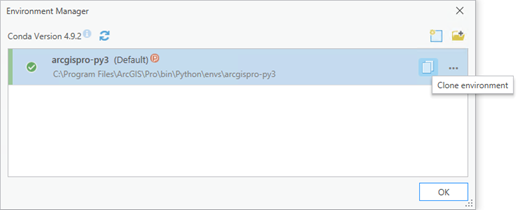
. - In the Environment Manager dialog box, locate the environment you want to clone and click the Clone environment button
 . Alternatively, click the Clone arcgispro-py3 button
  to clone the default environment.
The Clone Environment dialog box appears.
- Click the Browse button and browse to a folder to store the new environment. Alternatively, click the Destination text box and edit the default name and path.
- Click OK.
- Select the newly created environment and click the Refresh button
 to update the list of available packages.
 - Click OK to close out of the dialog box.
- Click the Active Environment drop-down arrow, and select the cloned environment.An environment is created. Next, you will install the tools.
Install the toolbox using the Package Manager
To install a toolbox through the Package Manager, complete the following steps:
- At the top of the Package Manager window, click Add Packages to see the python packages that can be installed.
- In the Search text box, type package name to find the desired toolbox. The following packages are listed below with the toolbox they correspond to.
Package name Toolbox name untools
Utility Network Package toolbox
utilsolutions
Utility Solutions toolbox
- Select a package and click Install.
- In the Install Package dialog box, review the terms and conditions, check the check box to agree, and click Install.
- Click Install to install the package.
- After the installation is complete, exit ArcGIS Pro.
The next time you start ArcGIS Pro, you can access the toolbox from the Geoprocessing pane under the Toolboxes tab.
Install tools using the Python Command Prompt
If you are unable to install the tools using the steps in the section above, this section offers the option to use the Python Command Prompt. Follow the steps below to install the tools using the Python Command Prompt.
- In the Windows Start menu, browse to the ArcGIS folder.
- Click the drop-down arrow next to ArcGIS and click Python Command Prompt to open the window.
- Verify that the first line of code displays the name of your cloned environment before continuing.
- Once confirmed, type conda install -c esri <toolname> --insecure and press Enter.
For tool name, specify either untools, utilsolutions, or dltsolutions in the command prompt.
- When the installation is complete, close the Python Command Prompt and start ArcGIS Pro to confirm that the toolbox has been added.
Install the Utility Data Management Support Toolbox
The Utility Data Management Support (UDMS) toolbox is a comprehensive suite of tools designed to enhance the management and configuration of utility networks within ArcGIS Pro.
To install the UDMS toolbox, complete the following steps.
- In a web browser, navigate to the UDMS GitHub repository.
- In the download section, click on the version that corresponds with your version of ArcGIS Pro.
Tip:
After downloading the toolbox, consider moving it to a safe location where it won't be accidently deleted.
- In ArcGIS Pro open an existing project, or create a new one.
The toolbox is installed on a project level so you need to install the tools in each project you want to access them from.
- In the catalog pane, right click on Toolboxes and select Add Toolbox.
- Navigate to the downloaded toolbox and select OK.
The toolbox will be added to your project and available for use.