Volume of features can be measured from any georeferenced raster dataset, mosaic dataset, or image service comprised of an elevation surface such as a digital surface model (DSM), digital terrain model (DTM), or digital elevation model (DEM). Draw a polygon around the feature to calculate and display cut and fill volumes in the map, the Results pane, and the measurement report.
Calculate volume measurements
You can measure the volume of objects in a DSM, DTM, DEM, or other elevation dataset using the Volume tool  in the Mensuration gallery. If you have a choice of elevation surface types for your area of interest, it is recommended that you use a DSM, which best represents the elevation of features above the ground.
Base surface
The volume measurement is calculated from a reference surface determined by the polygon delineating the object you want to measure. The reference surface—called the base surface—can be created using any of the following Base Surface options:
- Constant—A user defined value that defines a flat base surface
- Interpolate—Uses the z-value at each vertex in your sketch to interpolate a base surface for the volume calculation.
- Minimum—Uses the minimum z-value found in the sketch vertices to define a flat base surface at the minimum elevation.
- Maximum—Uses the maximum z-value found in the sketch vertices to define a flat base surface at the maximum elevation
- Mean—Uses the mean z-value from the sketch vertices to define a flat base surface at the mean elevation.

Note:
The raster layer used as a backdrop for digitizing your features of interest can be a multispectral image, thematic, an elevation surface, or another type of supported raster dataset. The only requirement is that features and objects digitized in the layer should be represented in the elevation dataset to obtain accurate volume measurements. This is because the volume measurement is calculated using the elevation surface dataset defined in the Mensuration Options pane.Mensuration results
The results from each of the volume measurements are listed in the Mensuration Results pane and compiled in the measurement report. The following properties are calculated for each volume measurement:
- Total Volume—Calculated as cut + fill, in the units selected, such as cubic meters
- Cut—Cut volume of above base surface features, in the units selected, such as cubic meters
- Fill—Fill volume of below base surface features, in the units selected, such as cubic meters
- Area—2D area of the polygon, in the units selected, such as square meters
- Perimeter—Linear measurement of the polygon, in the units selected, such as meters
- Time of measurement—Time of the volume measurement, defined as month/day/year h:mm:ss AM/PM
Note:
If you make volume measurements in an ortho mapping workspace, the error of the calculation will also be reported. The error is calculated in the following manner:
Cut Volume error = <number of cut cells> * 2.0 * GSD³Fill Volume error = <number of fill cells> * 2.0 * GSD³Total Volume error = Cut error + Fill error
The steps to collect a volume measurement of a feature in an image are as follows:
- In the Catalog pane, add your georeferenced raster dataset, mosaic dataset, or image service.
- Open the Mensuration Options pane from the Mensuration group on the Imagery tab.
- Expand Units to display the table listing the measurement tools. Under Unit for the Volume tool, click the drop-down arrow to display and select the volume unit of measure.
- Specify the Elevation surface dataset file to be used to calculate the volume measurement.
- Expand Volume to display the Base Surface options. Click the drop-down arrow to display and specify a method for determining the base surface reference.
- Click OK to accept the parameters and close the Mensuration Options pane.
- In the Contents pane, activate the layer you want to use as a backdrop for digitizing features.
- On the Imagery tab, click the drop-down arrow in the Mensuration gallery and select the Volume tool
 .
.The digitizing cursor will be active when placed in the map.
- Digitize a polygon around the feature of interest by clicking vertices and double-clicking to close the polygon.
This polygon is used to define the base surface and the object for volumetric measurement.

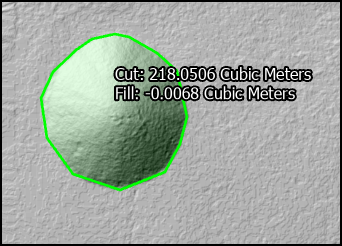
The cut and fill volume measurements of an object digitized on a hillshaded elevation surface layer are shown. If you use an elevation surface dataset as the backdrop for digitizing objects for volumetric measurement, it is recommended that you render it as a hillshade layer. This will help you distinguish your features of interest in more detail for better digitizing.
- Click the Generate Report button
 in the Mensuration Results pane to save the volume measurements of objects to a .txt file.
If you make volume measurements in an ortho mapping workspace, the error of the calculation will also be reported. The error is calculated in the following manner:
Cut Volume error = <number of cut cells> * 2.0 * GSD³Fill Volume error = <number of fill cells> * 2.0 * GSD³Total Volume error = Cut error + Fill error