Mit der Business Analyst-Lizenz verfügbar.
Demographic map services power Color Coded Maps functionality in the Business Analyst web app and in Business Analyst Desktop. Deploying them to your portal is an essential step in the data installation process that should be performed after you install Business Analyst Data.
Prerequisites
- ArcGIS Portal, with ArcGIS Server federated into it and set as Hosting server. It is not required that this is the same instance as used for Business Analyst Server. Depending on your configuration and load, you might decide to use a dedicated server for Demographic Map Services.
- It is recommended that you use Portal Administrator account to perform the deployment. You can also use any Publisher account, but in this case you will have to make sure that this account is a member in Esri Demographic Layers group.
- Substantial free disk space in your arcgisserver directory, e.g. C:\arcgisserver. Deployed Demographic Map Services require about 110 Gb of space on this drive.
Enough RAM on the Server machine. With all services started, you will need about 16 Gb RAM minimally to run ArcGIS Server.
During this process you will need to deploy 8 Server Definition (SD) files to Server, spin up 8 ArcGIS Server based Feature Services based on those SDs, share them with Portal, and share them to the Esri Demographic Layers group in Portal.
Deployment Instructions
Make sure you have access to Business Analyst 2020 US Data Install. To achieve optimal performance, it is recommended that you copy this install to a local hard drive on the machine running Server.
- Start the <Server Data Install Path>\ ServiceDefinitions\publish.py Python script.
- Follow the on-screen instructions. You will be asked to provide the following information:
- Portal User Name (it is recommendation that you use Portal Admin. You can also use any Publisher who is a portal member.
- Portal User Password
- Portal URL (e.g. https://webadaptor.domain.com/arcgis)
- Server URL (e.g. https://webadaptor.domain.com/server)
- Folder with SD Files (e.g. F:\ESRI_BA_Server_2020_US_Data\ServiceDefinitions)
Hinweis:
The publishing process might take up to several hours to complete. At the beginning of the process the following checks are performed:
- Free space in Server’s Upload directory
- Correctness of URLs
- Necessary permissions on the user account
During actual publishing the script iterates over the Service definition files. For each SD file, it uses an Upload Service Definition Geoprocessing tool to publish the file to Server and performs Portal API calls to ensure that the services are accessible to the Server and are discoverable by the Business Analyst web app and by Business Analyst Desktop.
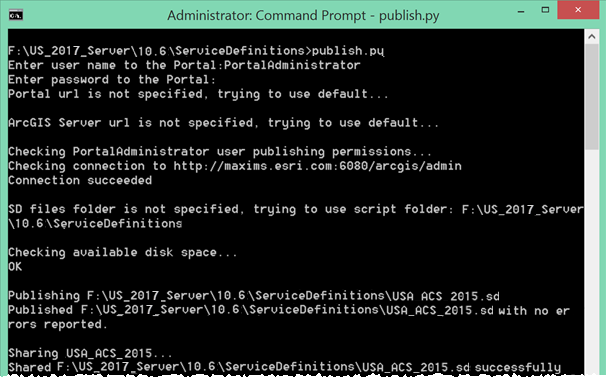
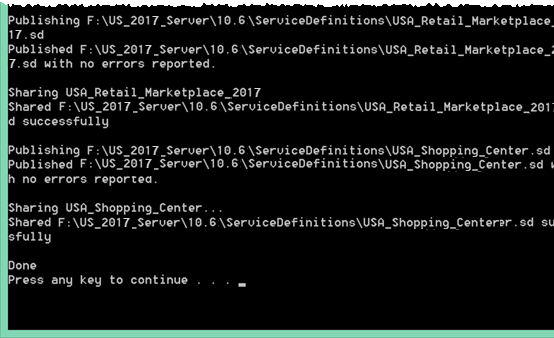
- Verify the results by checking the execution log. There should be no errors. Below is an example log (in two parts):


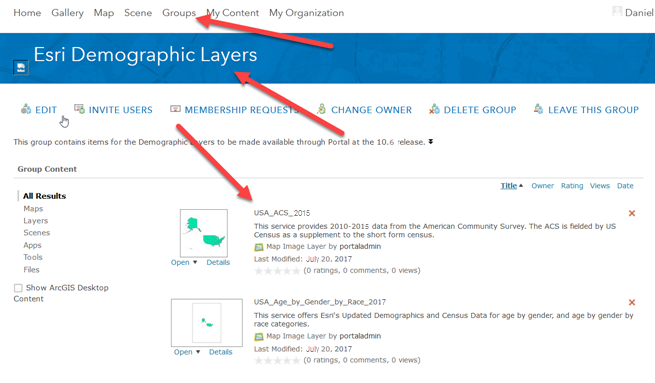
- Verify the results by checking the services in the Esri Demographic Services group. It should look like the following:

The following map services are expected to be there:
- USA_ACS_2015
- USA_Age_by_Gender_by_Race_2020
- USA_Consumer_Expenditures_2020
- USA_Demographics_and_Boundaries_2020
- USA_MPI_1_2020
- USA_MPI_2_2020
- USA_Retail_Marketplace_2020
- USA_Shopping_Center
Once you verify that the feature services are successfully published, you can proceed with the next steps in the installation process.
Silent Installation
Rather than selecting the parameters interactively, you can enter them in the command line.
The parameters available using the command line are:
| Parameter | Usage |
|---|---|
-u | Portal for ArcGIS Administrator User. |
-p | Portal for ArcGIS Administrator Password. |
-s | URL for ArcGIS Server: https://hostname.domain.com/serverwebadaptor |
-t | URL for Portal for ArcGIS: https://hostname.domain.com/portalwebadaptor |
-f | Path to folder with Service Definition files to be published. Default = /ServiceDefinitions |
--force | If specified, this parameter will delete existing services and update them with new services. This will not delete services that are not going to be deployed at the time this script is run. |
-k | If specified, this parameter will enable the publish.py script to ignore SSL certificate warnings. |
Additional notes when using Integrated Windows Authentication
When using Integrated Windows Authentication (IWA) there are additional permissions to navigate when deploying the Demographic Map Services for use with the Business Analyst Web App. To help with navigating these permissions, you will need to install the Kerberos protocol.
To install Kerberos and run the publish.py script while IWA is being used you will perform the following steps:
- Open a command line and navigate to C:\Python27\ArcGISx6410.6\Scripts
- Run the following command:
pip install requests_kerberos - In the command prompt, navigate to the ServiceDefinitions folder where the Business Analyst Server Data install is stored.
- Run the following command:
publish.py -u PortalAdministrator -p <PortalAdminPassword> -s https://webadaptor.esri.com/serverwebadaptor -t https://webadaptor.esri.com/portalwebadaptor -f <FolderWithSDFiles> -a IWA