Webhooks are a widely supported method used to allow multiple applications to interact with each other, using HTTP POST requests to pass callbacks between them. For more information, see Wikipedia's page on webhooks. Common uses for webhooks include sending notifications by email or SMS, posting messages to social media, automatically writing records to a spreadsheet, and updating enterprise databases.
In ArcGIS Survey123, webhooks can be set up and activated when a survey response is submitted. For example, after a successful submission of information to the feature layer, the webhook can be called and trigger another action, such as sending a notification email, appending the survey content to a spreadsheet, and sending an alert.
Your workplace may have its own webhook provider, but a variety of third-party workflow services are available, such as Microsoft Power Automate, Make (formerly Integromat), Zapier, and tray.io. All of these can be used to incorporate Survey123 as a trigger for an automated process. In particular, Microsoft Power Automate and Make each have a built-in Survey123 connector, allowing you to integrate Survey123 into your webhook workflow with minimum difficulty, and without the need to configure the webhook in the Survey123 website or to input a payload URL.
Caution:
When you create or modify a webhook for a survey, the survey must be updated in the Survey123 field app for the changes to take effect.
There are numerous ways you can use Survey123 as a trigger in your workflows. The following three sections demonstrate how to set up a webhook to send a notification email when a response has been sent that contains a question answered with a certain value.
At the end of this topic, all properties that are available in the webhook event payload are listed for reference.
Set up a webhook in Make
Make (formerly Integromat) is an online automation platform. Sign up for a free account to get started. Make has templates to use as a starting point for including attachments in your email notifications, adding records to spreadsheets, and creating calendar items.
- Go to https://www.make.com/ and sign in.
- On the Scenarios page, click the Create a new scenario button.
- Click the module icon in the middle of the screen. Search for Survey123 and select it.
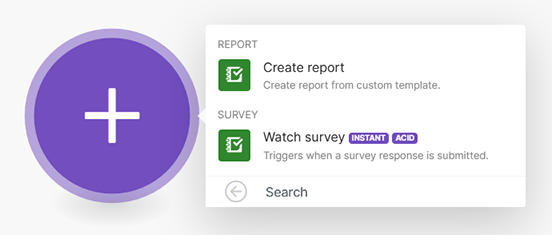
- Choose the Watch survey trigger module.
This module is designed to run the scenario each time a survey response is submitted.
A pop-up appears to help you configure the Watch survey module.
Tip:
The Create report module can be used to generate a report for a survey response.
- Click Add and provide a name for your webhook.
This name should be unique to the survey for which you are configuring the webhook.
- If this is your first time using the Survey123 module in Make, set up a connection to your ArcGIS organization. You only need to do this once, as Make saves your information for future use. Under Connection, click Add and name the connection to ArcGIS.
- To connect to ArcGIS Online, click Save to sign in to your ArcGIS organization.
- To connect to ArcGIS Enterprise, register Make with your portal. For more information, see the Survey123 Tricks of the Trade: Make blog post.
- Choose a survey from your ArcGIS organization to connect to.
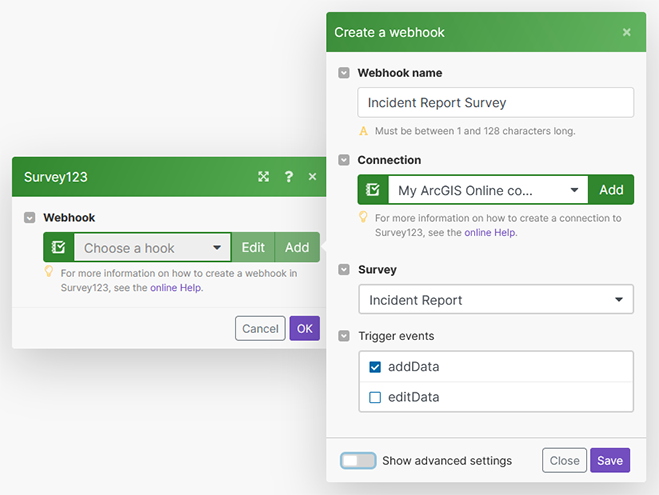
- Consider the options to include in your webhook, and click Save.
Keeping the default value of Yes is recommended for all advanced settings, giving you the most flexibility when customizing your webhook.
- Click OK.
Your webhook is created and the Watch survey module is configured.
- Click the Add another module button on the right side of the Watch survey module to connect another module to it.
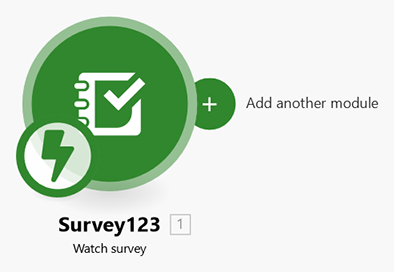
- Search for Email and select the Email module.
- Select the Send an Email action.
- If this is your first time using this module in Make, click Add to set up a connection to your email account. Select a connection type and sign in to your account.
You only need to do this once, as Make saves your connection for future use.
- Add a recipient email address.
This is the email address where the triggered email will be sent.
- Click in the subject text box. Choose fields from your survey to construct your email subject using the module settings panel that appears.
- Click in the content text box. Choose fields from your survey to construct the content for your email using the module setting panel that appears. You can format the content using HTML.
- Click OK.
This scenario needs to send the email when a question has been answered a certain way, so you will provide a filter.
- Click the tools button between the two modules, and select Set up a filter.
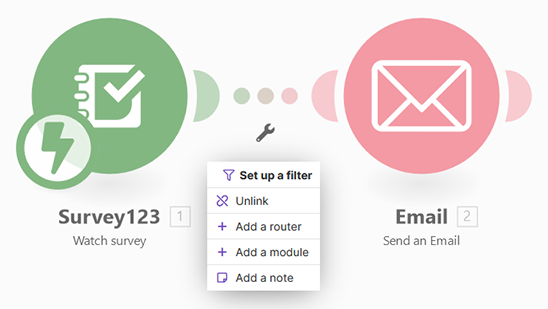
- Click in the Condition text box and choose the field from your survey that you want to use in the filter.
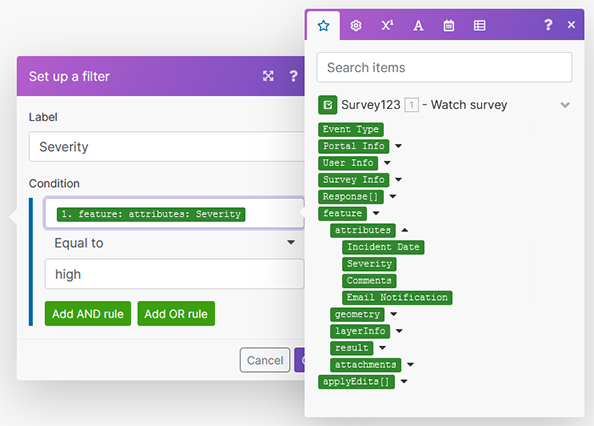
- Choose the operator for the condition. In this case, choose the default, Equal to.
- Enter a value for the condition and click OK.
- Click Save to save your scenario.
Optionally, you can click Run once to test your webhook. After clicking Run once, open Survey123 and submit a survey, ensuring that the survey response satisfies the filter condition. Confirm that the recipient receives the email.
- Use the toggle button at the lower left of the page to activate your scenario. Set the schedule to Immediately to ensure that the scenario runs each time a survey response is submitted.
To learn additional ways to use Survey123 as a trigger in your Make scenarios, see Survey123 integrations.
Set up a webhook in Microsoft Power Automate
Microsoft Power Automate is a webhook service provided in the Microsoft Office 365 platform.
Note:
ArcGIS Online credentials used to create flows in Power Automate will automatically sign out after two weeks. If you cannot browse expected surveys in Power Automate, check that your Survey123 data connection is active. For more information, see The drop-down list does not display surveys Knowledge Base article.
The following steps describe how to set up a flow using the built-in Survey123 connector for surveys published to ArcGIS Online. To use Power Automate with surveys published to ArcGIS Enterprise, you will need to set up a custom connector. For more information, see the How To: Create an ArcGIS Survey123 connector for Microsoft Power Automate for use with ArcGIS Enterprise Knowledge Base article.
- Open Microsoft Power Automate.
- Select Create from the page side menu.
- Select Automated cloud flow from the Start from blank options.
The Build an automated cloud flow dialog box appears.
- Name your flow.
Next, you'll select a trigger.
- Type Survey123 in the search bar. Select When a survey response is submitted.
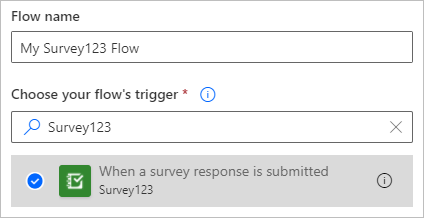
- Click Create.
- If this is your first time using this connector in Microsoft Power Automate, click Sign in to sign in with your ArcGIS organization credentials.
You only need to do this once, as Microsoft Power Automate saves your credentials for future use.
- Select the survey you want to use for your webhook from the drop-down list of surveys.
You have now set up the trigger for your webhook. However, for the webhook to perform actions with this trigger, your process needs more steps.
This flow needs to send an email when a question has been answered a certain way, so you'll provide a condition.
- Click the New step button, and choose Condition at the top of the Actions section.

- Click the leftmost text box to open a dialog box to select a question or property from your survey. Select the survey question you want to use to qualify your survey.
- The middle text box is a drop-down menu where you select the condition on which to trigger. Since you're looking for an exact response, select is equal to.
- In the rightmost text box, type the value for the question for which you want to send a notification.
You want this email sent only if the condition is fulfilled.
- Click Add an action in the If yes box. The If no box remains blank.
Many mail services have connectors that can be used in this flow.
- For this exercise, select Office 365 Outlook - Send an email (V2).
- Sign in to the mail service with your credentials, if your credentials are not already saved.
- Fill in the To, Subject, and Body fields of your email.
The Dynamic content dialog box that appears when you select a text box allows you to insert content from the survey response as necessary.
- When your email is complete, click Save.
Your webhook is complete and is active by default. The webhook will now run every time a survey response is submitted with the given conditions.
Tip:
You can use the Create report action to generate a report for a survey response.
Configure a webhook in the Survey123 website
Complete the following steps to set up a webhook in the Survey123 website:
- On your My Surveys page, select the Settings tab from the menu at the lower right of the survey's panel.
- Select the Webhooks section from the menu on the left.
This page allows you to set and access all webhooks you've set up. If you haven't set up any webhooks in Survey123, the page is empty.
- Click Add webhook.
A new page appears where you can set up how the webhook will interact with your survey.
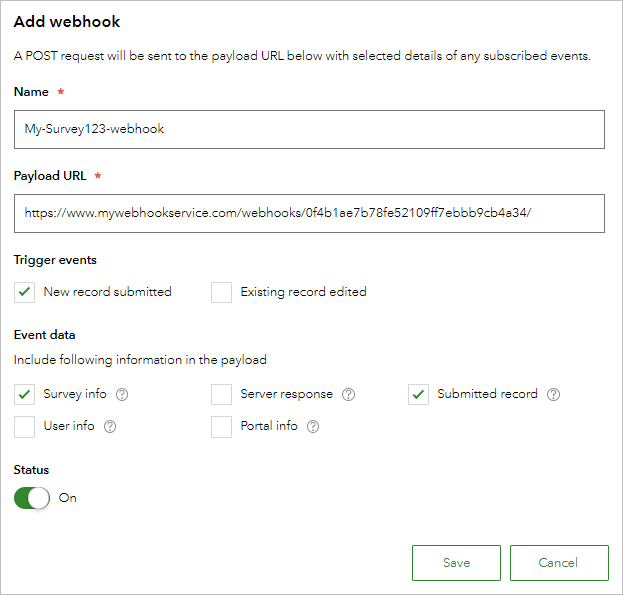
- Provide a name for your webhook, which will be used to identify it in the future.
- The payload URL is where the survey information will be sent. This needs to be provided by an external webhook service.
When you create a webhook using a service such as Microsoft Power Automate or Make, the payload URL is automatically populated on this page. Other services such as Zapier or FME Server provide the payload URL for you to copy to this page. Other apps may require you to create a dedicated service to listen for the webhook.
- The trigger events describe the specific actions that will call the webhook. Select New record submitted.
- Event data allows you to choose the information from your survey that will be included in the payload: Survey info, Server response, Submitted record, User info, and Portal info. Check the Survey info and Submitted record options.
- The Status toggle button determines whether the webhook will be active when saved. Leave it set to On (the default).
- Click Save.
The webhook is ready to use and will run every time a survey response is submitted. Rules set in the webhook provider can ensure that an email is sent only if certain criteria are met.
Event payload properties
A webhook event sends a payload of properties as a JSON object. The contents of the payload will differ based on the survey. The following table lists the common properties contained in the JSON object:
| Property | Description |
|---|---|
| eventType | The type of event. Values can be addData or editData. |
| portalInfo | Information about the ArcGIS organization where the survey is hosted. It contains the following properties:
|
| surveyInfo | Information about the survey that generated the webhook. It contains the following properties:
|
| userInfo | Information about the ArcGIS organizational account for the user who submitted the survey. It contains the following properties:
|
The following properties will vary depending on the survey and event type:
| Property | Description |
|---|---|
| applyEdits | The Apply Edits payload submitted by the survey. If eventType is addData, it will contain adds. If eventType is editData, it will contain updates. When adding a new repeat record, it will also contain adds. |
| response | The response from the applyEdits operation. It includes the global IDs for the features created by the operation and whether the operation was successful. |
| feature | The survey record that was submitted. It contains the following properties:
|