Available with Image Analyst license.
Note:
This tutorial requires ArcGIS Pro 2.3+ and the ArcGIS Image Analyst extension for ArcGIS Pro. If you don't have either ArcGIS Pro 2.3+ or the Image Analyst extension, get a free 21-day trial.
As part of ArcGIS Image Analyst, Full Motion Video lets you view and exploit geospatially enabled video in ArcGIS Pro. Learn more about the FMV video multiplexer geoprocessing tool, or about all the capabilities of FMV.
FMV reads and processes georeferencing information encoded into a video file. Non-FMV-compliant videos may not have the proper information encoded into the video due to the following limitations:
- Metadata may be stored in an external file (rather than embedded in the video)
- Metadata may not include all FMV-required fields
- Metadata may not have FMV-compliant field headings
This tutorial focuses on using the Video Multiplexer geoprocessing tool in ArcGIS Pro to address these issues, creating a single FMV-compliant video file from an archived video stream file and an associated metadata file.
Before you get started, download and unzip sample data to use with the tutorial.
Review a non-FMV-compliant video
Open and explore a non-FMV compliant video in ArcGIS Pro in preparation for using the Video Multiplexer.
- Start ArcGIS Pro. If necessary, sign in with your ArcGIS Online or ArcGIS Enterprise credentials.
If you have a Named User license, you must sign in to use ArcGIS Pro. If you are already signed in, your username will appear in the upper right corner of the ArcGIS Pro window.
If you have a Single Use or Concurrent Use license, you don't need to sign in to use ArcGIS Pro as a desktop-only application. However, you do need to sign in with ArcGIS Online or ArcGIS Enterprise credentials to share content to your portal or to access content from a portal. For example, you need to sign in to open the project package for this tutorial.
- Select Map under the Blank Templates list to create a new project with the Map template. In the Name box, type FMV Player and click OK.
- To check if the ArcGIS Image Analyst extension is available, click the Project tab, then click Licensing. Under Esri Extensions, find Image Analyst and confirm that under Licensed it says Yes. If it says No and you have a Named User license, check with your ArcGIS Online or ArcGIS Enterprise administrator to activate the license. If you have a Single Use license, see how to authorize an extension. Once you're done reviewing licenses, click the arrow in the top left corner to return to the map.
- The project opens with the World Topographic basemap already in the display. From the Map tab, change the basemap to Imagery.
- Click the Insert tab on the ribbon above the map view. Click Add Folder and navigate to the location where you downloaded the tutorial data. Click OK.
- From the Catalog pane,
expand Folders, then expand the folder you just added to see the tutorial data. If you do not see either the Contents or Catalog panes, click the View tab from the ribbon and choose the panes or windows you would like to see in your project.
- Right click on the Raw_Video.mpeg file and select Add to Current Map. The video player will open and dock below your map display.
- Click and drag the video player off the Pro window. It will resize, defaulting to the format size of the video. Select the color Mars Red to identify your video.
- Investigate the video to confirm that it is not FMV-compliant.
- Play the video. On the toolbar at the top of the video player, click Zoom to Video.
Your map will remain unchanged because the video does not contain any georeferencing data.
- While the video is playing, in the Contents pane, right click on the Raw_Video.mpeg file and select Video Metadata.
The Video Metadata pane will open, but will not display any information since the video does not contain any metadata.
- Play the video. On the toolbar at the top of the video player, click Zoom to Video.
- Right-click the video file in the Contents pane and click Remove.
Create an FMV-compliant video
Use the Video Multiplexer tool to generate an FMV-compliant video.
- In a spreadsheet program like Excel, open and examine the Raw_Metadata.csv file. This metadata file contains the 12 essential metadata parameters to create an FMV-compliant video file, but the column names are not FMV-compliant.
If you open the file in Excel, ensure that the first column, TimeStamp, is a 16-digit number, NOT in scientific notation (e.g., 1.4334E+15). If it is in scientific notation, format the entire column to be a Number, with 0 Decimal places.
- Map the custom field heading names in Raw_Metadata.csv to the FMV-compliant field headings.
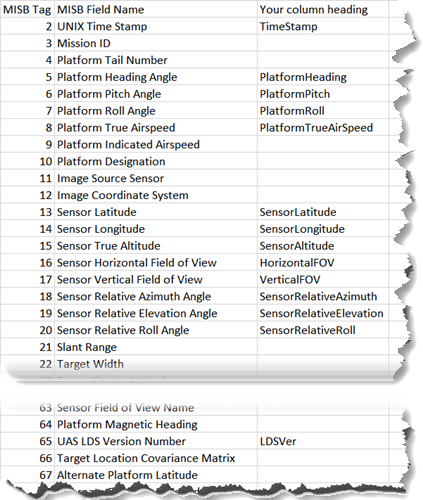
- Open the FMV_Field_Mappings.csv file. In the second column, enter all the column headings from Raw_Metadata.csv next to the corresponding FMV-compliant MISB field name (for example, enter the custom field name "TimeStamp" next to the FMV-compliant field name "UNIX Time Stamp"). Double-check the metatdata file to make sure you've mapped all the column headings.
FMV will use this CSV to find the correct metadata fields without editing the original metadata file.
- Save the file as Custom_FMV_Field_Mappings.csv. It should look like the following table.
- Open the FMV_Field_Mappings.csv file. In the second column, enter all the column headings from Raw_Metadata.csv next to the corresponding FMV-compliant MISB field name (for example, enter the custom field name "TimeStamp" next to the FMV-compliant field name "UNIX Time Stamp"). Double-check the metatdata file to make sure you've mapped all the column headings.
- Run the Video Multiplexer geoprocessing tool.
- On the Analysis tab, select Tools and search for Video Multiplexer. Click the tool to open it.
- Complete the Video Multiplexer dialog using the following values:
Parameter Value Input Video File
Raw_Video.mpeg
Metadata File
Raw_Metadata.csv
Output Video File
FMV_Compliant_Video.mpeg
Metadata Mapping File
Custom_FMV_Field_Mappings.csv
Digital Elevation Model
3 Meters
The completed dialog will look like the following screenshot.
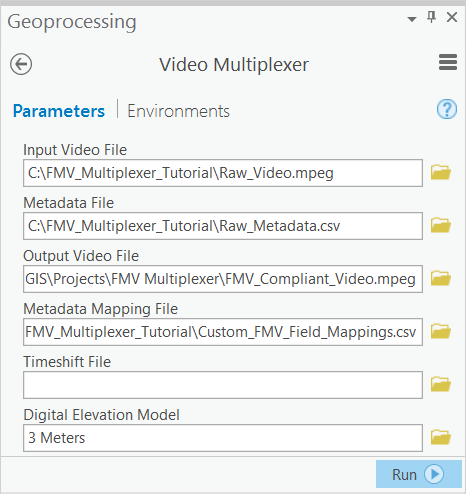
For the most accurate results, you should specify a DEM or elevation service that covers your project area. Since this is flat topography in Florida, we will use a constant elevation of 3 meters. (Be sure to specify the units.)
- Click Run to generate the FMV-compliant video file.
- From the Catalog pane, load the FMV-compliant video file FMV_Compliant_Video.mpeg into the map display—it will be in the ArcGIS Pro project folder. The new video will be docked under the map display.
- Select the tab of video and move it to a suitable location on your display monitor. Select a unique color to identify your video, such as yellow.
- Confirm that the video is now FMV-compliant.
- Play the video. On the toolbar at the top of the video player, click Zoom to Video. Your map view will zoom to the location of the video and display the video footprint on the map as the video plays.
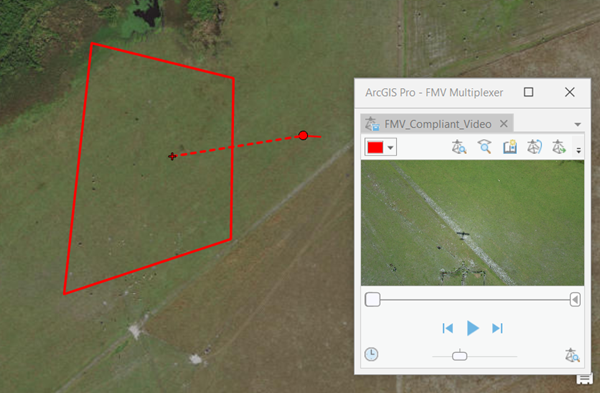
- On the toolbar at the top of the video player, click Follow Video. Your map view will dynamically move and adjust to the location of the video to display the video footprint on the map as the video plays.
- While the video is playing, in the Contents pane, right click on the FMV_Compliant_Video.mpeg file and select Video Metadata.The Video Metadata pane will open and display the metadata in real time as the video plays.
- Play the video. On the toolbar at the top of the video player, click Zoom to Video. Your map view will zoom to the location of the video and display the video footprint on the map as the video plays.
- Stop the video.
Adjust a video for a time shift
Occasionally, the video displayed in the FMV video player does not precisely match the location of the video footprint on the map. This is due to a discrepancy (time shift) between the timestamp and the video frame. You can correct for this time shift by creating a timeshift file and selecting it as a part of the Video Multiplexer options.
In this section, you'll use the FMV_Compliant_Video.mpeg you just created to identify the time shift, then run the Video Multiplexer on the Raw_Video.mpeg again, this time correcting the time shift.
- Review FMV_Compliant_Video.mpeg
to quantify the time shift that needs to be corrected.
- On the Video tab in ArcGIS Pro, change both the Forward and Backward DVR step increments to 1. Now you can step through the video one second at a time.
- Play FMV_Compliant_Video.mpeg from the beginning. Turn on Follow Video in the video player.
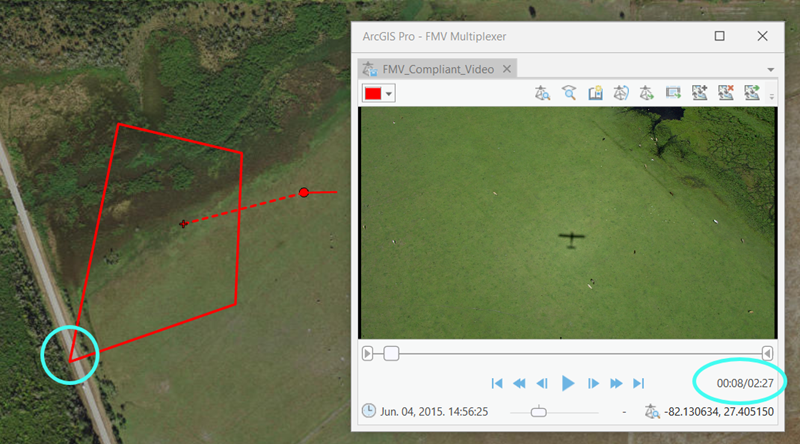
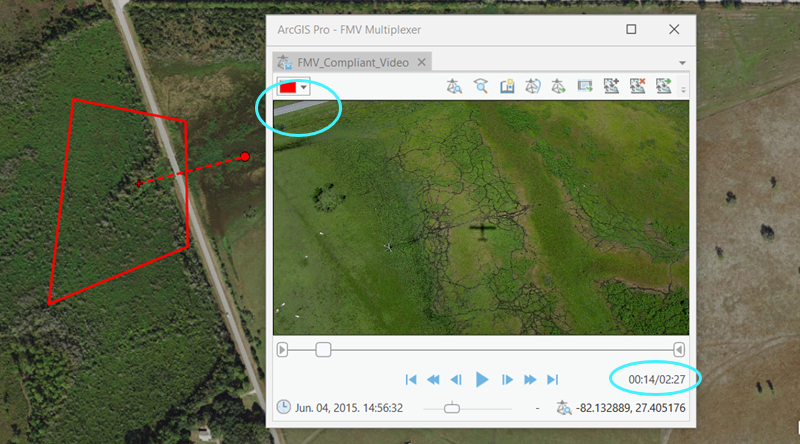
On the map, you will see the footprint cross a road at 8 seconds (see the first screenshot, below). In the video player, you'll see the road appear on screen at 14 seconds (see the second screenshot, below). This suggests that the metadata used to display the footprint is about 6 seconds ahead of the video.
- Pause the video. Use the Step backward and Step forward buttons on the video player, or the slider, to confirm when the road intersects the footprint and the video.
- Create a timeshift file to correct for the difference between the footprint on the map and the video.
- Open the FMV_Multiplexer_TimeShift_Template.csv. Enter the elapsed time into the video in the first column. In this case, we're going to correct the shift for the entire video, so you'll enter 0.00:00:00 to start the correction at the beginning. Enter the time shift you wish to correct in the second column: -6. Delete the second example row. Your file should look like the following screenshot.
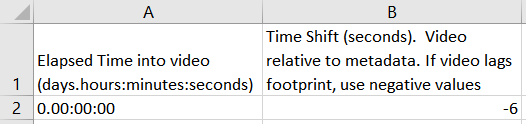
For some videos, you may find that the time shift changes throughout the video, or occurs at a specific point. You can start the shift correction at any point in the video, or include multiple shifts as separate rows if the error changes throughout a video.
- Save the file as FMV_Multiplexer_Custom_Timeshift.csv and close the file.
- Open the FMV_Multiplexer_TimeShift_Template.csv. Enter the elapsed time into the video in the first column. In this case, we're going to correct the shift for the entire video, so you'll enter 0.00:00:00 to start the correction at the beginning. Enter the time shift you wish to correct in the second column: -6. Delete the second example row. Your file should look like the following screenshot.
- Run the Video Multiplexer tool using the Timeshift file.
- On the Analysis tab, select Tools and search for Video Multiplexer. Click the tool to open it.
- Complete the Video Multiplexer dialog the same as before, but include the timeshift file you just created. The values will be as follows.
Parameter Value Input Video File
Raw_Video.mpeg
Metadata File
Raw_Metadata.csv
Output Video File
FMV_Compliant_Video_Timeshift.mpeg
Metadata Mapping File
Custom_FMV_Field_Mappings.csv
Timeshift File
FMV_Multiplexer_Custom_Timeshift.csv
Digital Elevation Model
3 Meters
- Click Run.
- Once the tool is finished, drag FMV_Compliant_Video_Timeshift.mpeg to the Contents pane and play the video to verify that the timeshift has been applied, and that the video and the video footprint now cross the road at the same time.
This tutorial walked you through the basics of working with the Video Multiplexer. See related tutorials below to find out more about what you can do with Full Motion Video in ArcGIS Pro.