If you want to create elevation profiles from the world elevation data, you need to publish the Elevation and ElevationSync geoprocessing services on ArcGIS Server 10.3 or later with an Advanced license. You also must have either an ArcGIS Desktop 10.3 or later Standard or Advanced license. Before publishing the services, you must repair the data paths of the source mosaic datasets to point to the Data Appliance path in your network.
Repair the paths to the image files referenced by the source mosaic datasets
When Data Appliance for ArcGIS is deployed in your network, the paths to the image files are changed, and the source mosaic datasets need to be repaired so that the new paths are used. The mosaic datasets consumed by the elevation geoprocessing services are found in the following file geodatabase:
\\<server-ip>\source_documents\data\WorldElevation\ElevationGP\MD\ElevationGP.gdb
where <server-ip> is the network IP or server name of the data appliance. You need ArcGIS Desktop Standard or Advanced to perform this task.
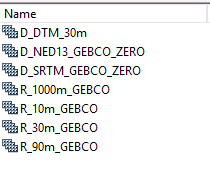
The dataset names that begin with D_ are derived mosaic datasets. The dataset names that begin with R_ are referenced mosaic datasets. Derived mosaic datasets are used to merge multiple source mosaic datasets, primarily to enable different collections of imagery to be accessed via one source. A referenced mosaic dataset is a new mosaic dataset that references an existing mosaic dataset but can redefine some properties and also include additional functions such as Hillshade.
Repair the paths for the derived mosaic datasets
- Open the Catalog window in ArcMap, and browse to the file geodatabase (ElevationGP.gdb) that stores all the mosaic datasets used by the elevation services.
- In the Catalog window, right-click the D_DTM_30m mosaic dataset and click Modify > Repair.
- Click Cancel to cancel the search operation.
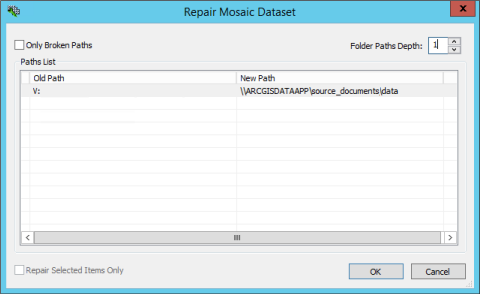
The Repair Mosaic Dataset dialog box appears.
- Change the Folder Paths Depth setting to 1 and press Enter.
- In the Paths List, the Old Path column shows V:,
which is the original path that needs to be repaired. For the New
Path, insert the UNC path for the data appliance in the form of \\<server-ip>\source_documents\data, where <server-ip> is the network IP or server name
of the data appliance. See the following for an example:
- Click OK to apply the changes.
- Repeat steps 1 through 6 for D_NED13_GEBCO_ZERO and D_SRTM_GEBCO_ZERO to repair their paths.
Repair the paths for the referenced mosaic datasets
- Open the Catalog window in ArcMap, and browse to the file geodatabase (ElevationGP.gdb) that stores all the mosaic datasets used by the elevation services.
- In the Catalog window, right-click R_1000m_GEBCO and click Modify > Repair.
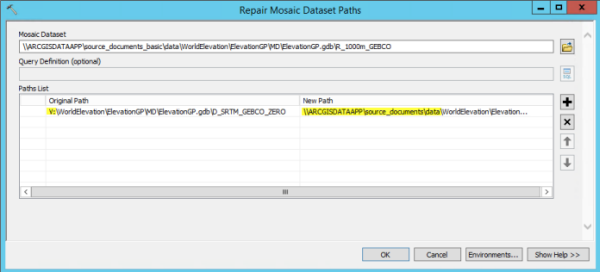
The Repair Mosaic Dataset Paths dialog box appears. In the Paths List, the Original Path column shows V:, which is the original path that needs to be repaired.
- Copy the path from Original Path and paste it to New
Path, and replace the V: drive letter using \\<server-ip>\source_documents\data in New
Path, where <server-ip> is the network IP or server name of the data appliance, for example, \\<server-ip>\source_documents\data\WorldElevation\ElevationGP\MD\ElevationGP.gdb\D_SRTM_GEBCO_ZERO.
Note:
The R_10m_GEBCO dataset references D_NED13_GEBCO_ZERO, the R_30m_GEBCO dataset references D_DTM_30m, and both the R_90m_GEBCO and R_1000m_GEBCO datasets reference D_SRTM_GEBCO_ZERO.
- Click OK to apply the changes.
- Repeat steps 1 through 4 for R_10m_GEBCO, R_30m_GEBCO, and R_90m_GEBCO to repair their paths.
Create the data source map document
- Open ArcMap as a blank document.
- In the Catalog window, browse to \\<server-ip>\source_documents\data\WorldElevation\ElevationGP\Layers, where <server-ip> is the network IP or server name of the data appliance. Drag the following two layers to ArcMap:
- footprints103090_credit.lyr
- footprints103090prf.lyr
Note:
When you perform this step (and the next step), make sure you drag the layers or datasets from a full UNC path, and do not use any mapped network drive. If the map document contains any mapped network drive letter in the data source paths, it may cause problems for the geoprocessing services. The best practice is to disconnect any mapped network drives before you perform these steps and reconnect them after you are done setting up the geoprocessing services.
- Browse to the elevation tools source data file geodatabase: \\<server-ip>\source_documents\data\WorldElevation\ElevationGP\MD\ElevationGP.gdb, where <server-ip> is the network IP or server name of the data appliance. Drag the following referenced mosaic datasets to ArcMap:
- R_1000m_GEBCO
- R_10m_GEBCO
- R_30m_GEBCO
- R_90m_GEBCO
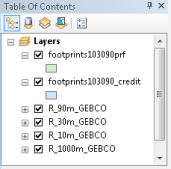
If a Geographic Coordinate System Warning message appears during this process, click the Close button to close the dialog box and ignore the message. After this step, the ArcMap table of contents should look similar to the following:
- Click the ArcMap Save button to save the map document as ElevationGP.mxd to a local folder (for example, in the folder C:\temp), and close ArcMap.
- Open Windows Explorer and copy ElevationGP.mxd from your local machine to the following location: \\<server-ip>\source_documents\data\WorldElevation\ElevationGP\MapDocuments, where <server-ip> is the network IP or server name of the data appliance.
Publish the elevation geoprocessing services
The elevation geoprocessing services are created by publishing their service definition files to ArcGIS Server using ArcGIS Server Manager.
- Open ArcGIS Server Manager and sign in.
- Click Services > Manage Services > Publish Service.
- Browse to source_documents > service_definitions on the Data Appliance data collection, for example, \\ARCGISDATAAPP\source_documents\service_definitions.
The following two service definition files for the elevation geoprocessing services are in this folder:
- Elevation_GP_Sync.sd
- Elevation_GP_Async.sd
Elevation_GP_Sync.sd is for publishing a synchronous elevation geoprocessing service, and Elevation_GP_Async.sd is for publishing an asynchronous elevation geoprocessing service.
- Select the service definition for the synchronous elevation geoprocessing service, Elevation_GP_Sync.sd, and click Open.
- Click Next.
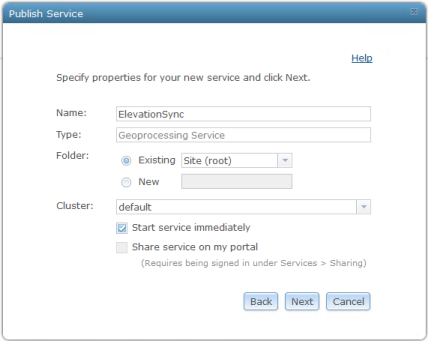
- Accept the default service name in the Publish Service window. Accept the default folder to publish the service to the site root folder.
- Click Next.
- Optionally choose the GIS server cluster that will host the published service definition. To learn more, see About GIS server clusters for Windows.
- Click Publish to publish the service definition as a service.
- Repeat steps 2 through 9 to publish the Elevation_GP_Async.sd file to ArcGIS Server as a geoprocessing service.
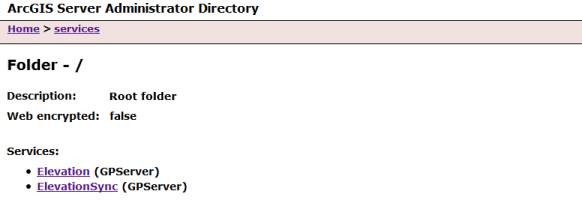
The new Elevation and ElevationSync geoprocessing services appear in the list of available services under the root folder.
Add a mapFile property to the geoprocessing service properties
The new geoprocessing service needs to be associated with a map document that contains all the source data layers to function properly. This is done by adding a mapFile property to its service properties.
- Sign in to the ArcGIS Server Administrator Directory using the URL http://<server name>:6080/arcgis/admin.

- Click services to view the available services under the root folder.
- Click the ElevationSync geoprocessing services that you published to this folder.
This takes you to the service properties page.
- Scroll down to the bottom of the page and click Edit.
- On the Edit GPServer page, scroll down and locate the properties section.
- Append a comma (,) after the maximumRecords line in the properties section, and press Enter to begin a new line.
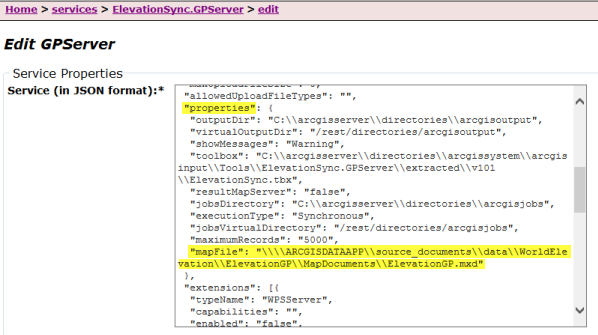
- Add a mapFile property to the new line. The mapFile property points to the data source map document (ElevationGP.mxd) that you created earlier, which is available in the following data appliance folder: \\<server-ip>\source_documents\data\WorldElevation\ElevationGP\MapDocuments\ElevationGP.mxd, where <server-ip> is the network IP or server name of the data appliance.
The following is an example of the text to insert:
"mapFile": "\\\\ARCGISDATAAPP\\source_documents\\data\\WorldElevation\\ElevationGP\\MapDocuments\\ElevationGP.mxd"
Notice that two backslashes are used to separate folders from subfolders.
- Click Save Edits to save and restart the geoprocessing service.
- Repeat steps 3 through 8 for the Elevation asynchronous geoprocessing service to set up the mapFile property.