Note:
A new Collector app is available. For help with the new app, see Inspect.
Part of collecting data includes updating where information has changed or incorrect information was added. You can update features using Collector, and your updates are immediately saved to the server and visible to others. Your update can include modifying the feature's attributes and location, as well as adding and deleting photos.
Open the map
In Collector, browse to and open the Damage Assessment Survey map that you made, or that is available in trial mode. If using the map you made, sign in to the app, open that map, and continue to the next section. If you want to use the map available in trial mode, follow these steps:
- Install Collector for ArcGIS from the App Store if you don't yet have it on your phone.
- Start the app.
- On the initial screen, select Try it.
Note:
If you already installed and logged in to the app, you can access the trial functionality by signing out. On the Map Gallery, select Action
 and select Sign out.
The trial user's content is loaded in the app, and you're taken to the list of All Maps. This is similar to the experience of logging in as the trial user, as it is a real account with real maps, groups, and content. However, the trial experience menu has no My Maps option.
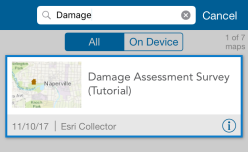
- On the All Maps page, search for Damage to find the Damage Assessment Survey map.

Note:
You may have a different thumbnail for the map; that's okay—it matches the thumbnail used on ArcGIS Online.
- Select the Damage Assessment Survey map's thumbnail to open it.
The map opens with the Damage Assessment Survey map. The extent shown reflects your current location if you enabled location services (otherwise, you see the extent at which the map was saved).
If location services is enabled, My Location shows a filled circle
 , indicating your location is displaying on the screen and that as you move, the map pans to remain centered on your location.
Select a feature and begin editing
Before updating the feature, locate it on the map and begin editing it.
- Choose a damage assessment on the map to update. For purposes of this exercise, it can be any of the damage assessments you see.
- Select the damage assessment.
Selected assessments show in a results list at the bottom of the map. The first in the results list is highlighted on the map. If your selection was in an area with multiple features, you have multiple features in your results list. Otherwise, you will have a single damage assessment and a result showing the address of your selection.

- In the results list, find the damage assessment you want to update. When it is the selected result, it is highlighted on the map.
Tip:
Flip through the results list by swiping the currently displayed result. To view all of the results as a list, drag the results tab up on the screen .
- Select the arrow to the right of the damage assessment
 .
.A menu appears displaying the actions you can take with that feature.
- Select Edit.
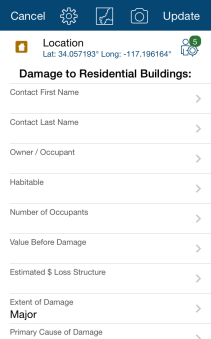
The feature's attributes display, and you are ready to make edits.

Update attributes
The Attributes tab shows an intelligent data entry form specific to your data. In this exercise, the screen captures showed a damage assessment of major damage. However, that building has now collapsed from the damage. In this section, you'll update the extent of the damage to destroyed.
Note:
If the damage assessment you are working with has a different extent of damage, that's okay. For this section, choose a different extent of damage than it had.
- Scroll to the bottom of the attributes and find the Extent of Damage field.
- Select the arrow to the right of the Extent of Damage field.
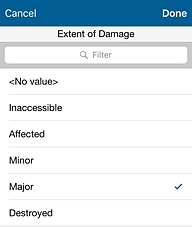
The valid extent of damage choices display.

The choices come from the data, and the data-driven form improves data quality by assisting with information entry, making it impossible to enter an invalid value.
Tip:
Enter text in the filter to limit the choices displayed.
- Select Destroyed. Select Done.
The Attributes tab returns. The feature at the top is now red, reflecting Destroyed as the new extent of damage. The value in the Extent of Damage field is also updated.
Update location
The location of a feature can also be updated. For this exercise, after marking the feature as destroyed in the last section, you notice it should have been placed one building farther west. Take the following steps to update the location of the damage assessment:
Note:
You might be working with a different feature during this exercise, which is okay. If so, use a new nearby location on your map instead of the location discussed in the steps.
- Select Map
 to view the location of the damage assessment on the map.
 - Pan the map so that you can see the correct location for the damage assessment.
- Use the map to move the damage assessment to a new location.
- Select Collect Attributes
 to return to the Attributes list.
Add a photo
Attach a photo of the damage to show how it looks.
- Select Attachments
 .
.
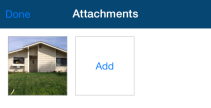
The Attachments page opens.
- Select Add.
The choices for getting your attachment display.

- Select Take Photo or Video .
The camera opens on your phone.
- Take a photo of the damage.
- If you're happy with the photo, select Use Photo; otherwise, select Retake to take a new photo.
Once you accept a photo, you're returned to the Attachments page, which now shows your damage photo.

- Select Done to finish adding attachments.
You're returned to the Attributes list, and your photo is ready to be added to the damage assessment.
Delete a photo
You might have noticed the photo added in the previous section didn't look like a destroyed building. The photo was taken facing the wrong way! Take the following steps to delete the attachment.
- Select Attachments
 on the toolbar.
The Attachments page opens.
- Select the attachment you want to remove.
The actions that can be taken on the photo display.
- Select Delete.
- Optionally, redo the steps for Add a photo and add a photo that shows the damage.
Save your edits
Save your edits to commit them to the server, making your changes visible to everyone using the map.
- Save your assessment by selecting Update.
Messages appear to indicate changes are being submitted and applied successfully.
The map returns, and you can view the created report. If you're working online, others immediately see your edits. If you're working offline, your edits are available to others once you sync them.
You should now be familiar with how to update the attributes and location of a feature, add and delete photos, and share your edits with your team.